

The Quilt Guild of Greater Houston’s Member Challenge as part of the show May 5th and 6th was to follow the theme “Joyous Flora” in a 24″x 24″ presentation piece. This is my entry:

***Update 08/03/17: This piece was accepted into the Embellished juried competition at the IQF in Houston this Fall!*** 🙂
Three area Quilt Guild representatives served as our judges for this member challenge, each awarding a Judge’s Choice ribbon to their favorite entry. I was fortunate enough to received such a ribbon!
But where did this project start? For years I’ve been collecting vintage damaged crocheted doilies that incorporate flowers and leaves into their design. After soaking to remove stains, etc. I carefully took apart the damaged crochet and saved the valuable parts. About 80% of the pieces are vintage, I crocheted the rest, filling in needed flowers and leaves. 5/16/17 Update: people have asked about the saved crochet pieces unraveling. In general the flowers and leaves are “self contained” little pieces. The original creator would knot the end of her crochet thread as she finished each piece.
I’ve had in my mind for about 3 years what I thought I might create with these saved bits and pieces, so when the Guild Member Challenge came along, I knew just what I wanted to make.
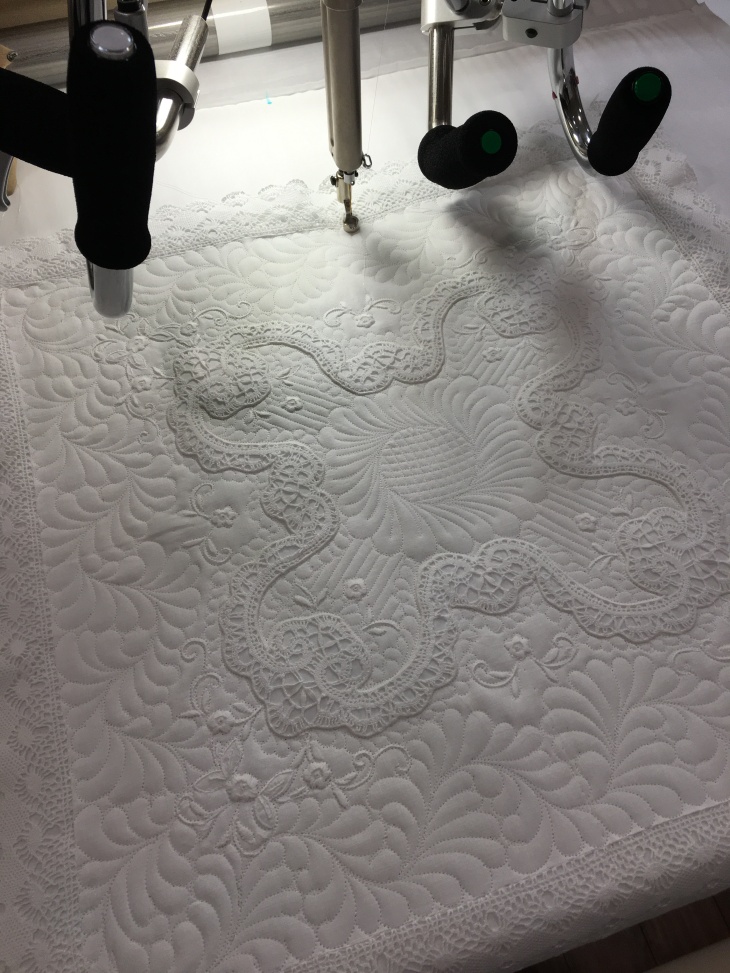
The backdrop for the piece is a vintage white table topper measuring approximately 23″x 23″. The edge has a lovely manufactured white trim, the interior has both cut work as well as embroidery.

Here are the particulars: the batting is Hobbs Poly Down white, single layer (if I did this again I would have double batted with a white 80/20 below the Poly Down) white (bleached) muslin directly below the table topper and again, white bleached muslin as backing.

Thread: Wonderfil Deco Bob 80wt., color 104 in the needle, the bobbin thread is a white 70wt. poly.
Marking pen for this project: a black Frixion pen by Pilot. Yes, I know all the warnings etc, regarding these pens but I still choose to use them in certain circumstances.

I don’t often stitch the spine of my feathers, but did for this project.

I’ve also been collecting vintage crochet baskets for a few years. I felt confident I’d be using the green basket below.

I did a trial layout and saw that the green basket distracted from the flowers.


On to Plan B: the ivory basket:

A few months ago I spent an afternoon dying several pieces of vintage trims. I knew I would need flower stems for this project, I knew I could crochet them but in the end it seemed simpler to use the Rit Dye.


So, you know Elmer’s School Glue is your “quilting friend” right? If you purchase the white School Glue, it washes out. Yes, there are other “quilting glues” on the market but how can you beat .97 cents for this plastic bottle? I used tiny dabs of the glue to hold the flowers, leaves and stems in place until I could hand tack them permanently into place.

Where did I do all this work? Why at my longarm of course! It is height adjustable and made the perfect work table for this project!


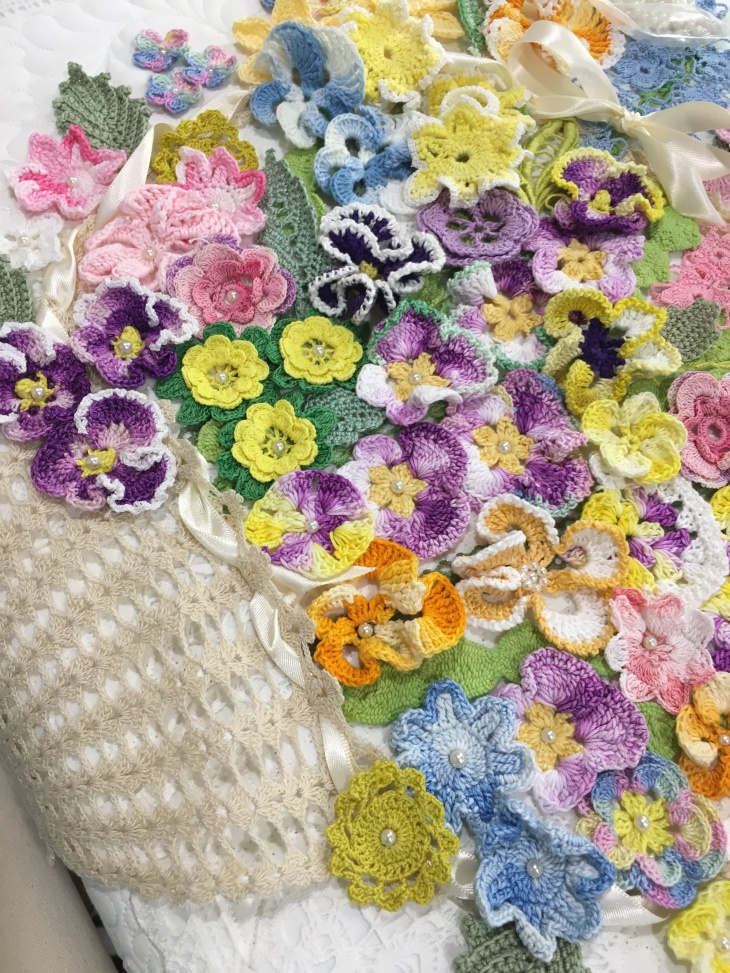
After all the motifs were permanently hand tacked in place, I hand stitched white pearls into most of the flower centers.


With everything secure except the basket bow streamers, I carefully folded back the white outer trim, pinned it in place and did all the parallel line longarm quilting to finish this part of the project.


I’m now finished with the quilting and the arrangement so I took it off the longarm, trimmed the edges and began to decide how to add a bit of subdle bling to the outside trim.


Again, pearls were hand stitched to the outside white trim. I chose a brighter white pearl than is found in the flower centers. I used a long bead needle and again, the white Wonderfil Deco Bob thread.


Finished! Well, finished with the exception of the binding, the label and the sleeve…


The 2 pictures below show the piece as it was hung on Thursday evening at the quilt show set-up.

I’ve included this picture to give you an idea of the depth of the piece.

And here it is again, project complete, ribbon attached and ready for the show to begin!
Hope you’ve enjoyed this blog post!
Happy Quilting,
Rhonda

Lovely work! From the photos it looks like the table topper had quite a bit of handmade bobbin lace (the edging and the cutwork in the middle) on it. I’m glad you were able to keep the edging, at least, visible. And using the salvaged crochet flowers this way is genius. Thank you for sharing the eye-candy and the inspirational photos.
LikeLiked by 1 person
Thank you for sharing your process on this stunning work of art!
LikeLike
Thank you!
LikeLike
Beautiful! Your explanation was excellent.
LikeLiked by 1 person
Rhonda, this quilt takes my breath away! and that’s just photos, I hope to see it in person some day, maybe Festival? Thank you so much for sharing your process. Does that mean you won’t mind if someone (like me) tries to make something similar? I have already been looking for crocheted doilies with flowers on it. I HAVE to make this!
LikeLiked by 1 person
Thank you so much for your kind words! This project was such a joy to work on. Yes of course! Make your own! Believe it or not it was a simple/straightforward project that turned out so much better than I could have even hoped for! As you progress through your own project, please know I am always available to help you in anyway I can!!
LikeLike
Yay! If you’re planning to attend festival this fall in Houston, it will be there! It was accepted into the Embrllished category of the juried competition, 🙂
LikeLike
Amazing! Congratulations on the ribbon but – mostly – on a beautiful piece of art.
LikeLiked by 1 person
Rhonda, your work is so beautiful and inspiring! Thank you for sharing the process, amazing to see how it all come together.
LikeLiked by 1 person
Rhonda,
It is so beautiful. I collect vintages linens and doilies too. Mix am curious to know if you just cut the crocheted pieces. If so, did you put something on them to keep them from coming undue Emphasis?
Paula
Sent from my iPad
>
LikeLiked by 1 person
Most often the crochet pieces that I salvage are stand alone units such as the flowers and/or leaves so there is no cutting involved and no unraveling to be concerned with.
LikeLike
Totally gorgeous! Saving all those sweet little doodads was just what was needed for this one!!!! So much fun when an idea/vision comes to life perfectly……and with such a great ribbon “decoration”!!! LOL!
LikeLiked by 2 people