


So you want to make a handkerchief quilt? There are so many different ways to use all those beautiful vintage hankies you’ve been collecting. I’m in the process of finishing my quilt top and want to share my progress. I’ve included a brief picture filled tutorial of sorts near the end of this blog if you’re wondering how to create a custom swag for your borders.
To start you need to decide how many blocks you’re wanting. I began with the idea of a 3 block by 4 block quilt top but quickly revised my plans to a 4 x 5. At this point I also decided I wanted a 6″ finished border on all sides.
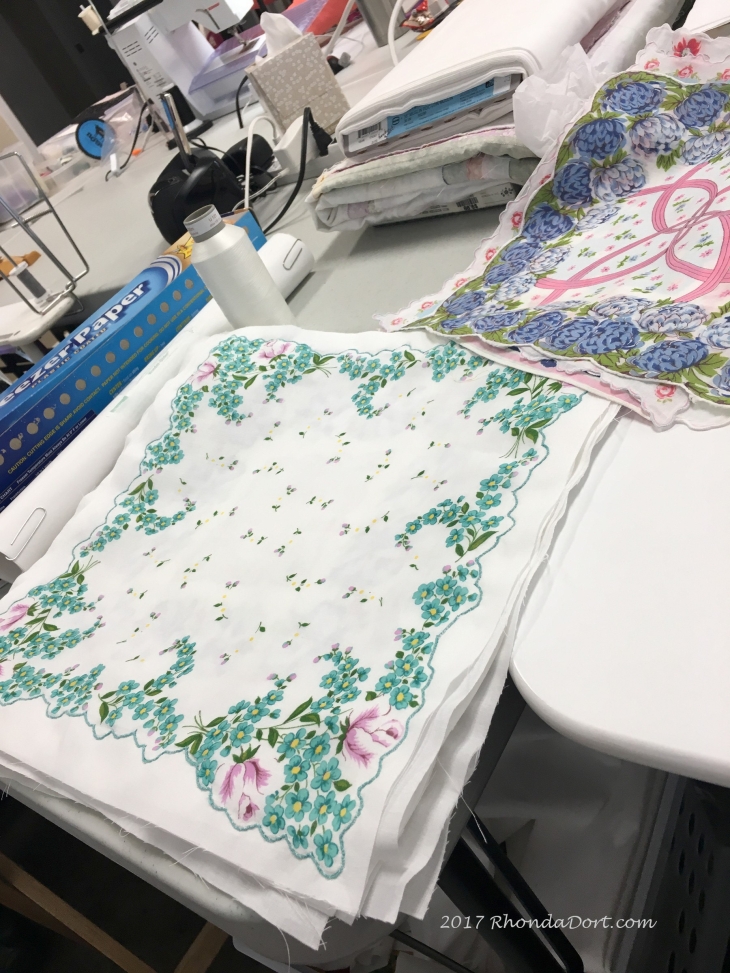
Not all vintage handkerchiefs are the same size and not all are square. Once you’ve decided on the number of blocks, sort through your hankies and determine the size of the LARGEST handkerchief.
Do not determine your largest hankie until you have laundered, starched and pressed each one!!!
My largest hankie is 13 1/2″ and is pretty much square. This largest piece determines the bleached muslin block size for EVERY BLOCK going forward. Before you do any cutting of your bleached muslin or solid white fabric you also need to think about how much of the white fabric you want to show around the sides of the handkerchief. I decided that I wanted 1/4″ to show around my largest hankie to I cut my muslin into 14 1/2″ squares.
Here’s the math: the hankie measures 13 1/2″. Add 1/4″ to show around hankie makes 14″ and seam allowances of 1/4″ each makes a 14 1/2″ unfinished block. With me so far?

The smaller the hankie the more your white fabric will show.
So it’s time to attach your hankies to your solid white background fabric. Note that I said “solid white” fabric. Hankies are thin and if you were to choose a print of some sort or even a white tone-on-tone fabric you will get unwanted shadowing and you will be sad. I experimented with using both a straight stitch and a teeny tiny zig-zag stitch to attach the hankies. The zig-zag stitch looks nice but takes FOREVER!!!! Just warning you: you’ll be crazy sick of zigzagging around all those lovely tiny handkerchief scallops. Just do a medium length stitch super close to the hem of the hankie.
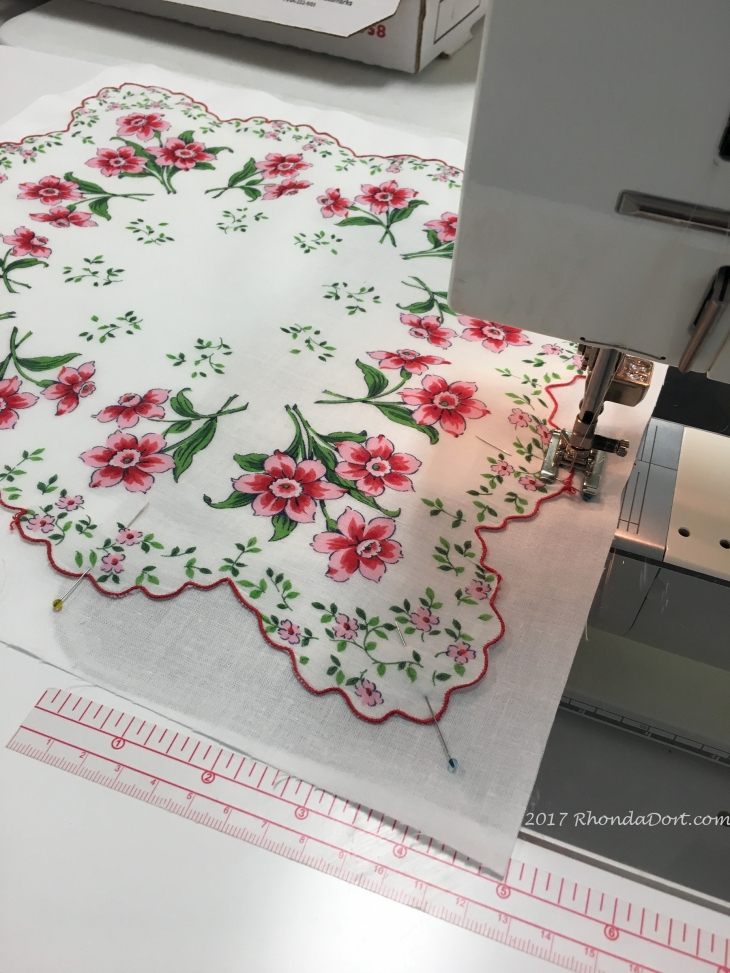
Thread! You’ll probably know by now I’m a HUGE fan of Wonderfil Deco Bob and Invisafil. The Deco Bob is 80 weight, the other is 100. For this project I used the 100 weight Invisafil. It is wonderful as it crosses over different colors as it takes on the color beneath it. You couldn’t ask for a better thread!
So, the picture below shows all the handkerchiefs lined up like little soldiers. They’ve each been stitched into the 14 1/2″ white bleached muslin squares and with the help of my sweet friends at retreat, they are in the order for stitching. How did I decide on the order? I wanted the “visually heavier” handkerchiefs to hold the 4 corners. After that it was left up to how well they “played” with each other.

About sashings: I knew I wanted soft pink sashings with the bleached muslin cornerstones. I chose a solid soft pink for the strips. Each sashing strip is cut 1 1/2″ by 14 1/2″. Each cornerstone is cut 1 1/2″ square. After seam allowances I will have a 1″x14″ pink sashing strip around each block and a 1″ finished white cornerstone.

Sew your rows together first with a sashing strip both at the beginning and the end of each row of 4 hankies.
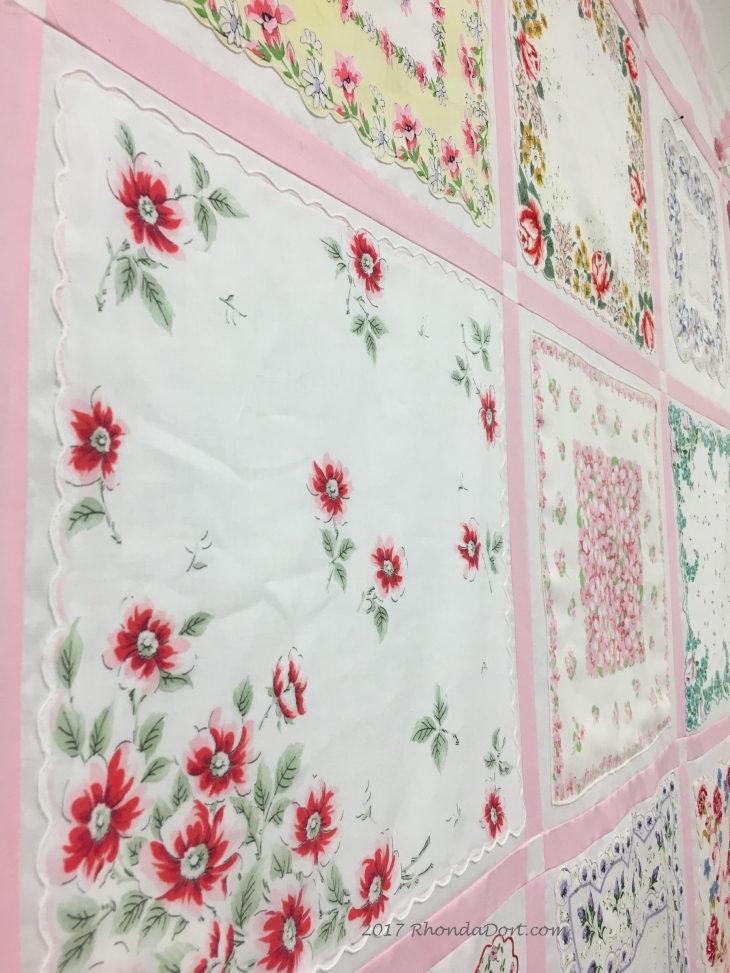
After your rows are completed make a long sashing strip beginning with a white 1 1/2″ square followed by a pink strip, etc. etc.. Sew this long strip to the top of each of your rows of hankies. Remember, you’ll need to also sew one of these long strips to the bottom edge of your last hankie row.
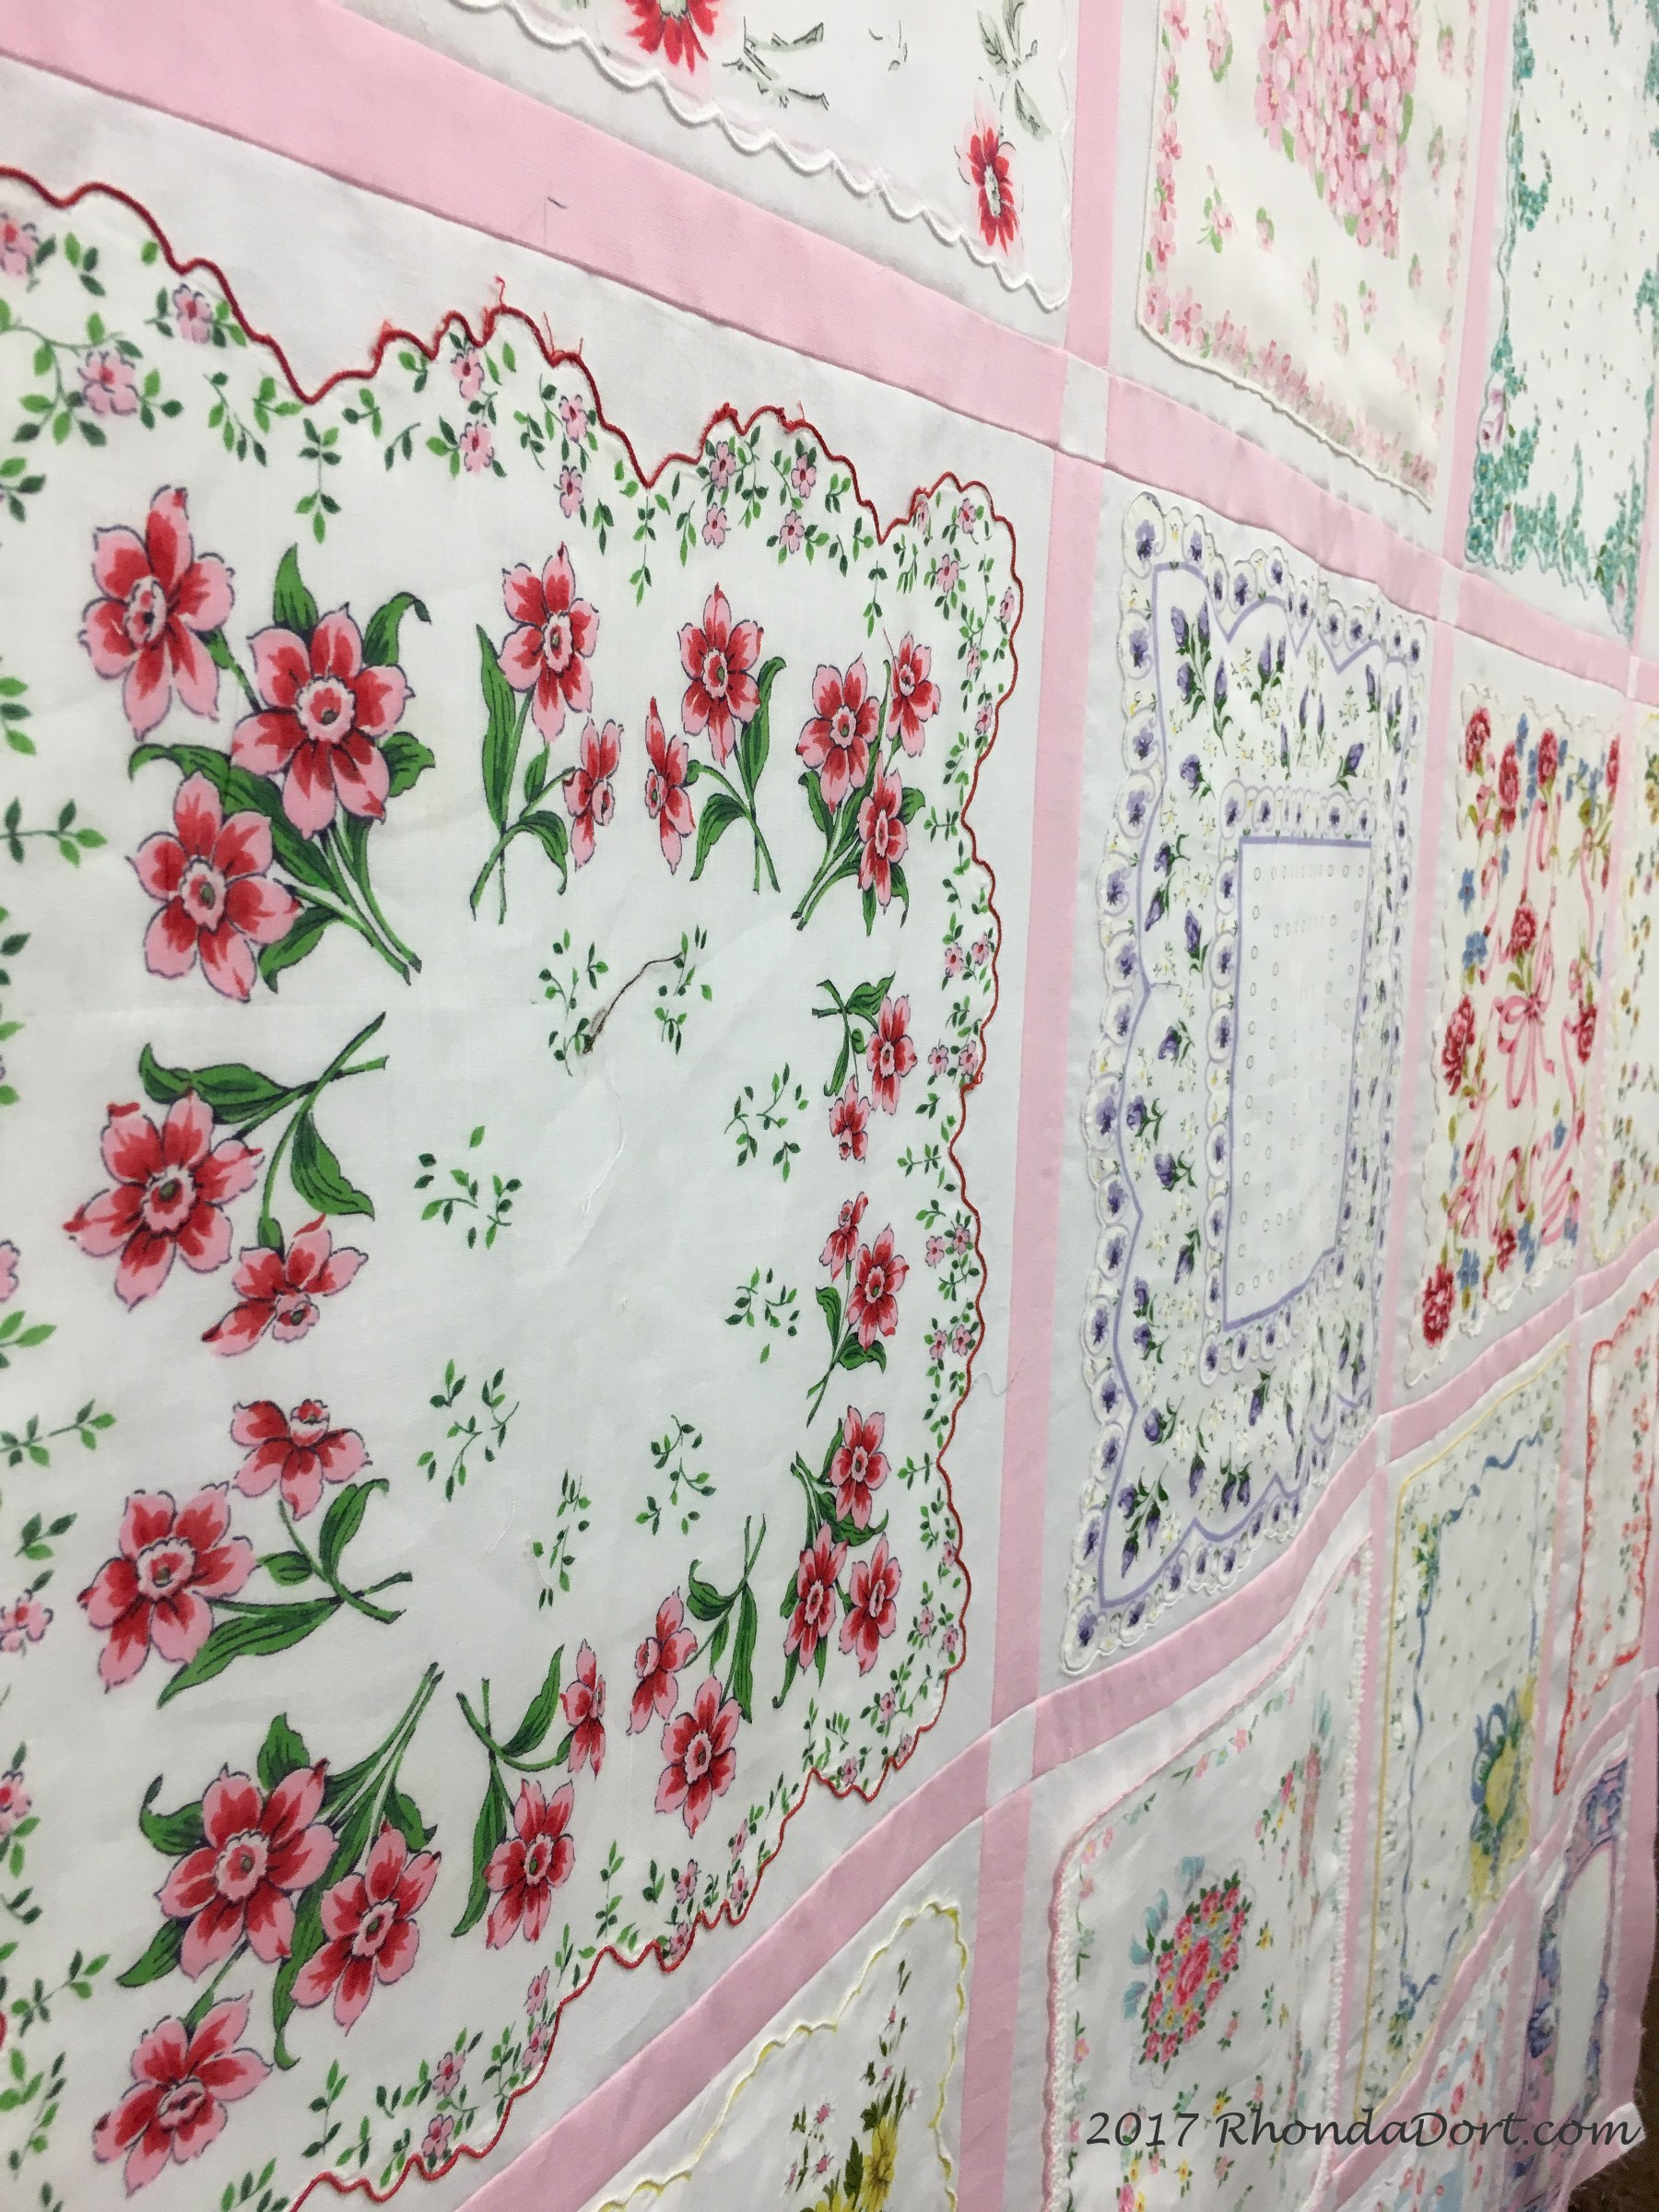
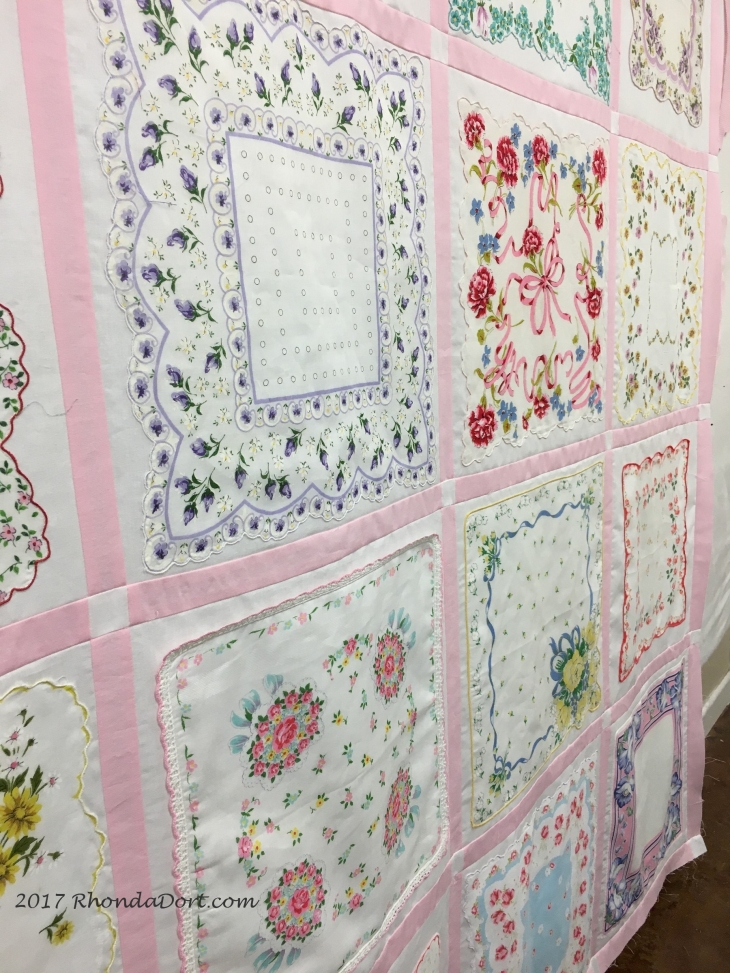
Here’s a picture of the hankie rows sewn together and custom sized swags machine appliqued to the top border. My design wall placement didn’t allow me to get a picture of the entire quilt top.

So…how do you draft a custom swag for your quilt top borders? I’m giving you lots of pictures below in what I hope will be a good enough explanation for you to charge ahead!
You’re going to need a few tools:
- graph paper helps but is not mandatory
- pencil
- some sort of large curve tool and
- some sort of circle(s) tool. I have some longarm clear acrylic templates I’ve used to help me with the large curves and a RAPIDESIGN® R-440 Template for my circles.
- a teflon pressing sheet
- freezer paper
- spray starch
- iron
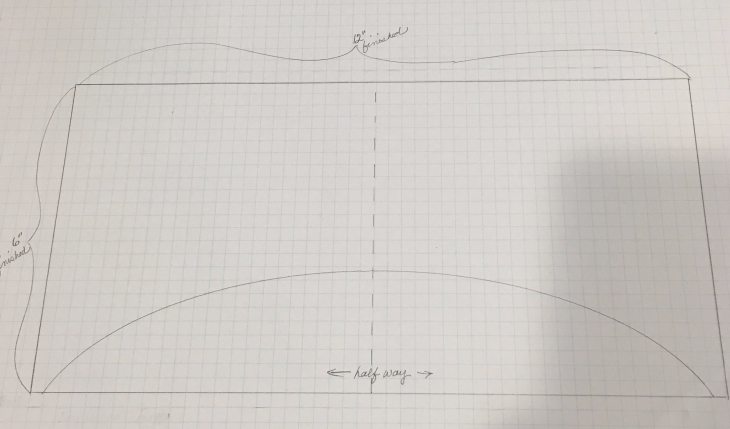
The picture below shows a custom swag that will measure 12″ x approx. 5 1/2″ when finished. You’ll see I’ve drawn my first arc for my swag.
I’ve shifted my set of oval templates up and will draw my second arc. Why do I have blue painters tape on my oval acrylic templates? First so I can keep them all held together and second so I can find them when they’re laying on fabric.

- RhondaDort.com 2017
Ok, so now we’ve drawn both the top and the bottom arc.

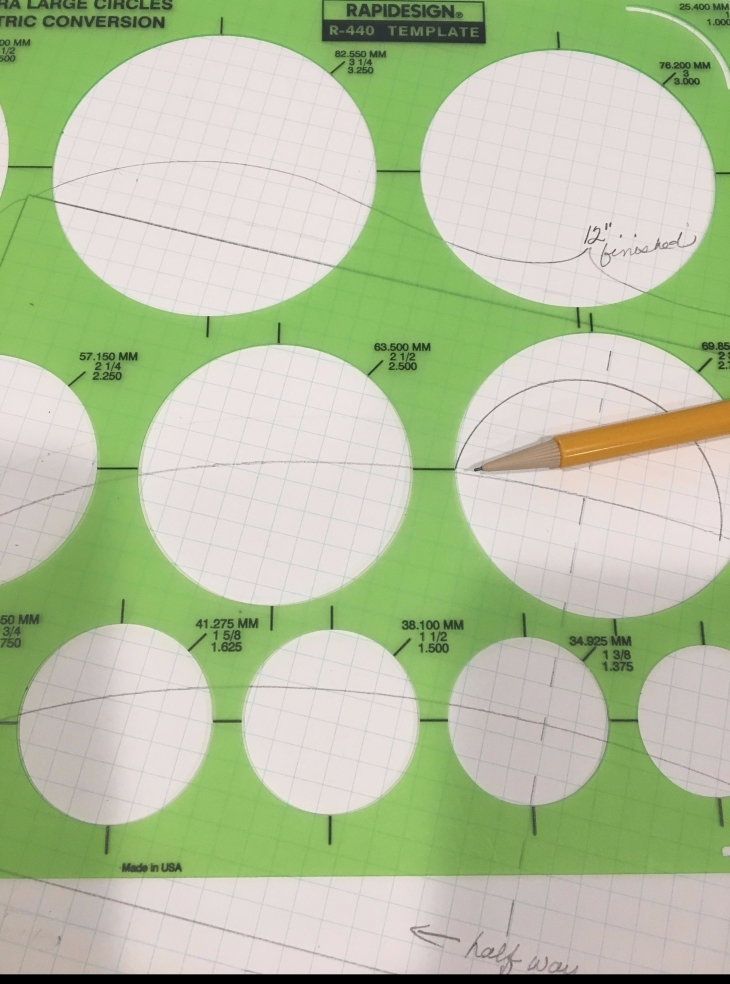
It’s time to use our circle template to make the swag bumps. Choose a circle size of your choice, paying attention to the circle side and top and bottom hash marks, place your circle on the top most arc, center your circle on your half way line and draw your half circle. The mechanical pencils below are pointing to the 3 important hash marks. See how the circle is lined up on both the “half-way” mark for both the arc and the swag length line.
Warning!! Do not position your swag bumps (circles) so that they touch the top like of your drawing! Leave at least 1/4″ space!

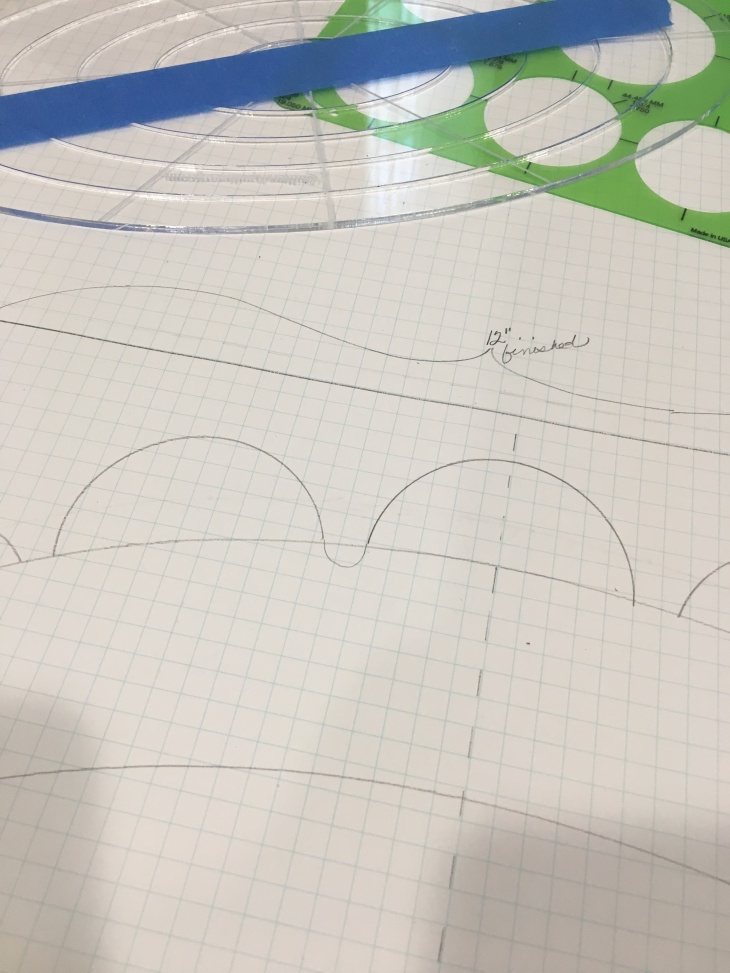
Here’s what your first swag bump will look like:

For the placement of the remaining circles you can use the hash marks as your spacer between half circles.
By time you reach both the right and left outer edges of your top arc, you may have to use the “fudge-factor” technique of swag bump placement. Just do what looks good to you.
Next step: you don’t want a straight line in between the bumps. You’ll need to free-hand a dip between the circles, either above or below the arc line. For this example I chose to place my dip below the arc.

It’s time to erase the pencil lines you don’t need any longer. And look what you’ve made, a custom sized swag pattern for your beautiful handkerchief quilt top border!

If you’ve never made/used a freezer paper template before, well, you’re in for some fun! There are many methods you could use but this is what I do:
Iron three sheets of freezer paper together. The size of the three individual sheets needs to be a bit larger than your finished swag you just created. For the above swag my three freezer paper sheets would measure something like 13″ x 8″.
On your ironing surface, first step is to position your teflon pressing sheet. On top of the pressing sheet place one piece of freezer paper SHINY SIDE DOWN and without steam, lightly press. Repeat with the remaining 2 sheets, SHINY SIDE DOWN until you have a nice firm layer of three sheets. ***Important: let your newly created stack of papers cool! Give the stack 2 or 3 minutes before your proceed. Once cooled, slowly peel the freezer paper from the pressing sheet.
With scissors, cut out your graph paper swag on the pencil lines. With the freezer paper stack laying shiny side down, place your cut-out swag on the stack, trace around the swag edges and carefully cut out your new template. Smooth cut edges are key so take your time with this step. Be sure to keep your graph paper template in a safe place as you’ll need it if you need to make a 2nd or a 3rd freezer paper template.
Position your new freezer paper swag template on your fabric and with a medium temp. iron press it into place. The paper will stick to your fabric.

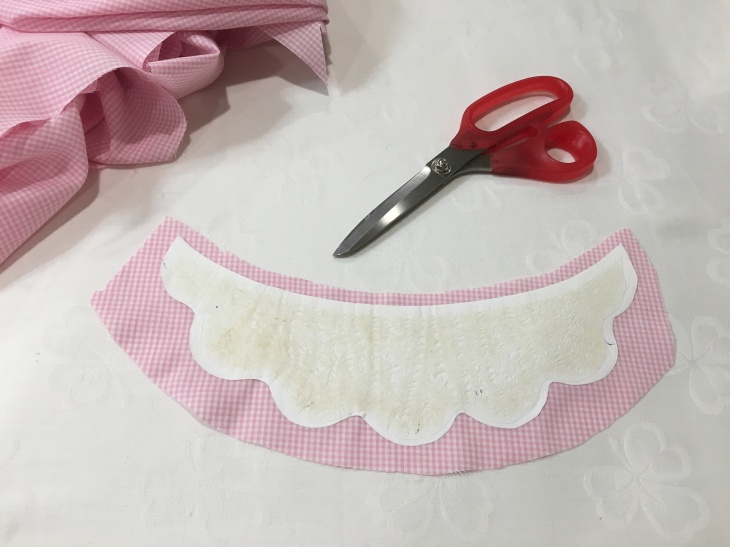
When it has cooled to the touch, trim around all edges leaving at minimum 1/4″. Here’s what your cut out should look like:

Using a rather heavy handed spray of the starch, make sure your fabric edges are a bit wet. Begin folding the top starched wet raw edge over the template and press into place.

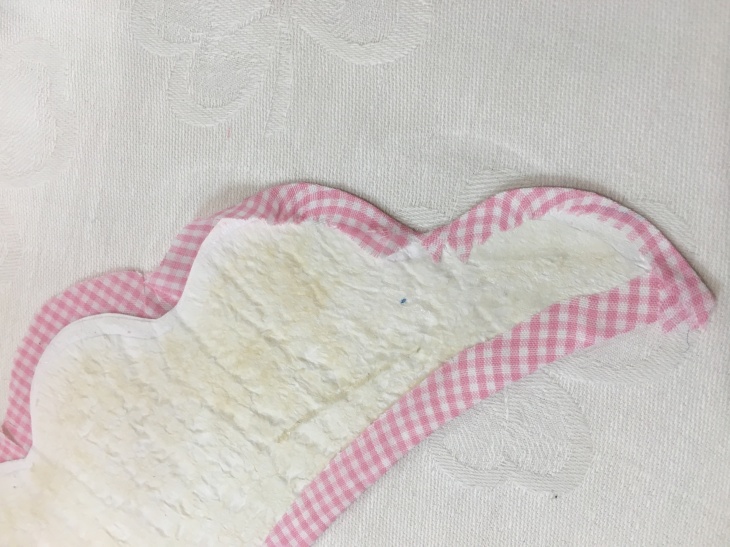
Here’s a pic of the top edge folded over and pressed:

Important! At the inside dip of each of the swag bumps you’ll need to make 3 small snips to allow for the dip or the concave part of the template. Snip almost but not quite to the template edge. Spray again with the starch and begin to slowly fold in and press these outer edges. Slow and steady all the while keeping your finger tips out of the way of your iron tip.
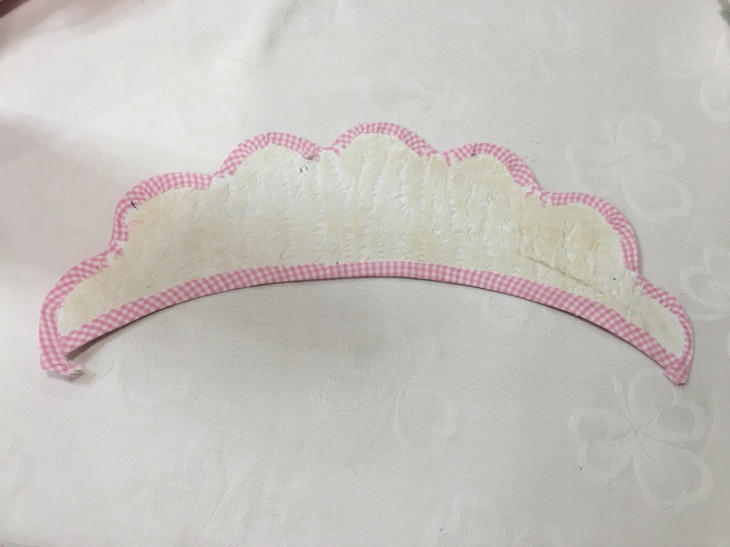
This is what your swag will look like when all the edges are starched, folded over and pressed, you can snip away the little pointy parts at each end of the swag:
Here’s what your swag will look like on the right side of the fabric:

Here’s the scary part: you need to remove the freezer paper template. Find a spot on the smooth arc edge, carefully pry up the paper edge and pull it away from the swag. Yes, your edges will get rumpled but don’t worry! Once your paper is removed, lay your swag right side down, re-position your edges, give it a quick press with your iron if needed. Warning!!! Do not spray starch your swag at this point!!! You will lose most of your hard work!! (Ask me how I know…) If you feel you must starch again, do it when you flip your swag over to wrong side down/right side up!

And you’ve just created your first custom sized swag for your handkerchief quilt top border! Congratulations!! Simple, easy and straight forward! How many freezer paper swag templates should you make? I usually make 2. These templates are used over and over again until they no longer stick to your fabrics. You’ll notice my template is brown in spots; that’s because I’ve used it maybe 10-15 times already.

For this project I’ve chosen to machine applique with a tiny width zig-zag set at a medium to medium/long stitch once again using the fantastic Wonderfil Invisafil in white.
Are you ready to start your own vintage handkerchief quilt top? I feel like I used WAY too many words in this tutorial! Hope all the pictures help! Don’t be the slightest intimidated about drafting your own swag, once you’ve done one you’re a pro and well on your way to a fantastic quilt border!
Happy quilting,
Rhonda
ps: Please-oh-please use the comments section to post your questions! If you’re wondering about something, chances are so are lots of other people!


Great tutorial. I have a few vintage handkerchiefs and will a small quilt. What do you do with the freezer paper. I keep rereading the instructions but do not see that information. I am thinking iron the hankie to that to add stability which takes the place of heat n bond. Is that correct? Do you have nay ideas for silky neck scarves?
LikeLiked by 1 person
The freezer paper is used to make templates, custom size templates for the swag border. 🙂
LikeLike
e Thank you so much. I did not read the part about making the swag as I thought I needed to get the handkerchiefs in place before I started thinking about the finish. I have scanned through your other sites now and “Wow”. So many ideas. I’ve got to get busy as I have embroidered pillow cases and dresser scarves from my MIL which I want to do something with. Time is ticking for me as I am a young 86 and love sewing.
LikeLiked by 1 person
🙂 Have a blessed day!! ❤️
LikeLike
My idea is to use silk pieces in a crazy quilt. Or I may just use them as if cotton. I have a really old silk quilt with no backing. That quilter foundation-pieced her silk onto a cotton base. It’s still in a fair condition for its age (probably close to a century). If you have any ideas would you please share them with me?
LikeLiked by 1 person
A great idea! Now, have you thought through the “care” for your finished project as to cleaning, etc? You may want to include pertinent/important cleaning/fiber content/etc on your quilt label. 🙂❤️
LikeLike
I got into quilting in Jan. 0f 2021, purchased sewing machine & all the necessary cutting tools etc. Then a long arm HQ Simply 16…practicing lots & have done some tops with simple FMQ & rulers. I now have gone thru Grandma & Moms hankies & put them in groupings…pieced 2 tops & watched many many of your posts & now ready to quilt…not as elaborate yet but looking forward to implementing your techniques for some of the pretty pretty feathers.
LikeLiked by 1 person
I have collected Vintage Hankies for years. Started collecting after my Mother Gave me all of hers and her Mothers.I did this quilt in 2020 without the scallop edges and it turn out beautiful. I get a lot of compliments. At that time I did not add My Mothers and GMothers as I was not sure how it would turn out. Well, I will be working on a second one and I will add them to pass on the quilt to my youngest Granddaugher that has taken some interest in sewing. Thanks Rhonda for sharing.
LikeLiked by 1 person
I’d love ❤️❤️ to see a picture of your handkerchief quilt!
Rhondadort@gmail.com
LikeLike
I have many white hankies, with beautiful handwork that I’d like to keep. Do you have any suggestions on how to show them at their best?
LikeLiked by 1 person
I have a box full of vintage white handkerchiefs that I have yet to decide what to do with. 🙂❤️
LikeLike
I am currently making a white handkerchief quilt. I used eggshell blue squares to back the hankies and am hand stitching each one. A number of them are delicate with details around the edges, so I am stitching the hanky down and then tacking the details around the edges when necessary. I have chosen a coordinated floral fabric to go with it. This has turned out to be a relaxing project.
LikeLiked by 1 person
How can I get the directions for the handkerchief quilt?
LikeLiked by 1 person
If you type: handkerchief quilt in the search bar of my website you should get at least one blog post about how I made the quilt. Otherwise, this is a project I teach 3 times a year at my retreat. See the Facebook group: 1914 Boehm House Vintage Linens Retreat for more information about joining us! 🙂
LikeLike
how did you quilt the hankerchief quilt ? a longarm ? thanks
LikeLiked by 1 person
Yes, I quilted this handkerchief quilt on my long arm.
LikeLike
Dear Rhonda,
I just found your site and after seeing your handkerchief quilt I am inspired to make mine. I have collected lots of hankies over the years and could never decide on a design in which to use them. Now I have. Thank you. I will send you a photo when the top is done.
I also love the hexagon piece you have made. Do you have a tutorial for that too.
LikeLiked by 1 person
Annie, thank you for your kind words 🙂. About the hexagon piece, I think I’ve posted about 3? different hexagon quilts, if you give me a bit more information I will be better able to give you a specific answer. Thanks again!
LikeLike
Just found your site. What a precious handkerchief quilt. I’ve collected hankies for years, most are white and lacy, some with embroidered corners. Here’s my problem – spray starch. This summer I heavily starched my vintage pillowcases which I use, but coughed all night. Have asthma and the starch set it off. I will want to use the quilt. Could I wash the top after its blocks are sewn together?
Your quilt showcased each hanky! Wanted a white background, too, with plain color separating each one. Other ways to use hankies just didn’t click with me. Didn’t want dolls, valances or shower curtains. You knew just what I wanted! Preservation of vintage lovelies! Hope you can get back to me with an answer. And I realize the crispness would be gone if the starch was washed out, but nighttime breathing is a good to have. 😊 Boy, oh, boy! I truly got excited when your quilt came up! Your instructions and photos were spot on, especially the math on your 13 1/2 inch hankie. I went what? You are a natural teacher! Thanks. 🤗 🌹
LikeLiked by 1 person
Theresa, thank you for your kind words! This was such a joy to make! About your issue with the spray starch and laundry suggestions. Can you wait to launder your quilt top until you have it quilted? The biggest issue I think you face is your vintage handkerchiefs have reached a point where they will no longer shrink but that may not be the case with whatever other fabrics you used to make your quilt top. If you choose to go forward with laundering you’re an quilted quilt top, you may need to do a lot of pressing with misting water and possible blocking before you have the quilt top quilted. Keep us posted on what you decide to do!
LikeLike
I pre-washed and dried my material before stitching the handkerchiefs to the squares. Don’t you have a problem with varied shrinking issues if this isn’t done prior to sewing?
LikeLiked by 1 person
Very good question! I’m not terribly worried about what this quilt might look like straight from the laundry process. It is very heavily quilted and the backing fabric was machine washed and dried prior to being loaded on the longarm.
LikeLike
Thanx Rhonda… going swaggin’ today… 😎
LikeLiked by 1 person
Excellent!!
LikeLike
I did this Quilt with all my vintage Hankies I have collected for years. It turned out stunning. If I could post a picture I would. It was my Stay at Home first quilt ever. Now I have the Quilting bug.
LikeLiked by 1 person
Congratulations! I’d love to see a picture! How about sending me an email: rhondadort@gmail.com
🙂
LikeLike
I just found this blog/ page. This is the most beautiful vintage hankie quilt I have ever seen. How can I get these instructions. I have been collecting hankies for years. I tried to print and it would not print all. I am in love with this. You did fantastic.
LikeLiked by 1 person
Thank you so much for your kind words! I only have the blog posts as directions, not sure why it won’t print for you??
LikeLike
If I can pdf the 2 blog posts, I will try and email them to you. Send your email addy to: rhondadort@gmail.com
LikeLike
What a beautiful quilt, Rhonda. I love your quilts! How did you quilt the Handkerchief Quilt once done?
LikeLiked by 1 person
Thank you! Do you have a Pinterest account? Do a search for Rhonda Dort, then look at my board titled: My Vintage Handkerchief Quilt. Scroll down several lines and you’ll find several pics of the back of the quilt that show off the custom quilting quite nicely. And again, thanks for your kind words!
LikeLike
I have quite a few vintage hankies that I have decided to make into quilts. Your information on stitching the hankies to white fabric has been so helpful. The white fabric I stitch mine to will be several inches bigger for each hanky as I can only manage to make my quilts with the quilt as you go method, so the front QAYG strips won’t be touching the hankies, just the fabric that they are stitched to. Your whole blog is so inspirational and giving me so many ideas.
LikeLiked by 1 person
Thank you for these instructions on how to make a handkerchief quilt. I have a box of lovely handkerchiefs which belonged to my Great Aunt Alma Chase and have wanted to make a quilt with them, however, all patterns I have seen required cutting them into various shapes, etc., and I just couldn’t bring myself to cut them in any way. I remember as a very young child sitting with her and looking through this box of handkerchiefs and it was has been a lovely memory for me. I am three months from being 76 years old, and I was most likely about six or so when I would spend time with her, so these handkerchiefs are a very precious part of my memories. Now I have a wonderful pattern to use them and not have to cut them up in any way. I only hope and pray that I am able to follow the instructions and make it all come out as it should. Thank you!!
LikeLiked by 1 person
What a wonderful story! I’m so happy that you will be able to make a quilt from some of her handkerchiefs, please keep me posted and of course let me know if I can be of assistance!
LikeLike
You delivered a simple way to mount your hankies on the background fabric and a clear demonstration of making the swag.You gave me the courage to start my own! Thanks!
LikeLiked by 1 person
Thank you! Keep me posted on your progress 🙂
LikeLike
This is a beautiful quilt! I just received about 50 vintage hankies that belonged to a good friend’s mother. I think I will make her a quilt like yours. Thanks so much for a great tutorial.
LikeLiked by 1 person
Thank you and good luck with your own vintage handkerchief quilt!
LikeLike
REALLY late to the ballgame here…or should I say quilting bee! I just wanted to thank you for helping me with 2 of my quilts in process (QIP). I have one that I really wanted to use a swag border on and then also have a hankie project that is just in design phase. Your work here is a tremendous help to me on both! Also, as to your fear of ‘too many words’… in my real job, I develop a lot of training resources and the art of balancing words, photos, and such is a real challenge. Too many of either one is distracting, confusing, or both. Too few and the user cannot accomplish the end goal of the training. You have a great balance here. That is obvious as the questions are not about your specific steps – we all understood those. Instead, they are questions prompted by your instruction about how these ideas and techniques can be applied to our personal projects. Wonderful job!
LikeLiked by 1 person
Thank you! What a nice comment!! I’ll now smile all day!!
LikeLike
I was wondering if you thought about fusing the handkerchiefs down before stitching around them so they don’t shift?
LikeLiked by 1 person
No, I am not fond of fusibles in general and especially when it regards vintage linens. I had no trouble with them shifting. Now, I do have a friend or two that did use fusibles and she was also successful in her handkerchief project.
LikeLike
i have been given my grandmother collection of handkerchiefs that she always carried by my mother. i have alway wanted to use them in a memory quilt but could not figure out how or find out any info on how to use them.. I am so happy to have run into your turtorial. i cannot wait to make this.. what a wonderful Christmas present this will be for my older sister, who was very close to my grandmother than i was…Thank you.. i’ll send pictures when it is done..
LikeLiked by 1 person
Thank you and OH YES!! Send pictures!!
LikeLike
Oh, what a great tutorial. I have hankies from my MIL. Now all I need to do is find them! Beautiful quilt.
LikeLiked by 1 person
Thank you!
LikeLike
🙂 A definite project for the new year. I think I have about 100 vintage hankies….
LikeLiked by 1 person
Enjoy your upcoming project!!
LikeLike
I have been collecting vintage tea towels, a lot with calendars on them. Do you have any suggestions as to how to put them together. I was thinking about an outdoor tablecloth.
LikeLiked by 1 person
Hi Betty, while I’ve never made a quilt out of tea towels I have seen several on Pinterest. You might want to search there if you have a Pinterest account. Keep me posted!
LikeLike
It’s gorgeous! Thanks so much for the tutorial. I’ve been collecting hankies for a long time with the goal of doing a hankie quilt. Until now, I didn’t have any idea how to do it. Again, thanks so much!
LikeLiked by 1 person
Thank you for your kind words! I really enjoyed making this quilt, if you decide to make yours, send pictures!
LikeLike
Amazing quilt. I’m wondering how you ended up quilting the one with the pink sashing ?
LikeLiked by 1 person
If you look for the blog post of July, 2017 there are lots of close up pics of the quilting of my vintage handkerchief quilt. Hope this will answer your question! If not, let me know 🙂
LikeLike
Hi Rhonda, I loved the idea of handkerchief quilt definitely but the best part of this tutorial is easy and elaborate step by step instructions to make it.
….And your quilt is gorgeous!!
Thank you so much !
LikeLiked by 1 person
Thank you for your kind words!!
LikeLike
This is an excellent tutorial – very thorough and clear. Thanks so much.
LikeLiked by 1 person
Thank you!! You’ve made me smile!!
LikeLike
I’m late to this party. I love your tutorial, and thank you very much! Love your work also. May I ask, why you do not use Templar for your pattern?
LikeLiked by 1 person
Thank you for Your kind words!! I do need help with your question, Templar? An you ask the question in another way and maybe I can give you an answer. Thanks!!
LikeLike
Templar is a heat resistant “plastic” sheet that you can draw your patterns on, cut out, and then proceed as with your method. I learned this in classes with Karen Kay Buckley.
LikeLiked by 1 person
Oh I understand now! The reason I don’t use that product is because it will not stick to my fabric like the freezer paper well. With the freezer paper sticking it makes the turning of the edge using the starch very easy in my opinion.
Thanks so much for clarifying your questions so that I could better understand! Merry Christmas!
LikeLike
Beautiful! Thanks for sharing your idea I’ve always wanted to make a quilt from vintage handkerchiefs but did not know what to do about the different sizes and how to attach them
LikeLiked by 1 person
How beautiful. Thanks for sharing. I’m going out to get some hankies right now!
Deelee
LikeLiked by 1 person
Be sure and post pictures of what you create! Looking forward!
LikeLike
This is almost a year after your post. So I am hoping you are still responding to comments and questions. I too am starting a handkerchief quilt and searching the web for any tips that I can use. I am laundering many mostly white and almost sheer hankies with the idea of doing white-on-white or tone-on-tone hand embroidery or candlewick embroidery on them once I have them adhered to the white foundation. When attaching them to the foundation fabric did you use any iron-on adhesive like ‘heat and bond’ or ‘misty fuse’ or did you just sew the edges down?
LikeLiked by 1 person
Hi Denise, I did not use any fusible on the Vintage handkerchief quilt. I used a heavy spray starch on both the handkerchief and the medium weight bleached cotton muslin, and about a thousand straight pins to secure the handkerchief to the block. I used a a medium length stitch, was careful that my sewing machine tension was a not too tight. If you have a spare handkerchief, you could make a test block to get your stitching just right.
I found that if my block appeared to be slightly puckered after stitching all the way around the hankie, a quick spray starch and iron took care of the problem.
Does this help?
LikeLike
Thanks for sharing your technique. I’ve seen some similar swag borders and always wondered how to accomplish them. Appreciate you sharing your expertise!
LikeLiked by 1 person
Una idea maravillosa, le ha quedado espectacular. ¡Felicidades!
LikeLike
Thank you!
LikeLike
I have a lot of vintage hankies and had hoped to make a quilt with them someday. I never quite knew where to start but your tutorial is so great that I feel as though I have all the info I need to make the quilt now. Thank you for a wonderful tutorial with wonderful pictures!
LikeLiked by 1 person
Thanks Susan! If you begin a handkerchief quilt top, be sure to send pictures! Happy Quilting!
LikeLike
No, no, no – never too many words. This is the best tutorial I think I’ve ever read and certainly ‘the best’ when it comes to making a handkerchief quilt AND designing a swag! I’ve had a number of heirloom handkerchiefs and always thought they’d make a great quilt but your tut has made me realize it’s possible to create a gorgeous quilt. Yours is wonderful. Do you plan to do the quilting yourself? No matter what, I hope you’ll keep us updated with the progress of this lovely quilt. I just recently found your blog and my only regret is that I haven’t been following for a long time. Thanks, Rhonda.
LikeLiked by 1 person
Thanks for your kind words!!!
LikeLike
you’ve taken making a handkerchief quilt to a whole new level. it is beautiful and it will be gorgeous when you are done. I’ve always loved handkerchiefs, my grandmother always carried one and I do too. thanks for sharing your process!
LikeLiked by 1 person
Thanks!!!
LikeLike