

If you’ve been following this blog you’ll know I’m in the process of quilting my Vintage Linens quilt top:
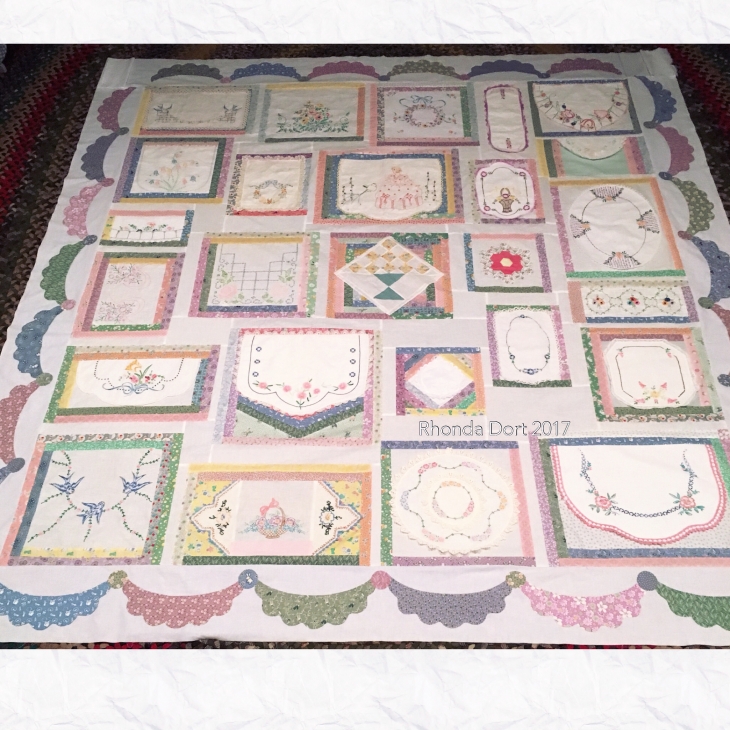
Most of the feathering has been completed in the strips of reproduction fabrics so it’s time to start on the actual vintage linens.
I’ve drawn in the undulating feather vein with a water soluble blue marking pen. I use EZ International pens mostly because I can buy them in bulk. I also use a small plastic applicator filled with distilled vinegar to remove the blue lines. Why vinegar? If you’ve used blue pen much you will know that when using water on the pen marks it can sometimes cause the blue to “wick out” as it dries. I’m finding the distilled vinegar lessens the wicking. The vineger aroma hangs around for maybe a day and then it’s gone.
Below you’ll see the right side of the linen has been marked and quilted:
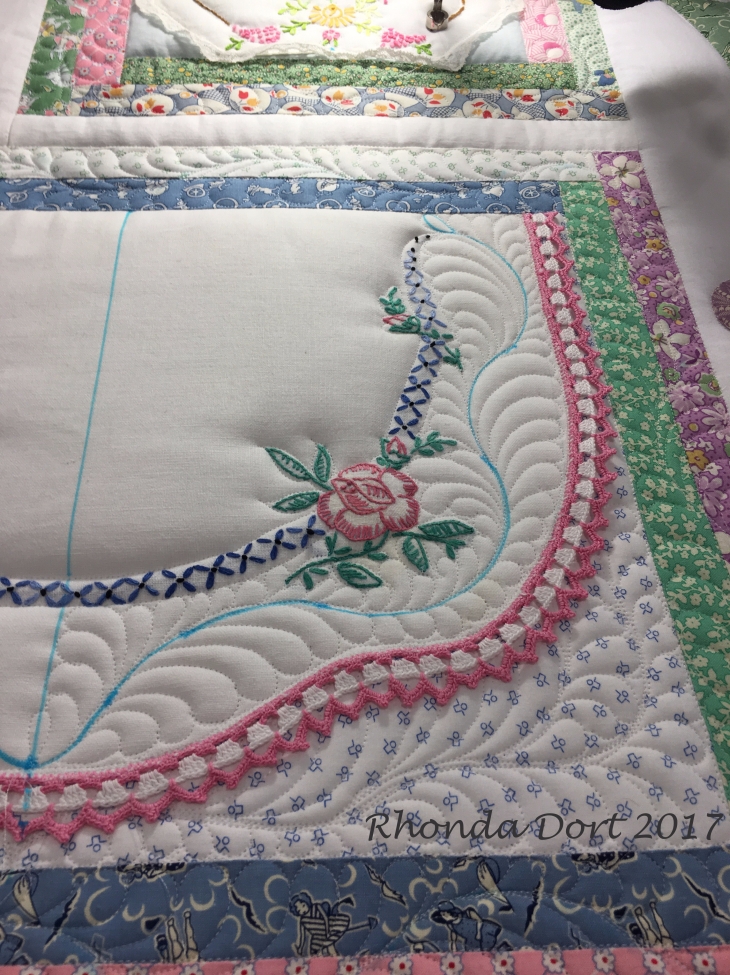
After the right side was quilted I marked once again the left side to be a mirror image of the right, best as I could. Don’t stress about perfection, it’s all about the finished quilting.

Both right and left sides are finished:


If you look closely you can easily see the two sides do not match perfectly. When they are freeform feathers, it would be difficult for them to mirror image each other. You can make yourself crazy trying or you can be happy with however they turn out.

The center feather wreath below was created by first stitching around an acrylic circle template and then adding both the inside and outside feathers. For me, unless I mark, the inside feathers can be difficult to line up. Look below and you’ll see there’s a “funny looking” feather at about 2:00 on the wreath. I’m not bothered by this, it’s all about the “big picture”. If you are crazy about perfection, heavily mark or use a feather wreath template.
This block is very special to me because my maternal grandmother embroidered this dresser scarf. The other half is part of my mom’s Old Linens Quilt shown in my previous blog post, or maybe the one before that…

The block below is made up of two doilies. The smaller piece is laying atop the larger.

Again, I marked blue registration lines to remind me where the center of my feathers should fall as well as a dot to show the center of the block.


My quilting friend Blue Painters Tape comes to the rescue again, holding back the lace trim to keep it out of the stitching area:

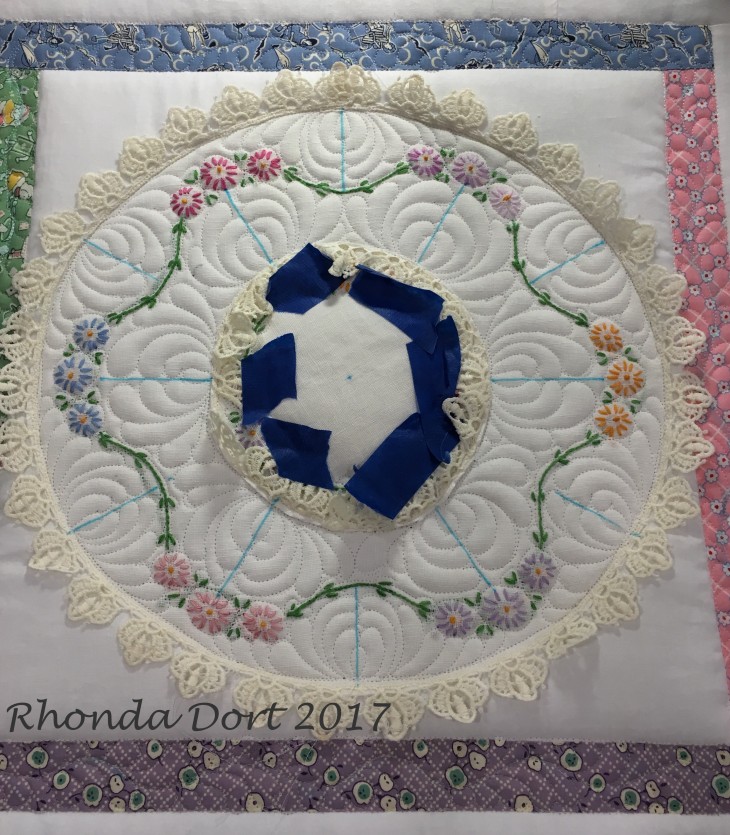
Almost finished:

And done! Well, almost done. I will probably eventually add quilting to each of the white 4 corner areas.

So it’s 2 down and about 24 more to go and then there’s all the white negative space created as I set the blocks together. In other words, there’s lots more to be done! Sometimes a large space can be intimidating when deciding what to quilt. I’m all about the concept of “divide and conquer” when it comes to quilting.
Hope you’ve enjoyed all the detailed pictures and of course, leave a comment if you have questions!
*** House update: I received an email from the floor tile company advising they have shipped our order! All 8000lbs!
Blessings for a wonderful day and of course “Happy Quilting”!
Rhonda

I was just going through your quilts as you are teaching so wonderfully. I have been buying doilies as I can. I now have some beautiful ones and need many more. This quilt makes my heart sing. I have started one hexagon for my hexagon quilt. I set it aside for way too long but I felt inspired to change some beading that just didn’t look right. Now to move forward and to trust myself in what I am doing. Thank you for sharing your beautiful talent so fun and loving.
LikeLiked by 1 person
Thank you Roberta! I’m happy to hear that you’ve collected some beautiful linens!!
LikeLike
Dear Rhonda You spoke at one of the Bay Area Quilt guild meetings last year and as a result I’ve been getting your wonderful inspiring updates on your quilting activities. I was going though my fabrics and discovered/found about 30 old hankies that I would like to put into one of those beautiful quilts you do so well. If I promise not to ask to many questions – May I write you from time to to to ask things like: What should I wash them in to make them look better? The don’t look tattered or have any holes but I wondered if I could whiten them up a bit – what should I use? May I iron them on low heat (to get the wrinkles out of them)? Is there a how to book on embellishing/quilting/working with old fabric? I want to make this and then surprise a friend with with it. So your help will be greatly appreciated and I promise not to be a pest. Hazel FowlerMember Bay Area and
LikeLiked by 1 person
Good morning Hazel, I’m here to help in any way I can! Yes, definitely soak the vintage handkerchiefs. My “go to” soak is 1/2 cup Biz, 1/2 cup cascade dishwashing powder (don’t get the kind with bleach!) in 1/2 to 1 gallon of warm water. Soak for about 24 hours. You’ll find this recipe in one of my older blog posts about cleaning vintage linens.
Have you read the blog post about how I made my vintage handkerchief quilt? You might want to read the post to answer many of your questions, but I’m always here to help!
LikeLike
Awesome! One of these days! I will get to mine. What did you use to mark the vintage linens? I have had ‘blue’ washable pens come back.
LikeLike
Oh wow, this is another beauty. Thank you for sharing the process. You make it look so easy but I know better 💖
LikeLiked by 1 person
Your quilt and the quilting brought tears to my tears – it’s just too gorgeous. Following your progress on this quilt is such a joy. Thank you for sharing your journey with us.
LikeLiked by 1 person
OH so BEAUTFUL!!!? Wow! Amazing.
LikeLiked by 1 person
Oh! It’s going just beautifully, like I knew it would! Please keep updating, I’m enthralled!
LikeLiked by 1 person
Thanks! Yes, quilting is fantastic therapy!!!
LikeLike
Looks amazing Rhonda. I know it must be wonderful therapy as well for you, especially while all of the storm damage work is going on in your home and your life right now. Muster through we must though and you are doing wonderfully!!!!!!
LikeLiked by 1 person