

I’ve been collecting Pansy Doilies for years and years and decided they could be used in as a collection in a quilt.

I sorted them by general color as I have those with white or very light ivory centers and others with darker ivory/ecru centers. I also discovered many in my collection were not actually pansies but rather, creative unknown flowers. See the doily in the bottom right of the picture below. Beautiful, but not pansies.

Like any other of my vintage linens, if they haven’t been soaked, starched and pressed, I set about to get those things underway.
Using my design wall I began an experimental layout. The doilies below became my “main players”.

If I felt the doily passed the layout test, I then laid it out on the bleached muslin to make sure it looked acceptable on white fabric. Some of the ivory centered doilies looked dingy on white and so they were relegated back to the storage drawer for another future project. If a pansy doily was still in the running I gave it a hang tag with a number.

By this point I felt I needed a plan so with graph paper I set about drafting what I thought would work. Each of the colors below represents a specific pansy doily. On each of the color shapes I notated not only the pansy doily number for that block, but the finished block size as well. It was my intention to always work in multiples of 2″ but with a few odd sized doilies you’ll see I have a few areas where finished 1″ blocks were necessary.
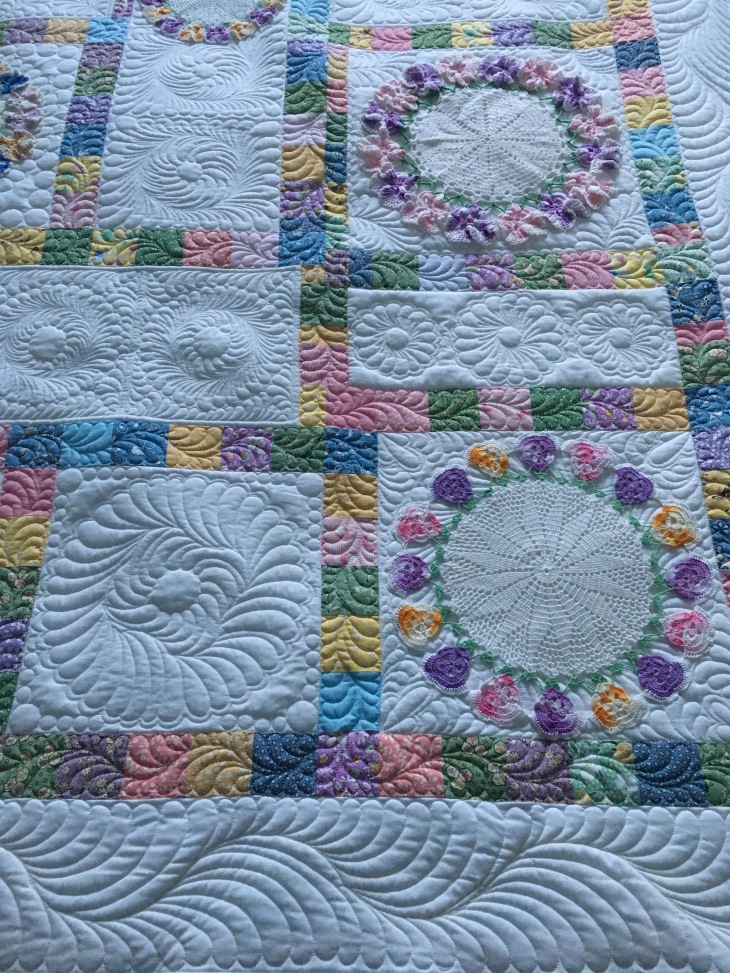
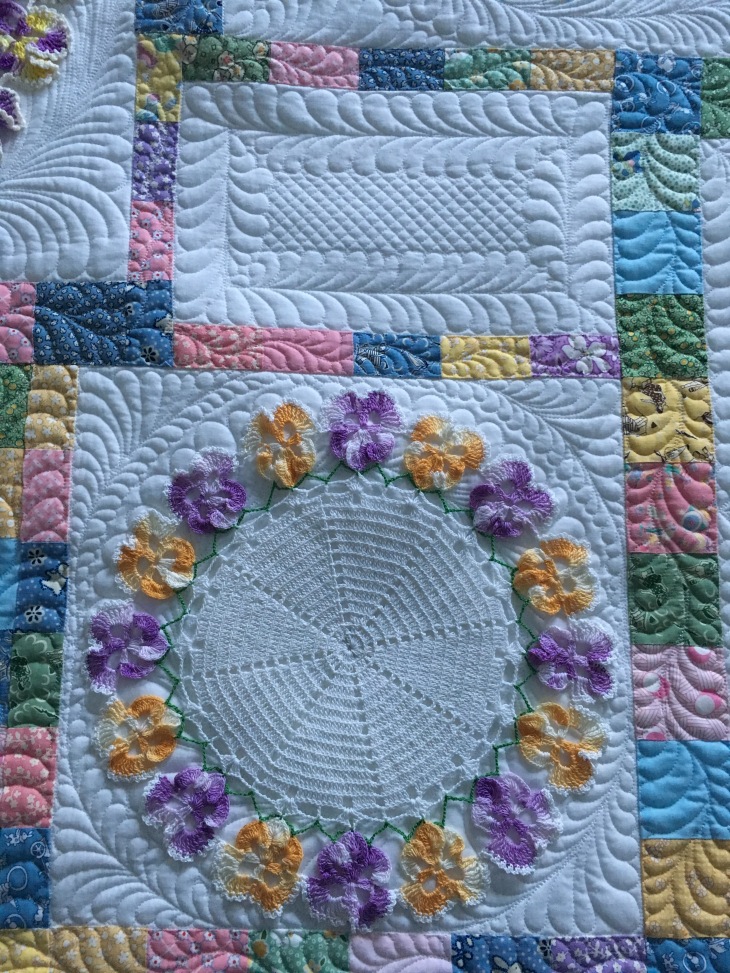
Each of the white blocks represented negative space to be quilted and then to place additional pieces of vintage crochet.

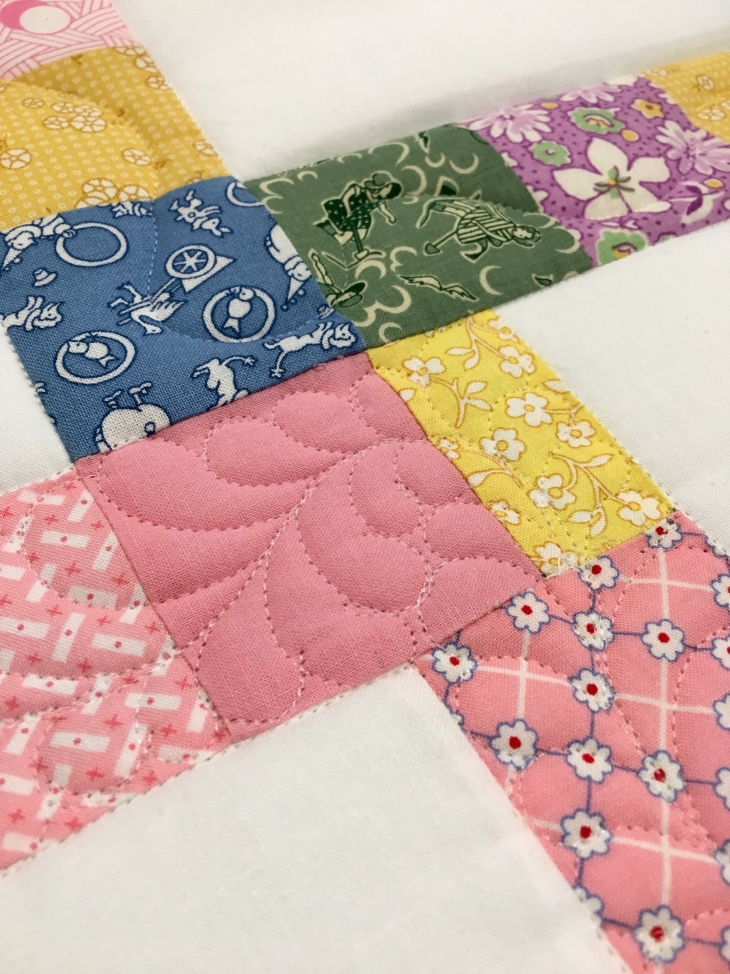
With the pansy doilies in hand I pulled out my fabric stash of 1930’s reproductions and began to cut strips measuring 2 1/2″. From these strips I then cut 2 1/2″ squares. I contemplated strip piecing for speed on construction but changed my mind deciding I did not want “consistency of fabric/color placement” throughout the project.

Earlier I mentioned each pansy doily was assigned a number printed on a hang tag. Here’s a picture of two such doilies.

The white “negative” spaces were intended to host pieces such as the snowflakes and hearts below.

So with my chart as my guide I began to set the blocks together to make the quilt top:

This was Plan A: (visual bedlam!)
After placing maybe just half of all the various pieces I stepped back and said “I need a Plan B!” There was way too much going on, there was no place for the eye to rest.


Now mind you, at this point I am not happy. I’ve collected vintage pieces for many years and I’d thought this project out in my mind for at least a year and was so excited to finally be creating this giant experiment. The only pieces that made the final cut were the pansy doilies.
Plan B won out and I used only the pansy doilies.
With the entire quilt top created (including 6″ white borders not shown above) I loaded it on my Innova longarm. I used 100% cotton bleached muslin on the back, a double batt of Hobbs white 80/20 topped with Hobbs Poly Down. If you’ve read any of my other blog posts you’ll know I’m a fan of Wonderfil threads, specifically their Invisafil and Deco Bob.
Invisafil won the toss for this quilt. You’ll see in lots of pictures below that by using one of these threads there is no need to change colors as you quilt over different color fabrics.

For the first time ever I quilted the top border first. I usually always quilt the body and then decide about borders.

Look at the thread below as I quilted over the different color fabrics! Amazing! If you haven’t tried either Invisafil or Deco Bob, what are you waiting for?
After I quilted the top border I moved down the quilt top quilting all the sashings. I can’t remember if I also quilted the side borders as I moved down but I’m thinking I didn’t??
I mark registrations lines/circles when I quilt. I always mark the “vein” of feather wreaths and when I know I want consistency in feather lengths, I mark an outside circle telling me where to stop.

Using my blue marking pen I used the “divide and conquer” method of quilting negative spaces.

You’ll see below that after I marked the block I changed my mind about what to quilt. The diagonal lines serve no purpose other than they indicate the center point of each of the divided areas and they did dictate the direction of the feather plumes.

While you can’t see the quilting you can see distinctly the sashings that ended up being 1″ in width. They stand out in the picture below but once the doilies are attached they blend in nicely.

The quilt at this point is trimmed and bound using the same white fabric as both the front and the back. And what’s not to love about it receiving the “Winston the Cat” approval!


After the quilt was quilted, trimmed and the binding finished, I laid out the pansy doilies and hand stitched them in place using a small curved needle and the Invisafil thread. I tacked them in the center and then all around the outside edge.
But… the pink and orange doily always bothered me and a few weeks ago I removed and replaced it.


I still don’t have anywhere in my house to set up my portable quilt display stand so laying out on a king bed will have to do. The picture below shows the pink/orange doily replaced with a more suitable player.


The lighting gives the quilting a chance to shine:


I was very worried that the white negative spaces would appear awkward as the original plan was to have a vintage crochet piece in each.

With this revised layout/placement, it gives the quilting a chance to shine.

You know, I’ve really never met a feather I didn’t love…


And finally, a bunch of pictures of the back:


The finished measurements are: 70 x 90″. This project took 31 hours, 40 minutes to quilt and about 2 weeks ago I had it appraised. I’m sharing the Replacement Value with you not to brag but to let you know you should have your quilts appraised (by a certified quilt appraiser) and then insured. Let’s just say I was STUNNED: $4,500.00.
I created this piece to be a teaching tool/example for what you can do with a collection of vintage pieces. As I speak to different groups, I’m always asked something like “I have grandma’s dresser scarves/doilies/handkerchiefs. What can I do with them other than stack them in the linen closet?”
Am I glad I stuck with it and finally created this quilt? Absolutely! When I look at this quilt I smile. I feel that it is a peaceful tribute to the hands that spend hours crocheting the Pansy Doilies.
If you’d like to use the graph to make your own quilt, please do so! If you need a better graph shot, email me and I’ll send you a better picture.
Let me know if you have questions, and if you’re thinking of creating your own Vintage Doily Quilt, keep me posted!
Blessings to all and Happy Quilting!
Rhonda
***House update: The fireplace wall is finished (and the fireplace is installed). The Master is painted with baseboards, the Dining Room is painted with baseboards and the Powder Room is looking better. The Office is painted. We are waiting on the new windows, the master fireplace, and the kitchen cabinet repairs. The back staircase is ready to be stained, the front staircase is next on the list. Big Progress!
Happy New Year!

I have a lot of vintage linens/ doilies. Are you interested in purchasing them? I can send photos!
LikeLike
Thanks for the offer Vicki but my stash of vintage linens etc. is bursting at the seams!
LikeLike
That is THE most gorgeous quilt I’ve seen made with vintage doilies! It’s just exactly how I had envisioned one looking! My skill level at quilting is way below yours, so I’ll be collecting doilies for a few more years before attempting anything like this. Would love to know what fabric line you used. It is just perfect! Thanks for sharing!
LikeLiked by 1 person
I love it! You do such beautiful work As a beginer I’m attempting to mix quilting with showing off and displaying vintage linens, lace and doilies that I’ve been collecting for a number of years. This was certainly a lesson on less is better. Also, badly needed the suggestions of using the Invisafil thread and a curved needle to attach the doily(s). My project is a smaller wall hanging and will have just one tatted doily in the center of a star. Your online “classes” are so well done and inspirational.
LikeLiked by 1 person
Greetings from New Braunfels! This quilt is a gorgeous adventure in creativity, FMQing, and superb photography! I delighted in visiting this post. I hope it still adorns your beautiful home.
LikeLiked by 1 person
Thank you for your kind words! And yes, the Pansy Doily Quilt is still here at home with me 🙂.
LikeLike
Amazingly Beautiful!!! ~your Texas neighbor in Wimberley
LikeLiked by 1 person
Thank you neighbor! 🙂
LikeLike
When attaching the doilies, do you stitch through the whole finished quilt or just through the quilt top? Thank you!
LikeLiked by 1 person
Just through the quilt top.
LikeLike
How absolutely beautiful. Great job.
LikeLiked by 1 person
Thank you!
LikeLike
I just found you on Pinterest and have to tell you how awesomely wonderful it is for me, a pansy doily crocheter (all kinds of doilies, actually, but pansies are a favorite) to see what you’ve done with your collection. The fact that you appreciate the hours put into them by someone who probably is no longer here is to me the greatest show of respect. Your quilt is just stupendous, and the appraisal proves it, as if you already didn’t know! God bless you and keep you always as you continue to use His gift to you! (I have a black cat, too, a lady cat named Pearl. Every cat is special, but the eyes of a black cat are beyond words to describe.)
LikeLiked by 1 person
Thank you so much for your kind words! And just so you know, I am in awe of anyone who can crochet a Pansy Doilies! I do love them so!!
LikeLike
Thank you for sharing your most beautiful quilt. It truly inspired me.
LikeLiked by 1 person
Thank you for your kind words!
LikeLike
Thank you!
LikeLike
I have been making vintage linen pieces. Layering my pieces and quilting them to death. I still don’t quilt feathers. Just can’t get them to look good. I am going to start practicing till I can do it. You are an inspiration. Beautiful!!! Thanks. Pam Sanders Madera, Calif.
LikeLiked by 1 person
Oh thank you! ❤️
LikeLike
❤️ Thank you!
LikeLike
Wow, this is absolutely gorgeous. I’d never seen a pansy doily before. They are really pretty and you made perfect use of them. Well done!
LikeLiked by 1 person
Thank you !!!
LikeLike
Absolutely beautiful!!! When you are ready to GIFT it to me, I’ll send you my address!
LikeLiked by 1 person
Wow. I had a gramma who crocheted the panies doilies by the gross. This is sich a wonderful idea. I might try it with hers. Yours is so so beautiful. You are very talented. Just wow!!
LikeLiked by 1 person
Thank you!!
LikeLike
Rhonda, your quilt is absolutely beautiful! The details of it and all the planning to get the right colors, etc is wonderful. Keep up the great quilting.
LikeLiked by 1 person
Oh my goodness ~ this is gorgeous!!! Thanks for sharing the process. I found you via pinterest this morning (clicked on a pin that was a close-up of your feather border. I am obsessed with learning to quilt gorgeous feathers…) I have a but of free time now, so I’ve brewed a cup of coffee and plan to visit awhile 🙂 It’s a pleasure to meet you, Rhonda!
LikeLiked by 1 person
IMYGOSH! I am breathless! Rhonda, your work is so beautiful! But just cuz I said that, don’t get a “swelled head.”
Luv ya, girlfriend!
Susan
LikeLiked by 1 person
Too late! I had already swelled up! 🙂
Thank you!!!!
LikeLike
Absolutely Beautiful!! Question: How do you sew the end of the pansy’s down? Long arm or hand sewing? I am thankful that you shared your progress, it really explains a lot of the things I’ve wondered about. I’ve been trying to collect doilies for a quilt someday. Elizabeth
LikeLiked by 1 person
I stitched the doilies down by hand using a small curved needle and the wonderfil thread. I secure the center of each piece and then stitched down the outside edges. I secure the center of each piece and then stitched down the outside edges.Does this information help?
LikeLike
OMG it is beautiful! I am putting a class with you on my bucket list! I have lots of crochet items. Some form my Husbands grandmother. I have no idea what I will do with them, eventually. I love that you planned it out, then quilted it before adding the doilies.
LikeLiked by 1 person
Thank you! It was a joy to make!
LikeLike
Love love love, is there anyone you could recommend that makes quilts I would like to have one made for my grandbaby due August
LikeLiked by 1 person
Thank you! If I were you I’d contact a local quilt guild and ask for a referral to have a quilt made to your specifics.
LikeLike
That is a work of art! It took my breath away. I am a novice quilter and seeing something as beautiful and stunning as that just encourages me to keep designing and quilting. Who knows, maybe my work will one day be just as amazing as that.
LikeLiked by 1 person
Thank you!
LikeLike
I was thinking about you the other day since I’d not seen a blog post lately. Now I know why…exquisite! You are a genius when it comes to the whole process of using vintage linens. I would never have considered doing all that quilting and then adding the doilies by hand but it’s perfect. I only wish I was hanging out in your mind while you process all your thoughts. I have one of Grandma’s pansy doilies and I love it and use it, too. I can see it used as a showpiece in a quilt. Thanks, Rhonda.
LikeLiked by 1 person
Good morning, Here’s some eye candy. At the end she shares some photos of her house which was damaged in Houston flood. Have a good Sunday. Hope you’re having sun, Judy. We’re not.☁️😕 Virlinda Sent from my iPad
>
LikeLike
First I am so gad your home is getting closer to being all claimed again. Wow that is a lot that had to be done and still to be done. I love the rock wall and all those windows. I love windows to look out of. I love your new quilt. You have such amazing ideas that turn into beautiful works of art. This quilt is stunning. I love the colors of the 1930’s recreated fabric. I never thought to save pieces like the pansy doilies for a quilt later. They just made this so pretty. I did like the little doilies but as you said it was too busy. Thank you again for the wonderful instructions and pictures. You make my heart sing when I see what you make.
LikeLiked by 1 person
Oh my goodness. That quilt is A.M.A.Z.I.N.G. I really really love it! Thank you for sending. I love the fireplace pic took. Love the rock/stone!!!!
Sent from my Windows Phone ________________________________
LikeLiked by 1 person
Oh my goodness, this quilt, Rhonda is the most beautiful work of art. The doilies are exquisite and the quilting……oh the quilting….exquisite. I must say I am pea green with envy at your crochet pansy doily collection.
LikeLiked by 1 person
Oh thank you! Considering you inspire me so much, it is I who should be sending accolades your way! This was such a fun yet frustrating yet challenging yet worthy project! This finished quilt makes me smile!
LikeLike
In the midst of the work on your home, Christmas, and Thanksgiving, you have created this stunning and incredible quilt. You amaze me. The quilt is so very lovely. I enjoyed reading about how you worked through the challenges. Not being a quilter, such patience is amazing to me. And what a great value is the quilt!
LikeLiked by 1 person
Thank you Jane! I really enjoyed the challenge this project presented.
LikeLike
Your quilts are stunning!
Sent from Samsung tablet
LikeLike
Thank you so much!
LikeLike
Rhonda,
All I can say is WOW…I love it. I love vintage linens and collect them. I joined a crazy quilt group that has a 12 block/12month project. Aim is to do new things you haven’t tried with crazy quilting, I.e. new stitches, ribbon embroidery etc. I thought I would show you where I am at for this month since my theme will be linen ladies: Still have more to do but love working on this.
Keep doing your beautiful work….it is so wonderful for “other ladies “ handwork to find new life. Don’t you know they would be thrilled to see what you have done with their treasures.
Paula Sent from my iPad
>
LikeLiked by 1 person
Thank you!
LikeLike
An absolutely gorgeous quilt! Thanks for sharing.
LikeLiked by 1 person
Thanks!
LikeLike
I am sooo in love with this quilt! So much inspiration here! Your feathers are the best!
LikeLiked by 1 person
Thank you! I really like this one too! Even through all the challenges and changes!
LikeLike
OMG, Rhonda, this is beautiful! I love Winston. I am happy to see progress in your repairs. Hugs.
LikeLiked by 1 person
Thank you sweet friend!
LikeLike