

I know some of you have started your vintage linens quilt tops! I love the pictures you’ve sent! Keep sending pics, keep posting comments/questions! The creative process is amazing!
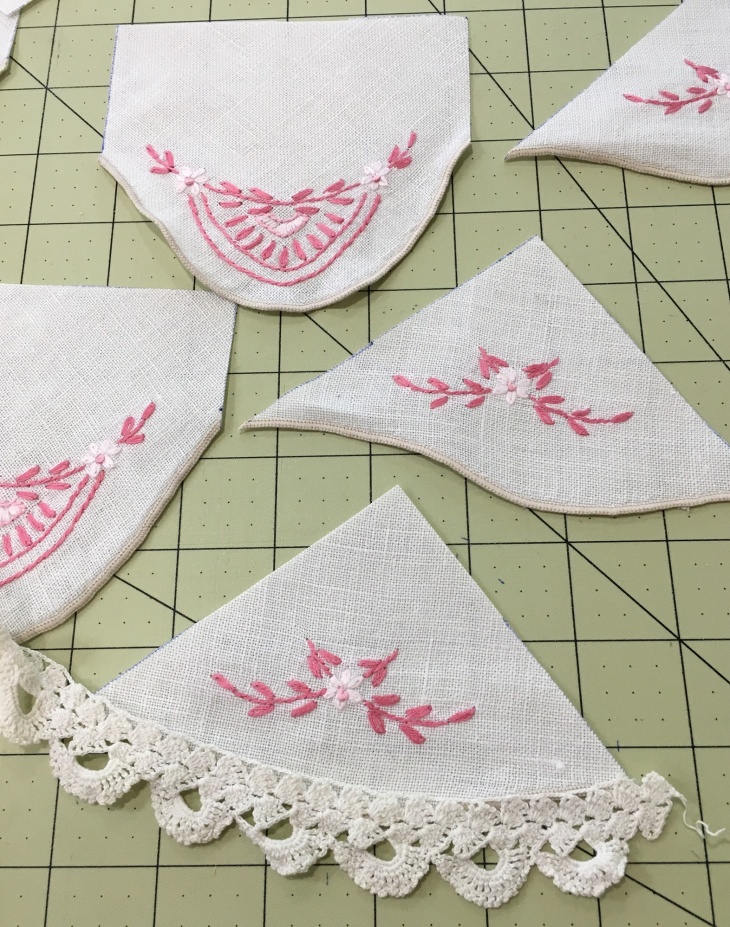
So remember: you’ve got a plan at this point, you have an idea of what your color scheme might be, you have an idea about the general size of your project and you’ve been scouring your stash, your friends stash, your local antique malls, etc. for wonderful vintage pieces for your quilt. But what do you do when you find something that works… kind of? The colors are right, the motif(s) are right but there’s that thick modern rolled hem all around the outside! You improvise! Today’s post is mostly about improvising with pieces to “make” them work. The luncheon/dinner napkin below is one of these pieces. You’re going to have to imagine it without the blue lines because I forgot to take a “before” picture.
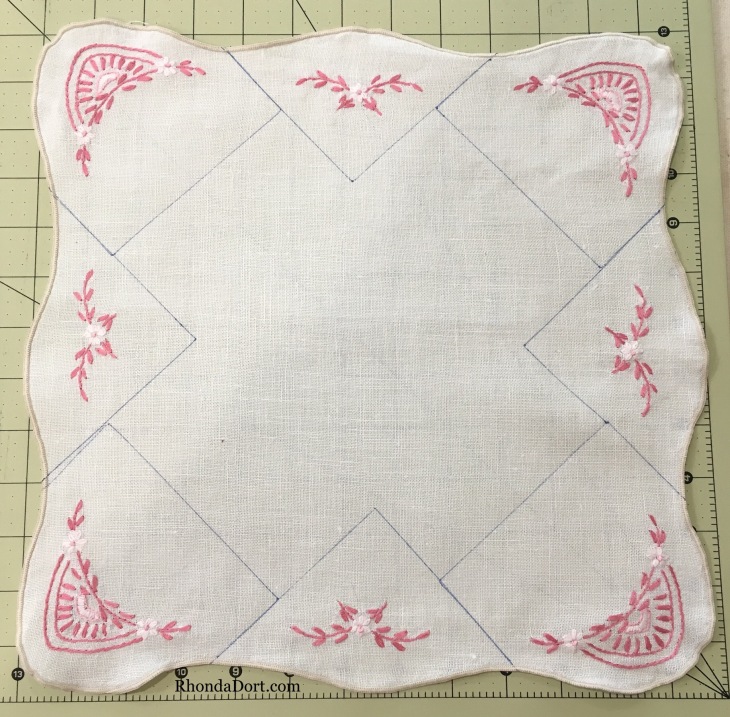
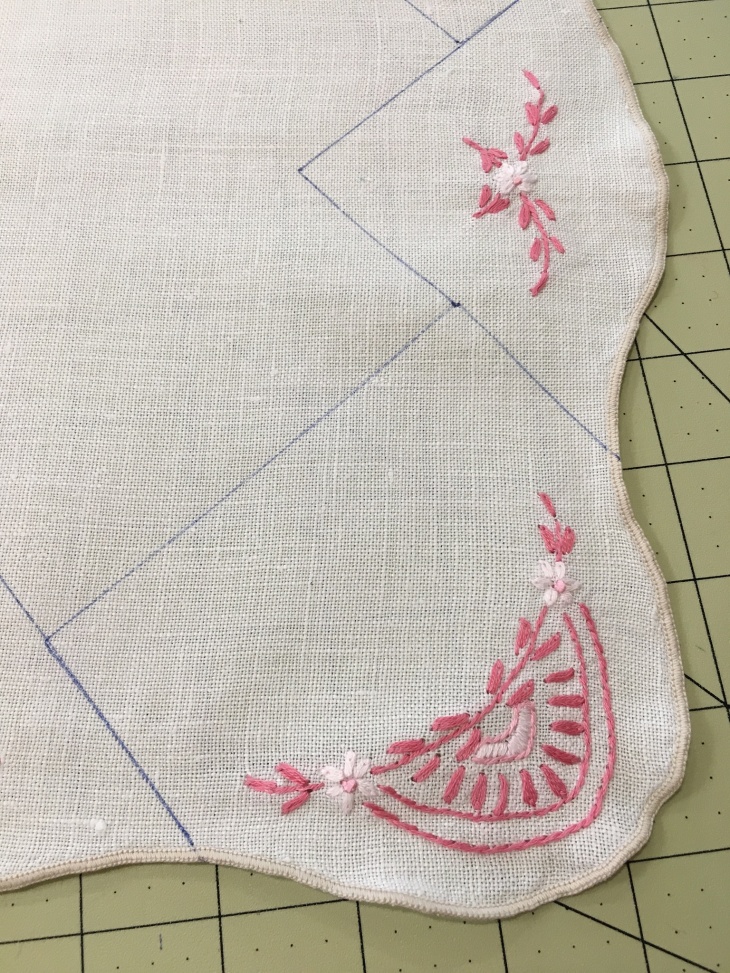
It’s a lovely light ivory medium weight linen with both dark and light pink hand embroidery. It’s well done, it it perfect in every way except that unsightly wobbly thick machine applied rolled hem. It will be perfect for cutting apart to make 4″ blocks!
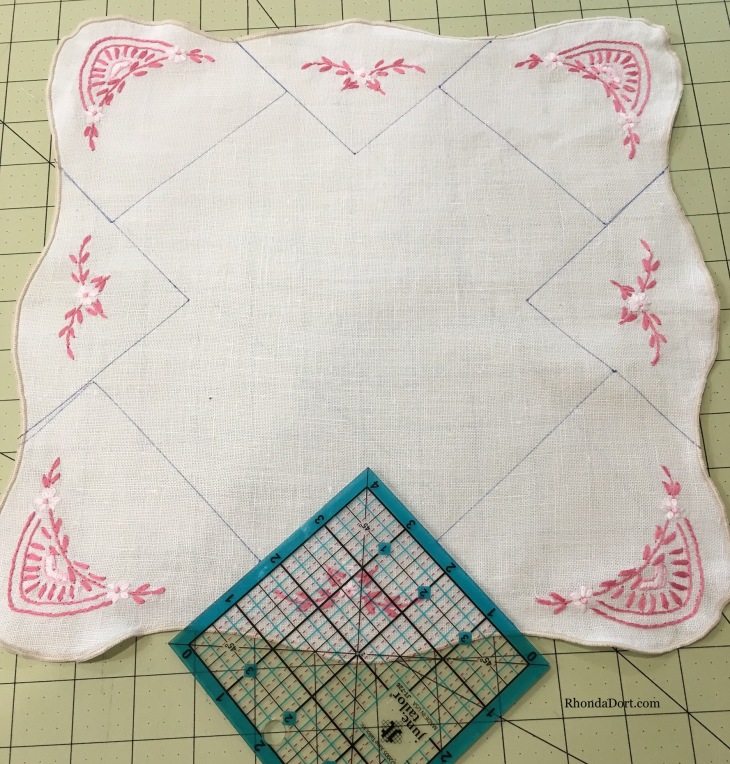
From this single napkin I now have 8 embroidered pieces!

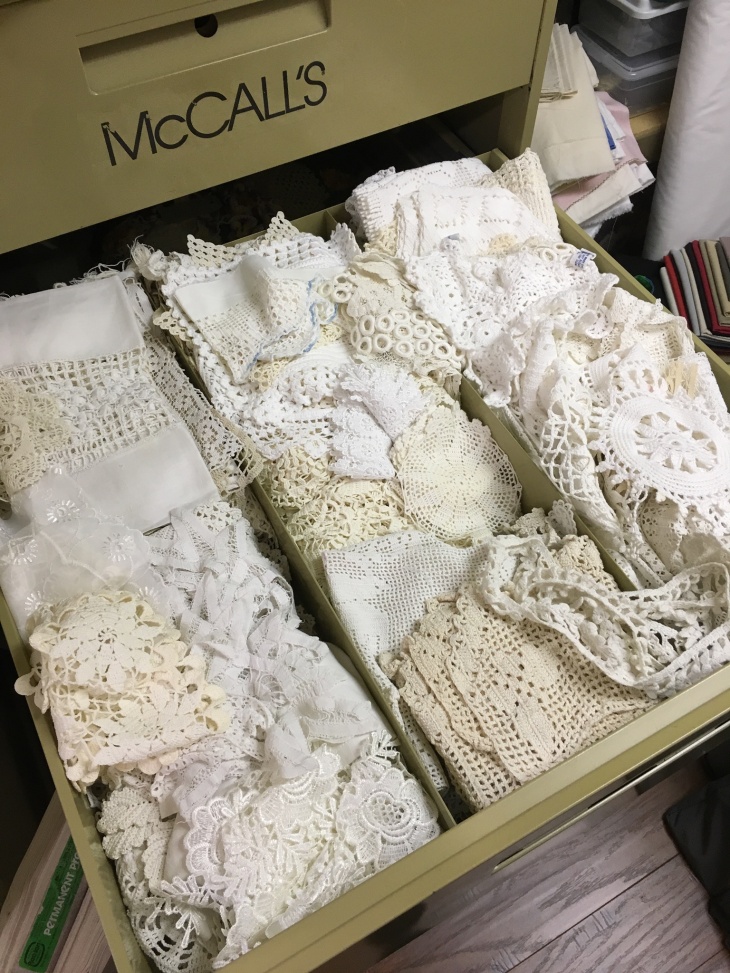
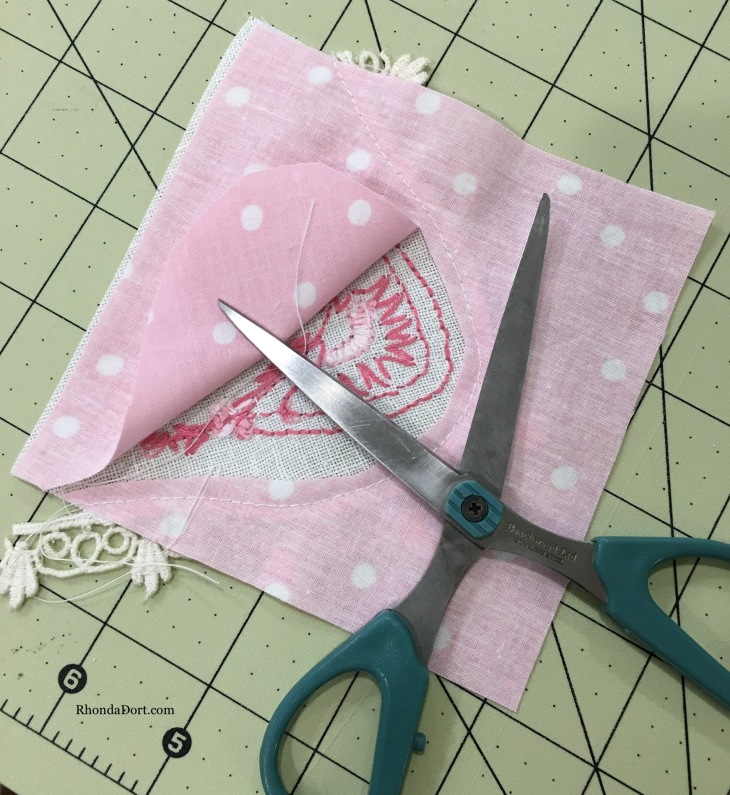
I immediately head to my repurposed McCall’s pattern drawers to look for trim to cover the rolled hem.

Auditioning trims, I make a final decision on a machine produced medium yellow/ivory trim. I sew on the trim and then carefully cut away the rolled hem. Important point: if I had cut away the rolled hem first, I would have been left with a fragile bias edge to manage. Don’t make the project harder than it should be!

Once the new trim is added and the rolled hem is cut away, I position the little piece on a 4″ 1/2 x 4 1/2″ fabric square, machine stitch just above the new trim edge. Now here’s where another problem presents itself. The fabric shadows through the ivory linen, or in other words, I can just barely see polka dots thru the linen. Not a good thing! Flip your piece over to the back side and CAREFULLY trim away the fabric ONLY behind the vintage piece.
Remember to place your little piece on your foundation fabric and in some fashion, baste around the raw edges. This is one of those times when you’ll be glad of the foundation as the top edge is 100% bias! Here are 4 of my new 4 1/2″ square blocks made from the dinner napkin. For consistency I used the same machine produced trim on each, you may have decided to have vary all of your trims.

For a little break in the action, here are a few pics of my remarkably clean, non-cluttered sewing room… ha! Yes it’s a giant mess but it’s MY mess! I’ve got my remote control and my can of HEB lime flavored sparkling water so I’m set!


It’s time to begin laying out your blocks. Refer back to your diagram for placement. Remember to mark (with pencil) on your diagram where specific blocks go, if you’re anything like me you won’t remember within a matter of 30 minutes!
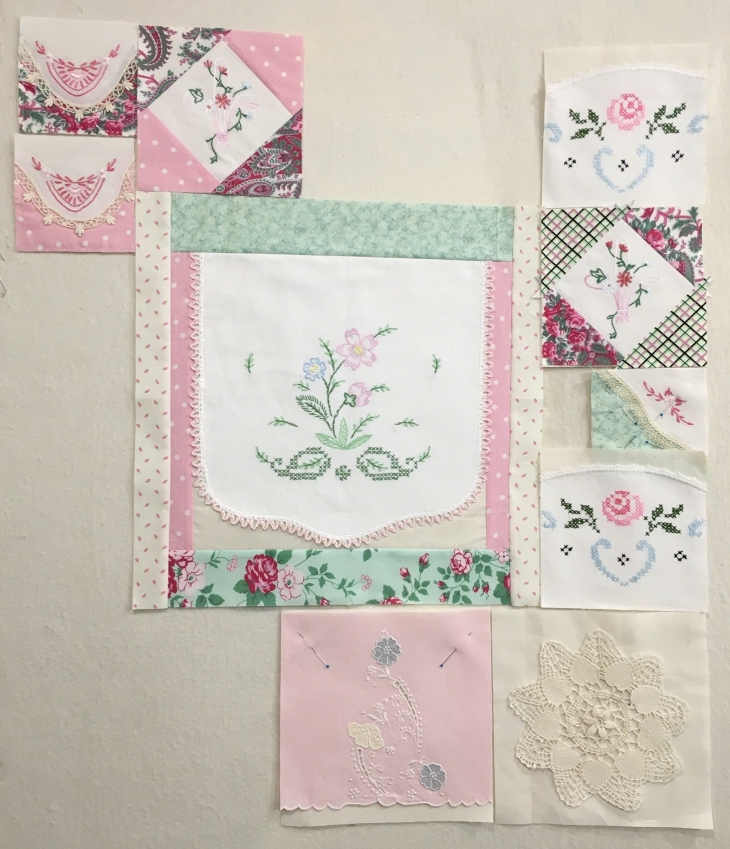
The pic below will give you an idea of the variety of things you can use in your quilt. You’ll note I’ve used both old and new-ish things.
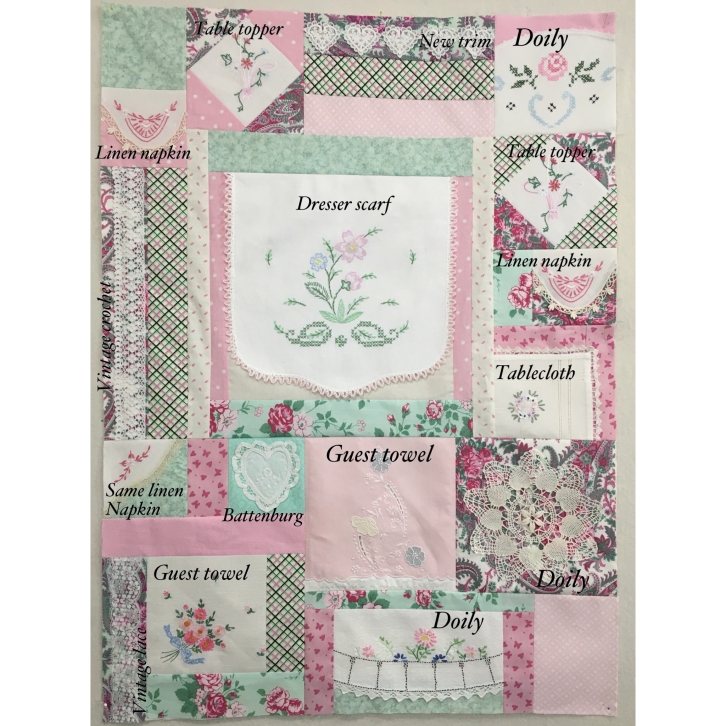
Now, here’s a warning of sorts: see the plaid fabric above, the one with the black lines? It is a new fabric, a VERY well known fabric manufacturer. Never in a million years did I expect the black to fade, in fact I never bothered to test it. It fades. I’ve learned my lesson. Test your fabrics, even if it’s just laying them atop a white paper towel and spritzing them with water. If I’d done even just that I would have discovered the fading issue.
I’d love to see pictures of the vintage linen projects you’ve started!
***
Now a bit of news from here: sadly my youngest sister passed on Tuesday. We knew it was coming but of course when it happens you’re still deeply saddened. We will be traveling to Chicago on Sunday for a Monday funeral service. I’d so appreciate your prayers for safe travels, for the gathering of the family, for words spoken at her funeral and of course for her sweet husband as he transitions to life without her. God’s plans and timing are perfect and nothing takes Him by surprise. It is in our humanness that we are deeply filled with sorrow at these kind of happenings because we have such a great sense of loss of loved ones.
Blessings to all and until next week,
Rhonda


I am so sorry with the loss of your Sister. It is expected but still hard. With my Mom and my Sister it was expected but hard. I really appreciate all your descriptions and wordy details. Things I would never think about I learn. You do such beautiful work. Seriously I never would think to even start a quilt because I am scared but I will have things for my children to keep and pass on. Thank you so very much.
LikeLiked by 1 person
So sorry about losing your sister. May God comfort you and her family and be with you on your
Travels. Thank you for sharing your pictures and experience.
LikeLiked by 1 person
Loosing a sibling, especially one who is younger, is so difficult. I lost my younger sister 14 years ago – she was just 50. Yes, it was expected but we’ve all grieved. May your gathering together be a time to remember your sister with love and the sharing of memories.
LikeLiked by 1 person
Love to you and your sister’s family on her passing…… Must be extremely sad in your heart, even though thankful. These blog pieces are each so beautiful. Such beauty in itself brings a measure of hope, even to me.
LikeLiked by 1 person
This was not posted by Richard, but by Jane!
LikeLiked by 1 person
May God comfort you with sweet memories of your precious sister and be with you as you travel.
Love and sympathy.
Anna Humphrey
LikeLiked by 1 person
Your blog is so wonderful that while reading/devouring the fun and insightful details of the process… I feel SO happy, so empowered, so grateful because you are willing to be my perfect & amazingly talented teacher who is willing to generously share with ME her secrets to guide me through your process to create something beautiful! Will you be my sister? Oh, that’s right.. you are …I love you and thank God for your endless guidance for our family and in all things, all ways. Thank you for commemorating Elaine and the beautiful way your words share and remind that God has a plan and his timing is perfect.
LikeLiked by 1 person
Rhonda, I am so sorry for your loss. Prayers to you and your family.
LikeLiked by 1 person
So sorry for your loss. This week has been a week of such loss for many…..both family and friends. My prayers are with you and your family as you all transition into days without her. May loving mercies and comfort from our Father attend and uplift you…………hugs, Dor
LikeLiked by 1 person
So sorry to hear of your loss. My prayers are with you and your family. Have a very safe trip and may God give you strength in this difficult time.
LikeLiked by 1 person
Rhonda, I’m so sorry for your loss. Thankful to have this therapy called “quilting” to help us through hard times. I find it really does! Beautiful work and thanks for your tutorials, they are priceless! xo
LikeLiked by 1 person
I am so sorry, Rhonda. I have 6 brothers and sisters and dread the day that one of them passes away. My heartfelt sympathy.
LikeLiked by 1 person
Rhonda, I’m so sorry for the loss of your sister. My prayers are with you as you travel and celebrate her life with your family this week. Hugs!
LikeLiked by 1 person
Oh Rhonda! I’m so very sorry for your loss. The process pics and explanations are invaluable! It never occurred to me that you could remove the “showing through” fabric from the back. Genius! Safe travels tomorrow.
LikeLiked by 1 person