

The Downton Abbey Garden Party quilt, named for the fabric line and the quilt pattern by Laura Heine. You’ve seen the pattern, the one made of bright colors in a 20+ inch quilt block? I bought this pattern about a year ago, started choosing bright color fabrics and set it aside when a few other projects took precedent.

The pattern:

Fast forward to June of this year. I’m not terribly fond of purple fabrics. Sometimes for a break in vintage quilting I actually piece a quilt top. Often times I try and use a fabric color I don’t like just to understand the color and how it reacts with others. That’s what happened here. The Downton Abbey fabrics are all in purple colors-colors that kind of gave me hives…

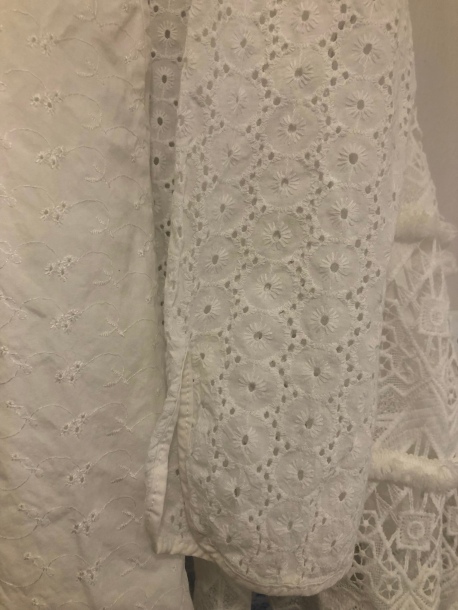
So what’s up with the laundry hanging in my doorway? I decided to do all the quilt block applique in white eyelet and where best to find a good variety of white eyelet than the many thrift/second hand stores in and round northwest Houston.


I bought 9 different eyelets in either clothing and/or pillow shams and bed skirts. As soon as I got home, everything went straight into the washing machine with a very generous amount of Clorox.


Once washed, sanatized and dried, I spent some time with my scissors and seam ripper taking everything apart.
Now’s a good time to tell you about that 20″ block of Laura’s: I took the pattern it FedEx/Kinkos and using one of their “big machines” reduced the 20″ to a 6″ block:

But how did I get all the pattern pieces drawn on the Heat ‘n Bond Lite? I used blue painters tape to attach a piece of the fusible onto card stock. I then laid out all the reduced pattern pieces on my printer/scanner. I copied the pattern pieces directly onto the Heat ‘n Bond Lite by using my ink/jet printer. Key word in that last sentence: ink/jet! This technique will not work no how no way with a laser printer!!! Can’t stress that enough! Laser printers work with high heat!

This was a HUGE time saver! Using a medium/high temp on my iron, I pressed all the Heat ‘n Bond Lite printed sheets to pre-cut pieces of bleached muslin. Why bleached muslin and not directly onto the eyelet? I needed a visual barrier between the eyelet and the purple fabrics. Without the muslin, the intense purple fabrics shadowed behind the eyelet.


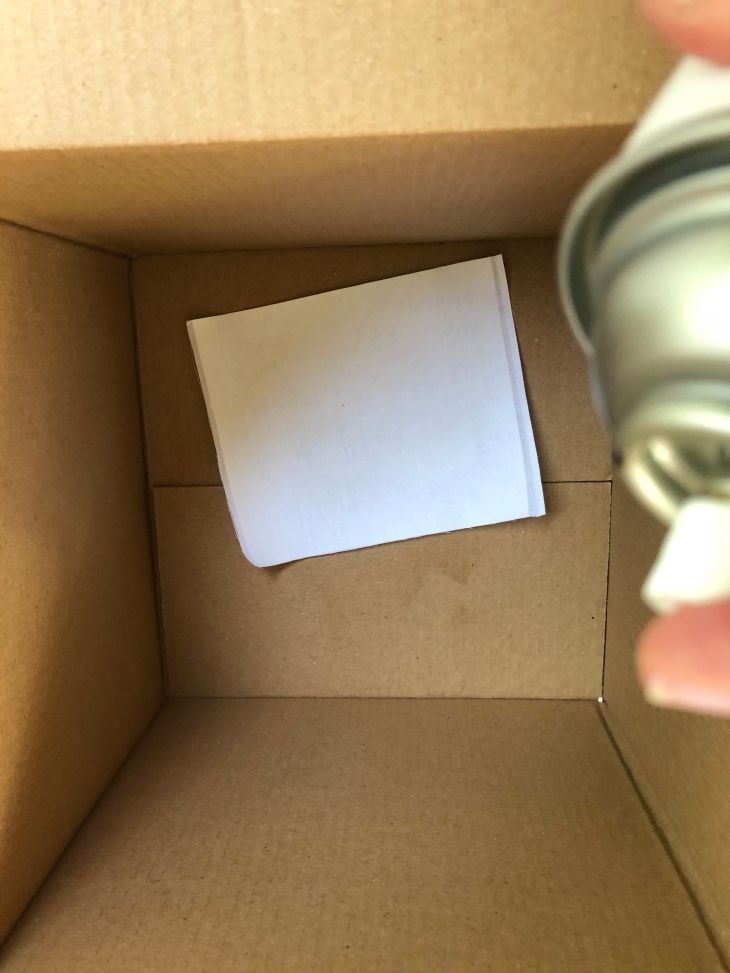
So… how to hold the eyelet onto the bleached muslin without adding another layer of fusible? Behold the adhesive spray! I googled this brand of spray and it is easily available at several online retailers. Why did I choose this particular one? Because it can easily be stitched thru with my domestic sewing machine with little to no sticky buildup on my needle.

But this spray should only be used with good ventilation! This deep cardboard provided just the right setting for an outdoors successful spray operation. Before I began, I did a short/quick shot of spray on the inside bottom of the box. This shot of spray then allowed me to “stick” my fabric piece to the box and thus keeping the piece positioned to receive the more thorough and uniform blast of adhesive. Don’t leave out this step, it’s important!
Once the muslin side has been sprayed lightly with the adhesive, I carefully played the eyelet fabric on the sticky/tacky side and gently patted the fabric into place.
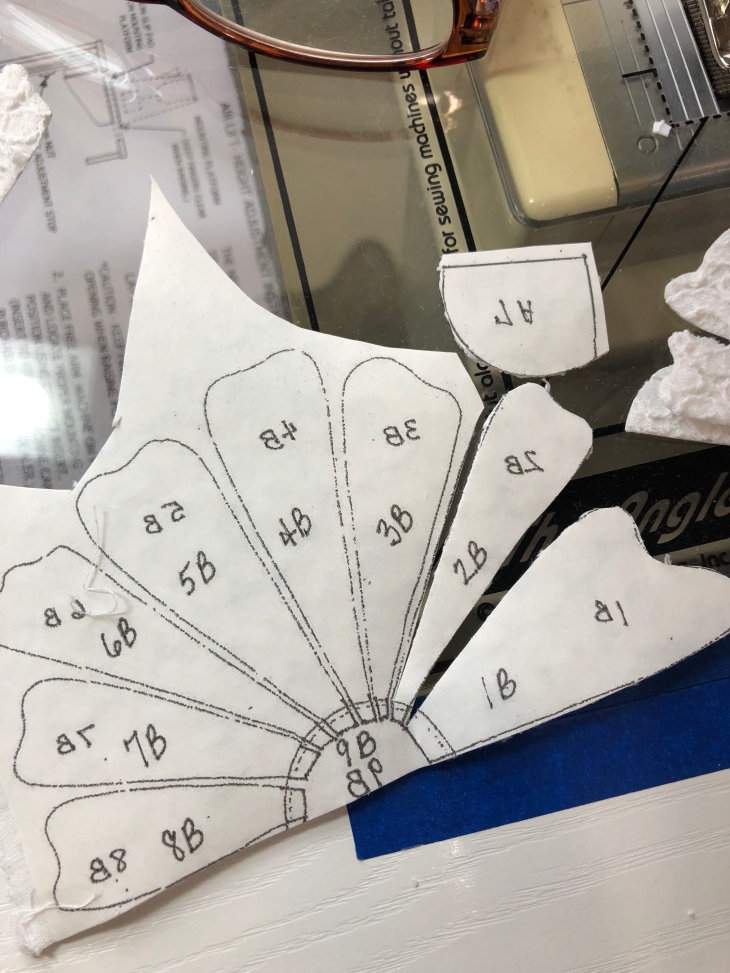
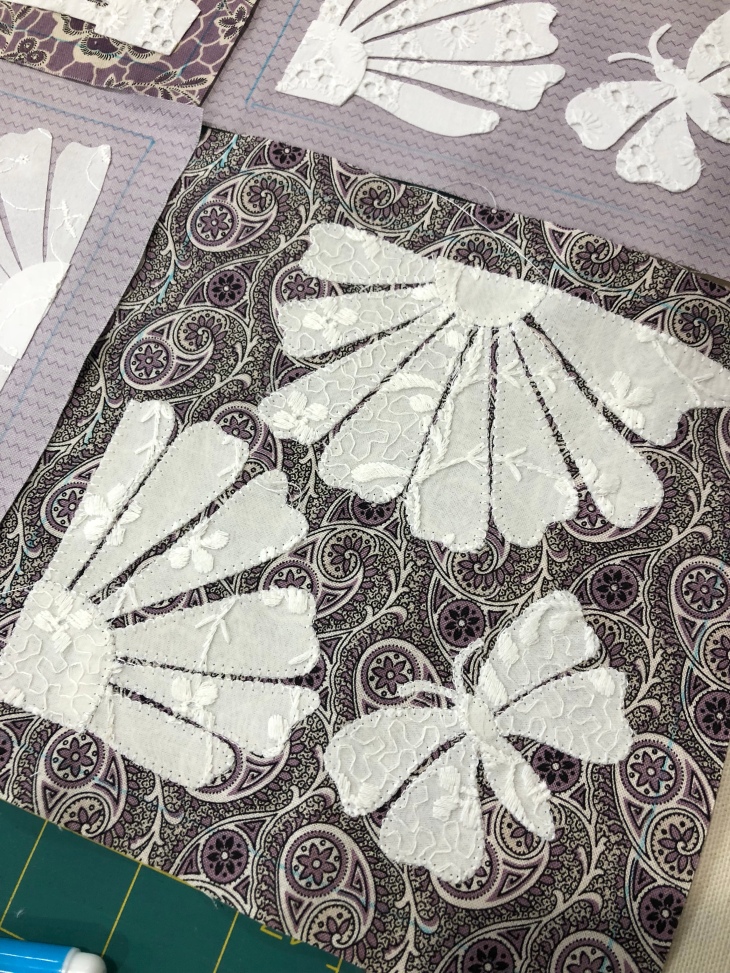
At this point I’m ready to cut out all the applique pieces.
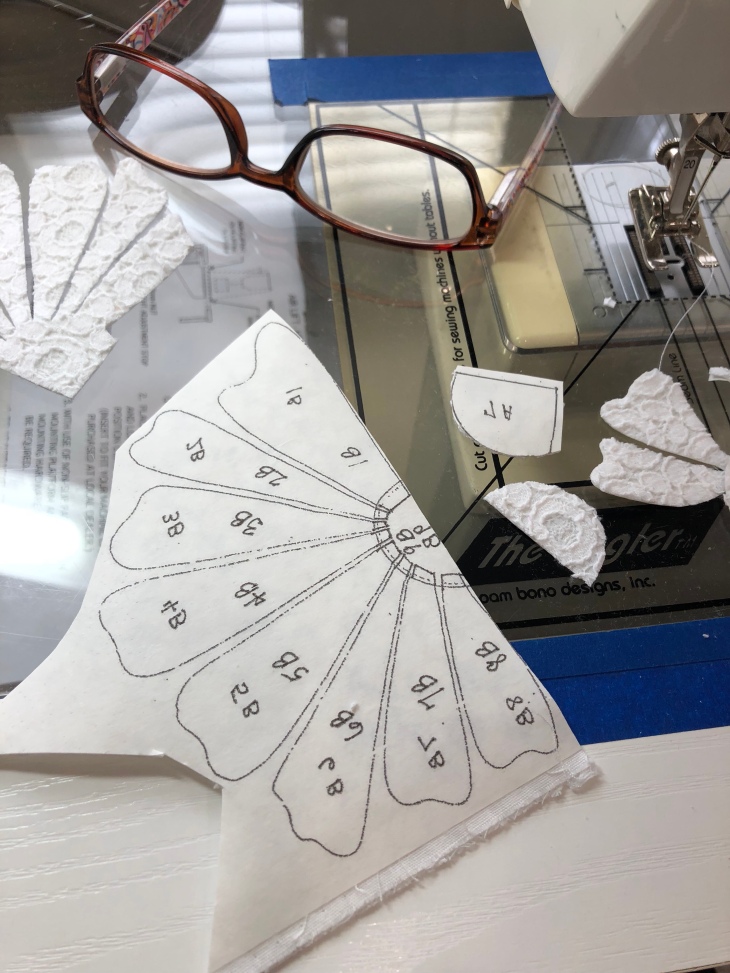
You’ll note that I don’t have to cut out each flower petal separately, I can leave them attached at the very bottom. This helps tremendously when it’s time to lay them out on the purple fabric.

Peel away the Heat ‘n Bond Lite paper backing and position the flowers and butterfly on the fabric. Once I was happy with the placement I ironed/pressed the eyelet applique motifs into permanent position and began to raw edge machine applique using Glide white thread in my needle. I’m using my Bernina 1630 and my applique stitch is set at default.

If you look closely you can see that the design/patterns of the eyelet fabric flow nicely when the petals are cut as one unit rather than separately.


Why am I using a design board with a chartruse fabric? Well, it was handy. Don’t worry, this green will not make its way into the final project.
So what would I use for sashings? I auditioned this white trim below. I liked the look but found I didn’t have nearly enough.

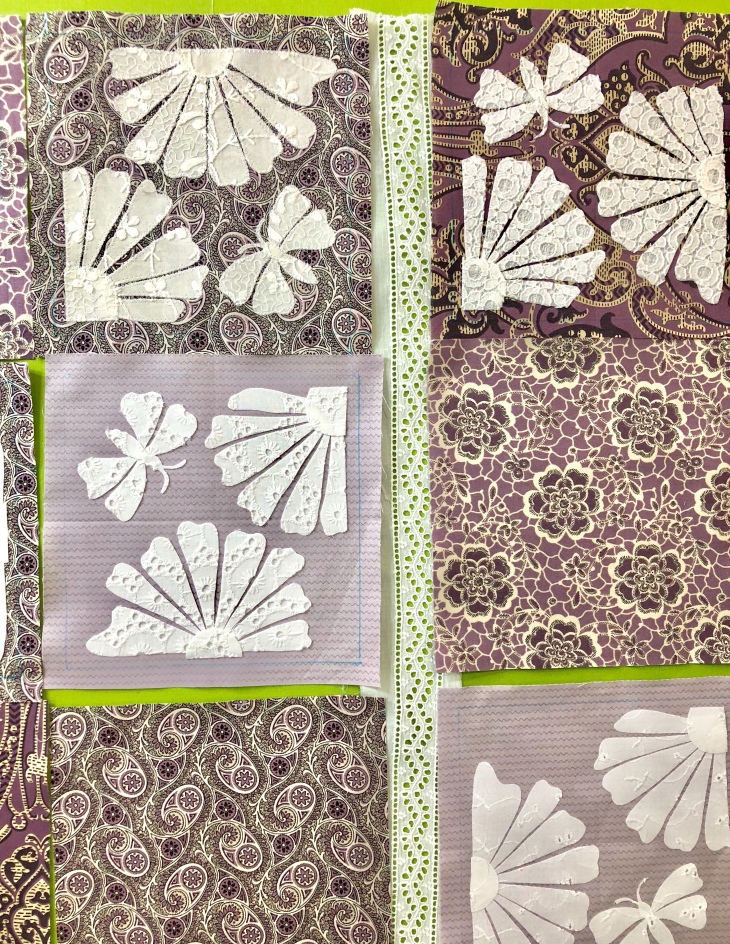
With all my second hand eyelet garments, I found I had plenty of one particular kind and that solved my problem. And yes, it order to have some consistency, I backed all the sashing eyelet pieces with bleached muslin.


You might remember from a past blog or two that I’m a huge fan of Elmer’s White School Glue. Just a tiny dab and a hit with a hot iron works wonders when matching seams is very important! The nice thing about this particular Elmer’s is that is washes out completely. Just remember to buy the white School Glue if you want to give it a try.

You can’t go wrong by paying close attention to how you press your seams. Consistency is key!


I’m strip piecing my sashings and cornerstones:


And sewing my rows together:

But… some of the purple fabric is very ravelly! And from experience I know that stray dark color threads can show through quilt tops! Again, Elmer’s to the rescue.


I draw a fine line along the problematic fabric and then with my index finger, smear the glue along the cut fabric edge.


To dry the smeared glue I lay my teflon pressing sheet on top of the fabric edge and quickly press until dry.


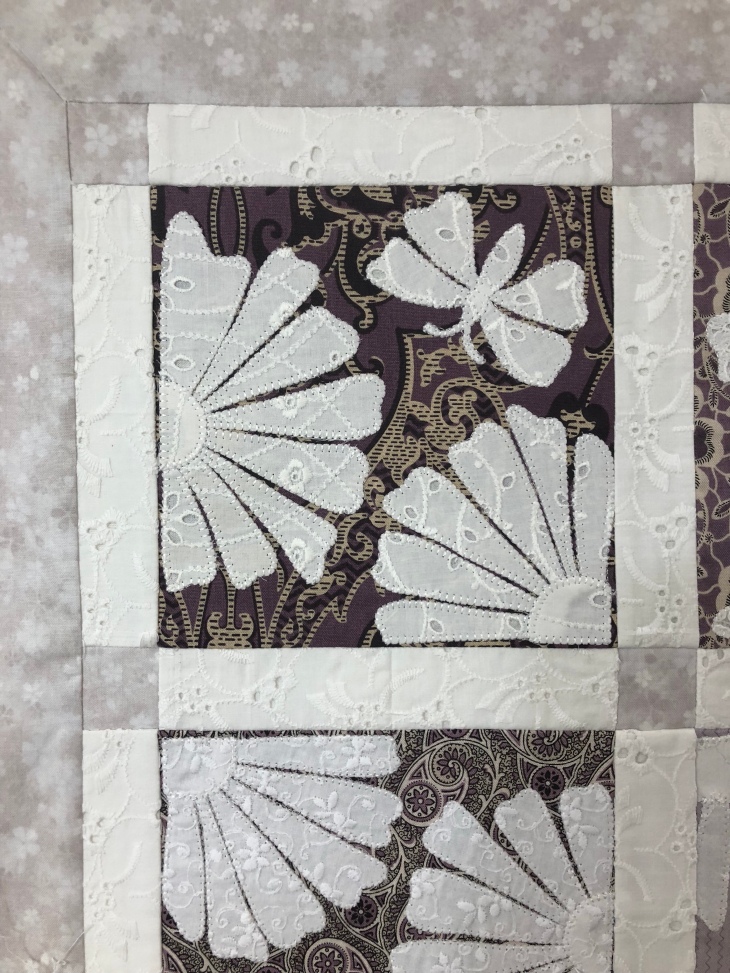
Some close up shots of the finished quilt top:


The back:

And finally the front! This quilt top measures 37×44″. The sashings are 1″ finished and the borders will measure 4″ when complete.
All of the block background fabrics are Downton Abbey. The cornerstone and border fabric is something found at Hobby Lobby.

I’m looking forward to the time when I can load this on my longarm and get it quilted. Of course I’m sure it will be full of quilted feathers 🙂
As a wrap up, you’ll find:
A Laura Heine quilt pattern, Andover Fabric, the Downton Abbey line, second hand eyelet garments and bedding, Hobby Lobby fabric, Heat ‘n Bond Lite and Glide thread in this project!
Hope you’ve enjoyed this blog post! Let me know if you have questions and of course, Happy quilting!
Rhonda
And… I just found out last evening that this quilt took a ribbon at the MQX Springfield! I’ll find out where it placed later this evening!!


Great ideas & beautiful. What’s the name of the spray glue? Thanks!
LikeLiked by 1 person
While a bit difficult to see in the picture, the name of this product is Sprayway. Thanks!
LikeLike
I have made that pattern 5 times in so many different ways, but never like that. It is beautiful. Thanks you for sharing. Megan
LikeLiked by 1 person
Thanks! It was so much fun to make!!
LikeLike
OMG that is beautiful…. Not a quilt in a day though! Just WOW, amazing.
LikeLiked by 1 person
I love this quilt! I am always looking around the thrift store for fabric and this gave me another idea. The glue truck is completely genius! I will be trying it on my next quilt! 💖
LikeLiked by 1 person
Rhonda,
Reminding you I am not a quilter, but an admirer of quilts. I stand amazed looking at all of the work that goes into these quilts. And also amazed at the beautiful idea to use several different pieces of old eyelet . How beautifully it works on this quilt.
Love and blessings to you,
Jane Alexander
LikeLiked by 1 person
Thank you Jane!
LikeLike
I’m back to clarify my question. I understand the ravelly concept but I don’t understand how glue helps match seams perfectly. Can you expand on that idea?
Thanks again.
LikeLike
Hi Rhonda,
Congrats on your success at the MQX Springfield Show. I would have loved to see it up close and personal.
You use white glue on your quilt seams but I’m not understanding what exactly you’re doing with it. Is there an earlier post that goes into detail? I’d love to learn more.
TIA – Carol
LikeLiked by 1 person
The Elmer’s white school glue is excellent to use instead of trying to pin tight corners, matching up seams, holding things in place, etc. It also works well to tame ravelly fabric edges. Sometimes no matter how well I think I have pinned, I still get a small shift in my quilt blocks. If I put a little spot of glue, match up my seams perfectly and then lightly press, the glue holds remarkably well for me.
LikeLike
This is an excellent web site that describes some of the many ways quilting and glue work together:
https://www.craftsy.com/quilting/article/how-to-use-glue-in-quilting/
LikeLike
Wow. I learned so much again. From the reducing a pattern in size to printing from your printer. I never thought of that. I like the idea of keeping the end together to have it lay out better. Congratulations on your winning an award again. That is fabulous. Thank you for sharing of your talent again.
LikeLiked by 1 person
Thank you!!
LikeLike
Thank you so much for your posts! I love your work, very beautiful and inspiring. I get excited when I see a new project you have done and can’t wait to sit back and read all about it!
LikeLiked by 1 person
Thank you so much for this great lesson. I really love your creativity!!! Best regards from Andorra: Fina
LikeLiked by 1 person
Thank you!
LikeLike
Had to look up Andorra on the map! I’d heard of it but couldn’t recall where it is located! We are worlds apart yet with the internet we are so close!
LikeLike
Thank you so much for sharing, Rhonda. Awesome, informative, & inspiring. 🙂
LikeLiked by 1 person
Thank you!!
LikeLiked by 1 person
I love this idea. Well, I love all of your projects! I learn something new every time I read your blog. Gorgeous quilt 💕
g
LikeLiked by 1 person
Thank you sweet friend!!
LikeLike