

Here’s how it all began:

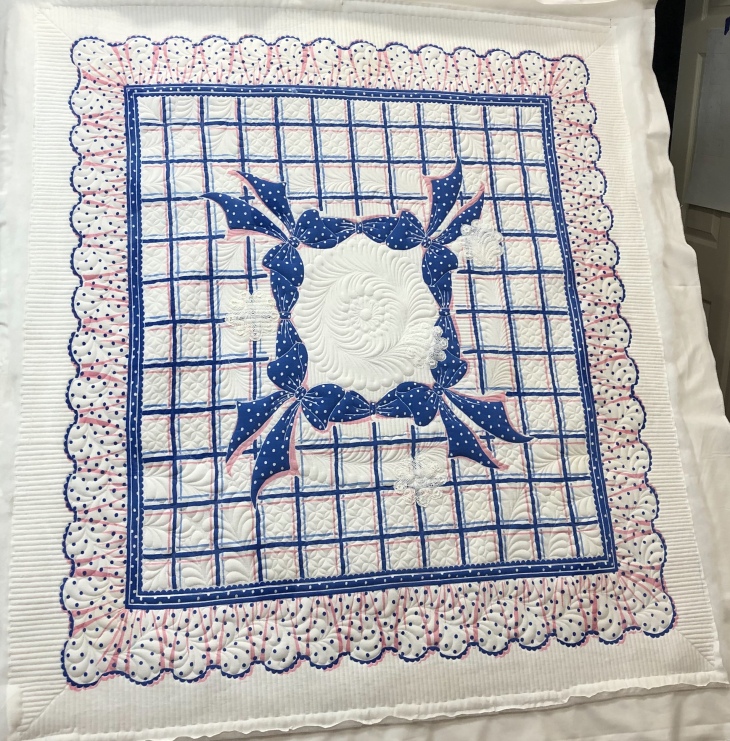
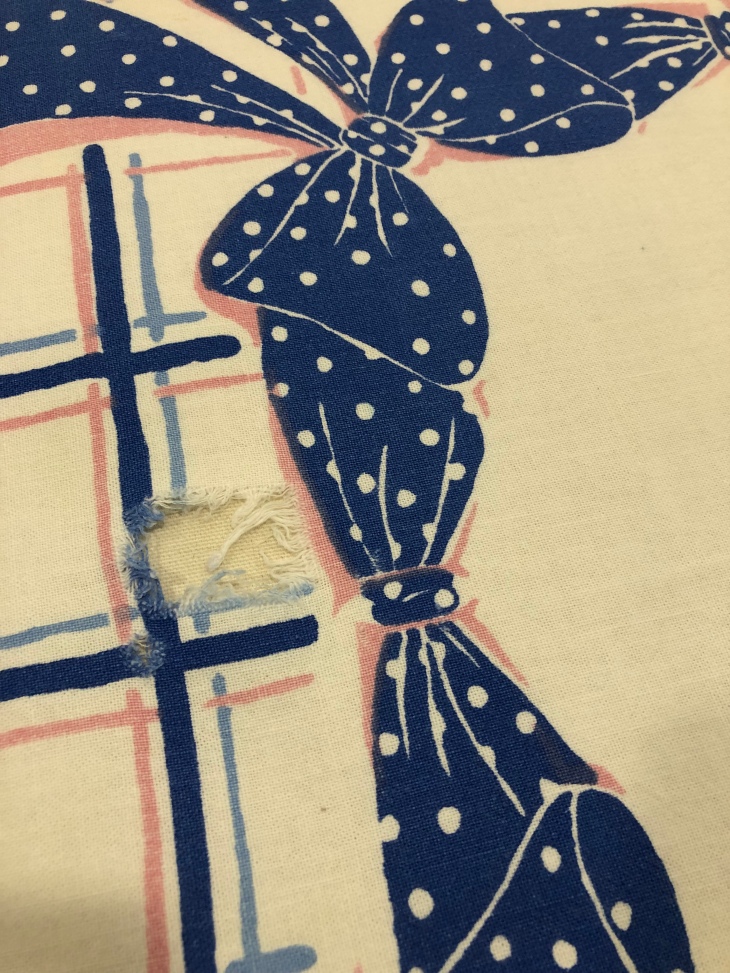
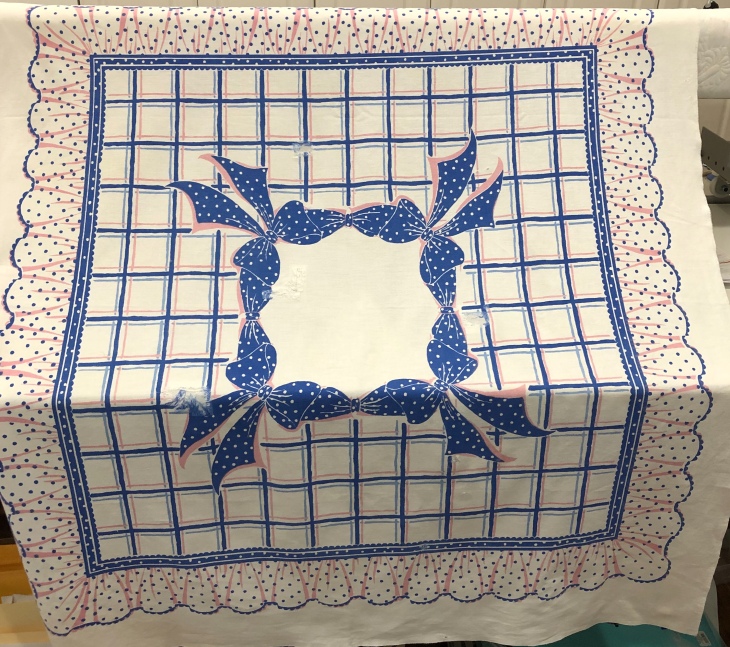
How I came to own this vintage 44×46.5″ luncheon tablecloth is a mystery to me. I’m guessing it was in a box of vintage pieces I bought sight unseen but no matter, I love it, holes and all. But how to save it?


Generally I shy away from mixing fusible products and vintage linens but this time I knew this great product by Heat-n-Bond would be perfect. It’s remarkably light weight so the added bulk to the tablecloth fabric was minimal
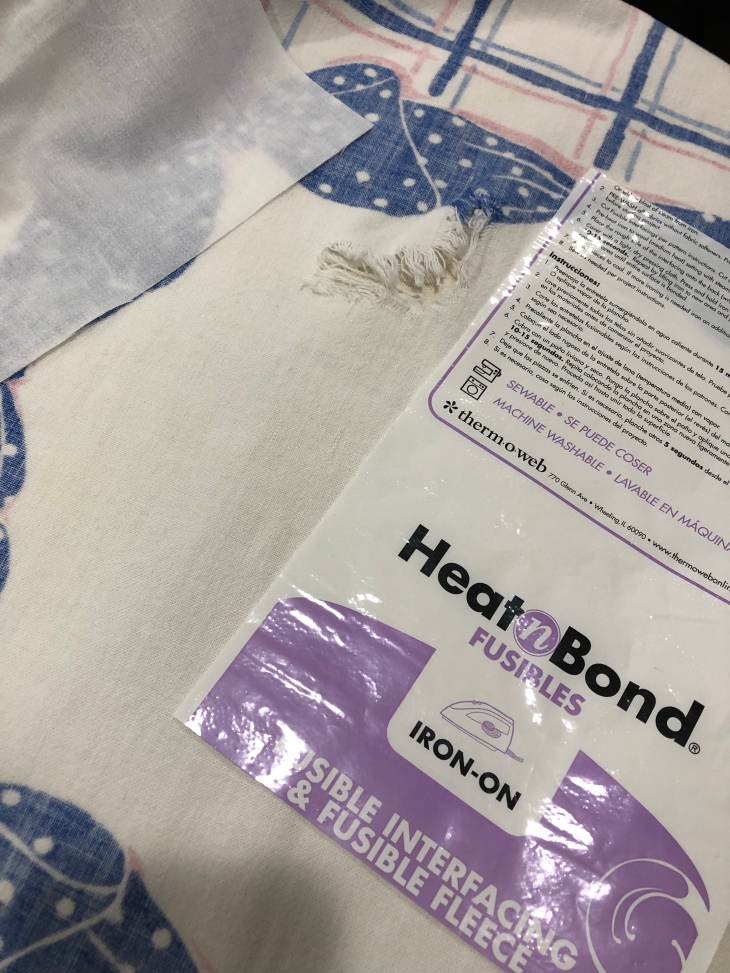

I assessed the size of the damaged area, cut a piece of the fusible about 1/2″ larger and using a Teflon pressing sheet I ironed the patch to the back of the cloth. You’ll notice I did not cut away the frayed edges. The raveled hole edges serve a couple of important functions: 1st, they provide a padding if you will so there’s not a sharp cut edge of where they would have been cut away and 2nd, they provide, in most cases, continuity of color.


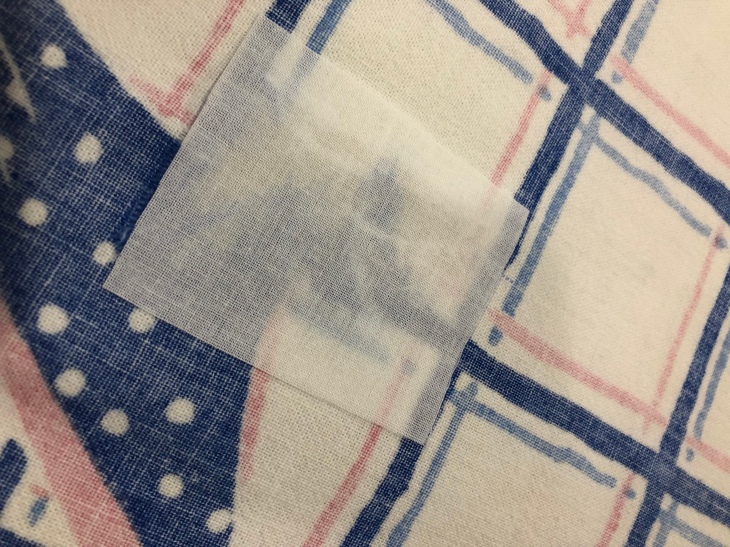

Here’s a picture below of all the holes with the iron on fusible in place.
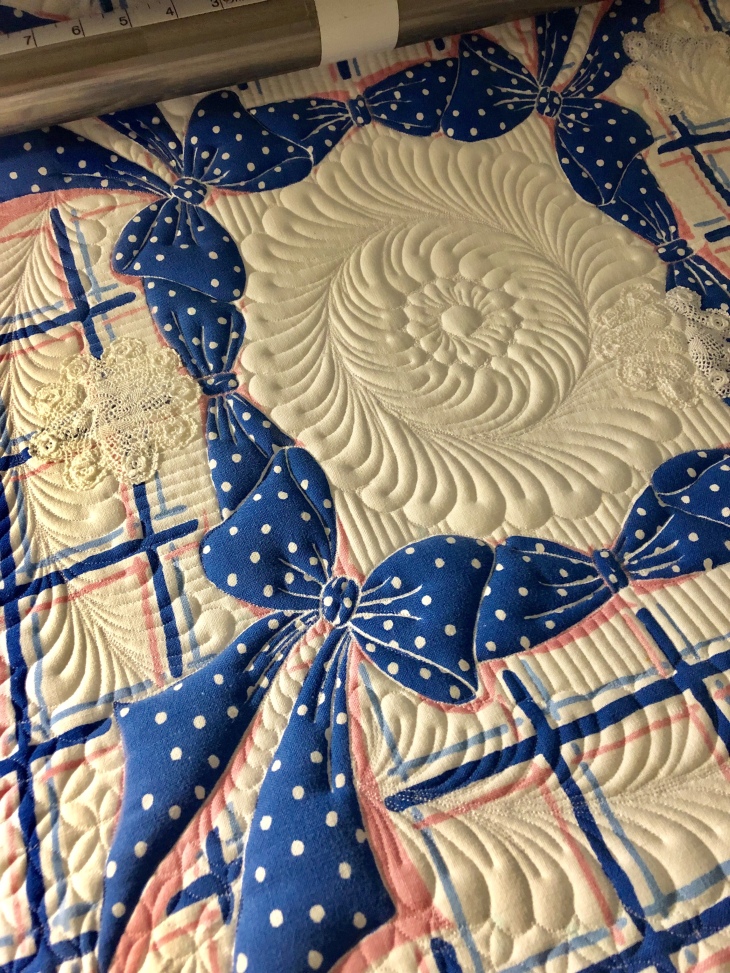
With the holes stabilized it’s time to decide on a general quilting plan and begin marking registration lines. If you’re familiar with my work you already know I believe almost anything looks better with feathers quilted EVERYWHERE!
Where to start: fold your tablecloth in half horizontally. Do your best to match up the printed designs. Adjust your fold if necessary and when you think you can’t get it anymore perfect, lay it carefully on your ironing board and press the fold. You want a firm crease pressed into your cloth.
Now fold your cloth in the opposite direction, again carefully matching the already pressed crease this time and the printed design and press once more. Now there’s no question about the center of your tablecloth and the center of each of the 4 sides. Remember, you MUST do this step before you introduce any sort of marking pen to your fabric! After you’ve begun marking, don’t even consider getting your piece close to an iron, or any other heat source.
The tool I’m using is a modified Dasco Pro Compass. I removed the pencil it came with and taped a blue marking pen in its place. I can’t remember where I purchased this great tool but google the name and you’ll generally find them for less than $12.00. The great thing is that you can also buy a 36 inch 1/2″ wooden dowel and make circles anywhere from tiny to 72″! I love the idea of quilting using hardware items to make our lives easier!

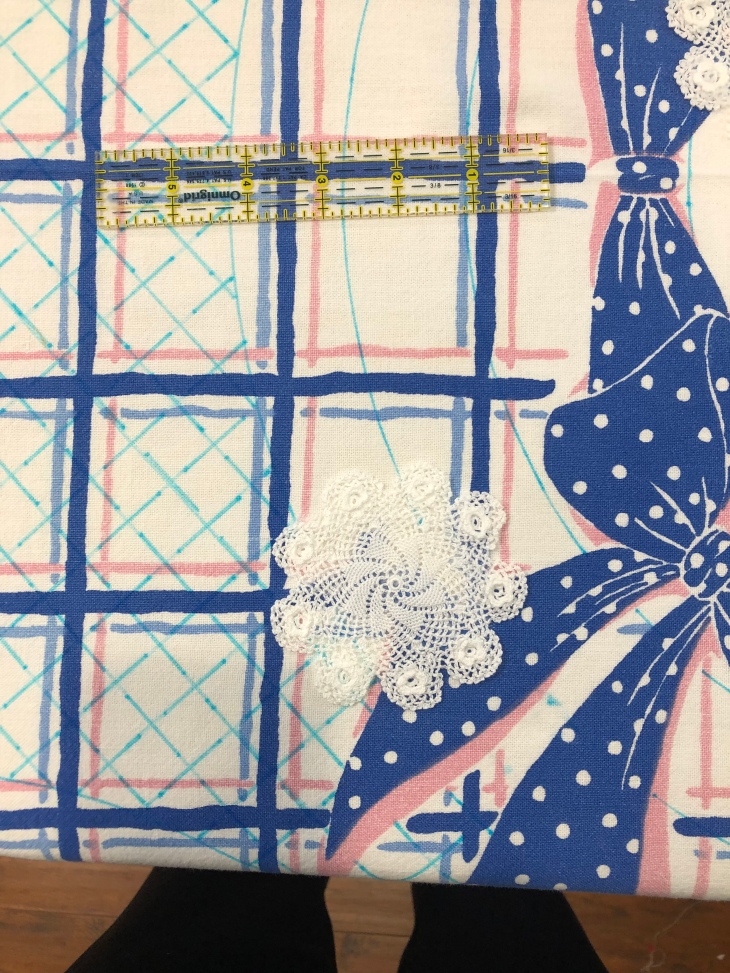
Introducing my idea about covering the holes: small white crocheted doilies. Now do you see why I chose to not cut away the frayed edges? They actually help with the look from the front through the crochet.


So now that I’ve decided on the little crocheted doilies, I’m moving to the printed ruffled border. Again, undulating feathers are a very quick and filling technique. I first mark a solid blue line halfway between the right and left edge of the printed ruffle design. Next, using a clear acrylic longarm template I mark the curves of my intended feather stem.
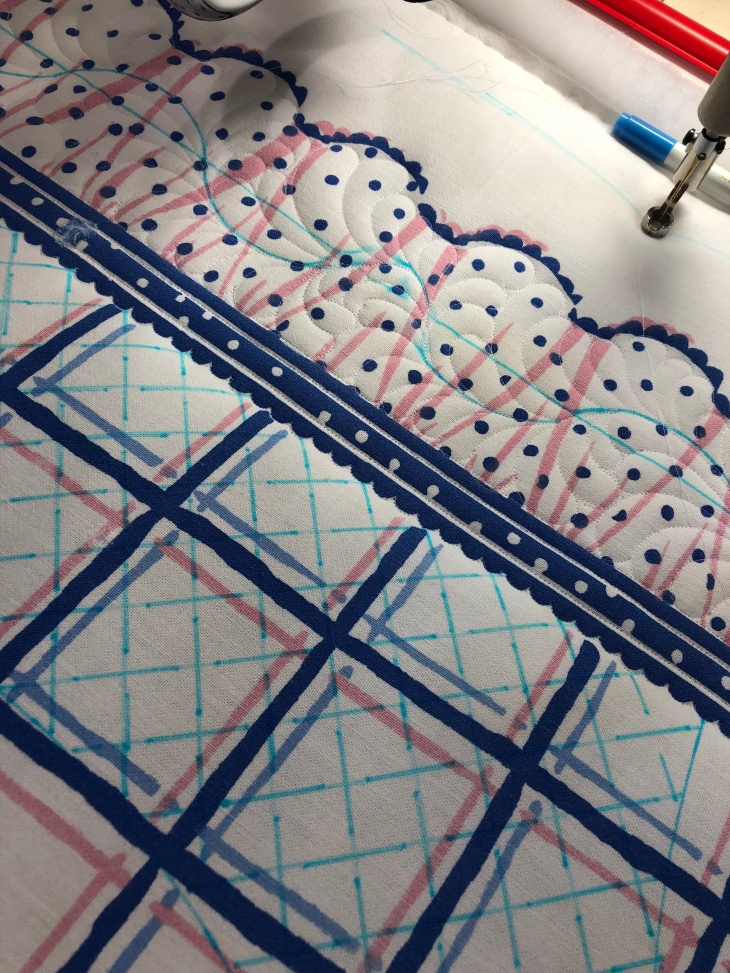
But…how do I know the curves will match with the corners? I don’t. If you begin your border marking by starting at each of the 4 corners and slowly and mark towards that pressed center crease, you’ll find yourself somewhere near the hard pressed center crease. Both the left and the right borders should be marked as mirror images of each other and then the same for the top and bottom borders. As you approach the center pressed crease from each direction, you now have a “make it work” moment.
See the picture below. Can you see where the curve is slightly different at the point where I’ve kind of got a mess with the blue marking pen? The up curve is quite a bit smaller than all the others. Once the feathering is complete and the blue pen is erased I would challenge you to find the aberration. It’s one of those “make it work” moments that give you a great feeling because rather than freak out, you’ve met the challenge.

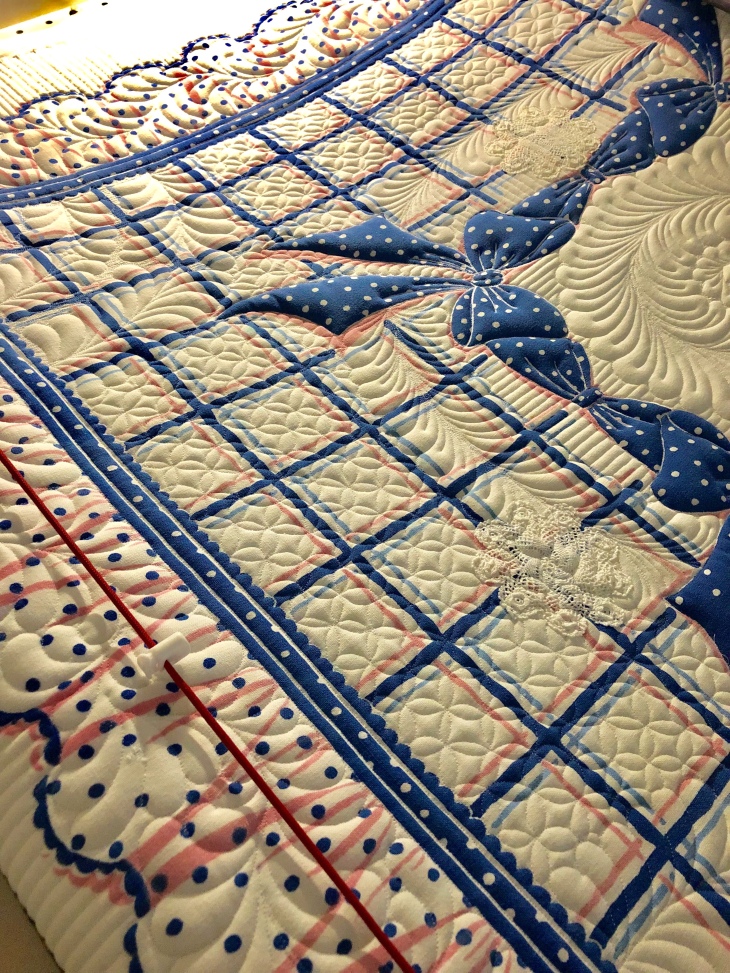
I’ve got a wonderful stencil that marks this nice grid that I will use to quilt the Orange Peel design. And on the 4 corners of the body of the printed design I decided to mark quarter circles to quilt abbreviated feather wreaths.

I did have a bit of a dilemma in deciding whether or not to quilt directly over the crocheted doilies. Because I wanted continuity of design on the back of the quilt, I threw all caution to the wind and quilted as thought the doilies weren’t even there. Yes it caused me to ask a few friends their opinion first, and finally I realized, if it looks bad, just get a seam ripper and take it all out. Whew! No Frog Quilting required.

Back to the doilies. I chose them for a couple of reasons. First, because I had them in my stash, second because they mimicked the center feather wreaths and 3rd because they offered contrast to all the horizontal and vertical lines of the quilt.


Can I just say here that I’m so happy this piece is not bigger! I grew weary of quilting Orange Peel!

Can I also say that it’s taken me 2 times of crazy frustration to finally learn not to use 3/4″ high loft poly batting. Hold me to it, never again! At least this time I knew to start quilting at the top and slowly work my way down the quilt. This 3/4″ high loft creates big problems with fabric puckering. I’ve got a few small pieces of this batt left and Tuesday is trash day. Wednesday I will not have any more in my house. Yes the dimension it creates is fantastic, I’ll just go back to my favored double batting of Hobbs 80/20 topped with their Tuscany PolyDown.


So what’s that red cord running right to left on my longarm? It’s a wonderful invention my 2 amazing Innova users, Donna Estes and Cindy Allen. What you can’t see are a bunch of white plastic garment toggles on the red cord. It’s a wonderful way to keep your quilt top centered and straight while quilting. Wonderful!


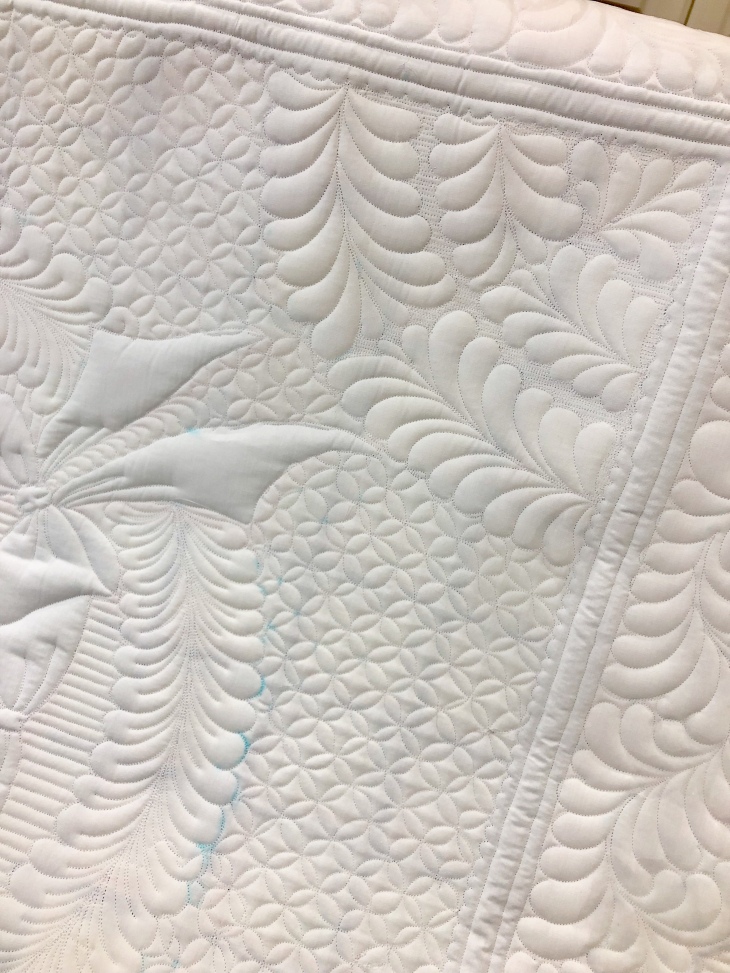
I always love to study the back of a quilt, this one’s no exception. This piece was finished with 8.75 hours of longarm quilting.
Here are the particulars: the top is a damaged vintage luncheon cloth measuring 44×46.5″. The (dreaded) batting is 3/4″ high loft poly, the back is white Moda Classic Muslin.
The thread, both needle and bobbin is from Wonderfil Specialty Threads, Deco Bob (weight 80) color 104.
My machine in a 26″ Innova with Lightening Stitch. All the work is hand guided free motion.
And thank you to Betty for her comments/question about the marking pen, I forgot to mention I use 2 different pens. First I mostly use an EZ International water erasable pen but sometimes when the blue is not dark enough I use a Leonis air/water erasable.


And again, the front. I will trim to size tomorrow but before I do, I found an area I forgot to quilt! I’ll load it back on the longarm, do the 10 to 15 minutes of stitching. After trimming I will serge the 4 edges, fold it up and soak it in room temp tap water for at least a few hours. I used so much blue pen that the crazy batt seems to soak it up and re-deposit it elsewhere… after a good soak, I’ll spin the water out in my front load washing machine and block the wet quilt on my design wall laid out on my dining room table. The binding will be from a vintage solid blue fabric I have in my stash.
So where will this piece end up? Maybe in your home! I have plans to donate this quilt to the Livingston, Texas quilt guild for their quilt show auction in April. Here’s a link to their web site for additional information: https://lpqgtexas.org/

I just hope there’s someone out there that loves this piece as much as I do!
***update 03/11/19
Remember I said I was going to do the binding in a blue, well I decided against that and used white instead. Can I just say I really love this piece!
It work of mine is being donated to the Livingston (Texas) Piecemakers Quilt Guild, lpqgtexas.org as an Auction Quilt. Contact the guild via the web site in the previous sentence if you have questions. I can tell you the show is April 6&7, 2019.
***update #2: Thank you to LaDonyce Hamilton, owner of the Red Barn Retreat in Coldspring, Texas! She won the auction and took this piece home!

Until later, blessings to everyone and Happy Quilting,
Rhonda


This is amazing to be able to read how this beautiful piece came to life. Thank you so much for your donation to the Livingston Piecemakers Quilt Guild!
LikeLiked by 1 person
I would have thought the table cloth was not going to be able to be used. But according to you anything can be salvaged. So smart to not cut off the frayed ends and to put little doilies on top. Seriously you explain things so well and have so many pictures that it makes doing things easier. I just have to tell you this. Because of you I wanted to have my own little sewing area. I bought a pretty desk (the pressed wood kind) but a cherry color. I love it. I had a feeling that when it came the top might be cracked as some people reported theirs were. Well mine was. It is strange to be excited about that but there is more to the story. This was not cracked through to the top so only the bottom no one sees was. They sent me a replacement for free. I saved it and put it out there in my heart that I needed something to put it on after glueing some wood to the bottom so it would not split. I was looking on a selling site on facebook here in town and someone was GIVING away some office items. I saw 2 short metal filing desk drawers and grabbed them quick. I am putting the refurbished desk top on top of these desks with one on each end. I have my long sewing table with drawers to put my sewing supplies in pretty much for free (well for the price of a piece of wood no one will see). You taught me to see how things can be reused and to be excited to sew again. Thank you Rhonda. I will post a picture when it gets set up. I have a larger bedroom I am putting this in.
LikeLiked by 1 person
It sounds like you’re creating a nice sewing/quilting area for yourself! Great find on the filing desk drawers!! Be sure to post a picture when you get your new area all set up! Hope it’s a great day!!
LikeLike
Rhonda, Wonderful job on your rescue tablecloth. Thanks for all the details in your blog too. Loved reading every bit. So I thought I’d send you this “hello from a land down under” and taa for the hints on how to save something worth a second life!! Truly stunning work.
LikeLiked by 1 person
Thank you for your kind words!! I’ll say hello to you from the other side of the equator! 😃
LikeLike
WoW!!!! This is genius! What a great idea & such beautiful work. I’m so inspired to do something with a couple of vintage table cloths I have from my grandmother. So many ideas, so little time. Thank you for sharing.
LikeLiked by 1 person
Thank you for your kind words!!
LikeLike
This was awesome. I just found an old tablecloth that had been embroidered by my husband’s grandmother. It has some stains and one hole. You have just inspired me to fix it. Thank you so much!
LikeLiked by 1 person
Keep me posted as to your progress!! 🙂
LikeLike
Others would have cut out the frayed edges. No, no! You did right! Absolutely stunning, as is all your work. You are blessed with talent!
LikeLiked by 1 person
Oh thank you for your supportive and kind words!
LikeLike
Beautiful! As always, you amaze me! You have probably said before, but what brand marking pen do you prefer? I’m always afraid it won’t wash out! I sometimes use the Frixion pens that iron off, but I’ve heard horror stories about them too. Thanks again for sharing your work in such detail!
LikeLiked by 1 person
Oh that’s a good point, I’m going to go back and amend my post to say that I use EZ International blue water erasable marking pens! Thanks for your kind words!
LikeLike
I almost can’t believe that you saved this, but of course I know you did, and in grand style! Really beautiful quilting brought it back to life. Phenomenal work Rhonda!!!
LikeLiked by 1 person
Thank you sweet friend!! I’m thrilled about how everything worked out!!
LikeLike
Amazing. Thank you for the process post.
LikeLiked by 1 person
Thank you!! Hope it helps as we run across really nice yet damaged pieces!
LikeLike
You turned a pretty vintage table cover into a truly lovely piece!
LikeLiked by 1 person
Thank you!
LikeLike
Amazing work and added information to fix the table cloth. Bring new into something old.
LikeLiked by 1 person
Thank you!
LikeLike