

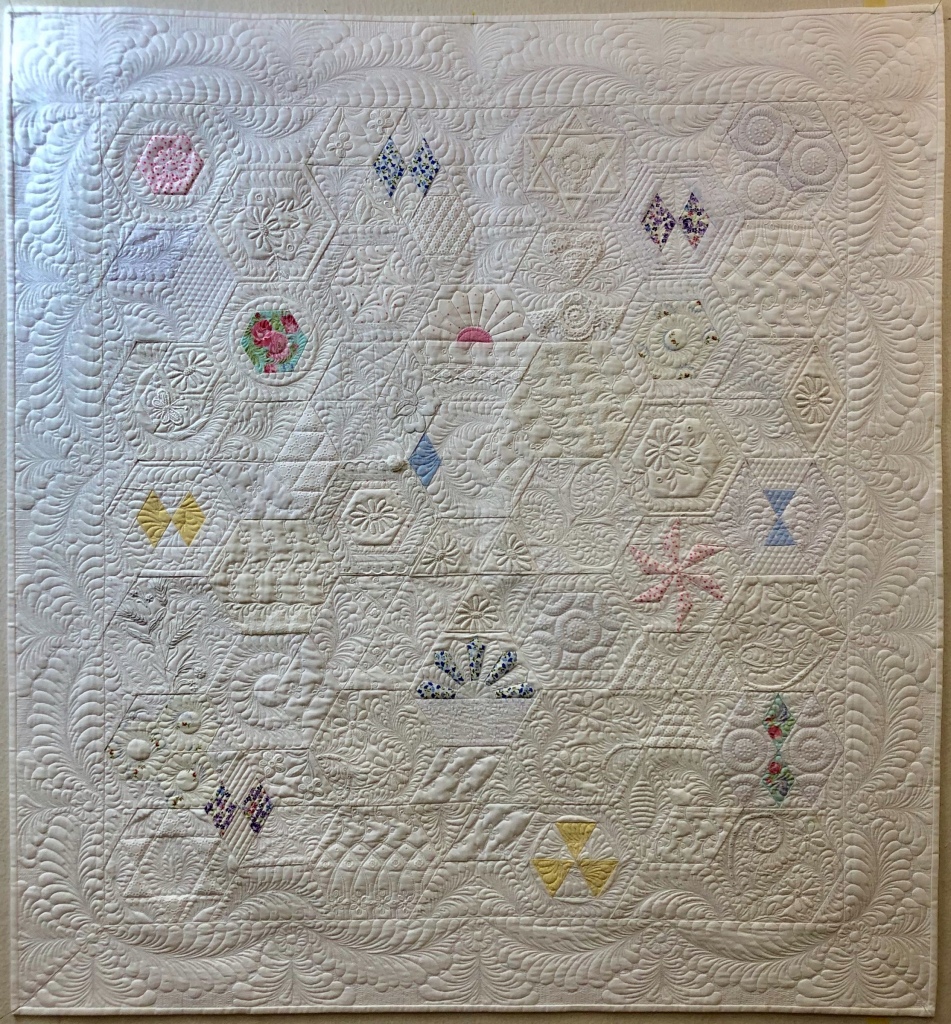
A wonderful experiment using whites, very pale ivories and new quilting fabrics for little pops of color.

This whole hexagon block began life as a guest hand towel. For this project I decided ahead of time to use an under layer of medium weight bleached muslin. Muslin that was laundered twice in hot water and dried in the dryer.
The thing to keep in mind about vintage linens is that they have most likely been used as utility pieces and would therefore have been laundered many times and because of this they are probably not going to shrink.
Each side of the hexagon, when a 1/4” seam allowance has been taken, will measure 3” EACH SIDE.

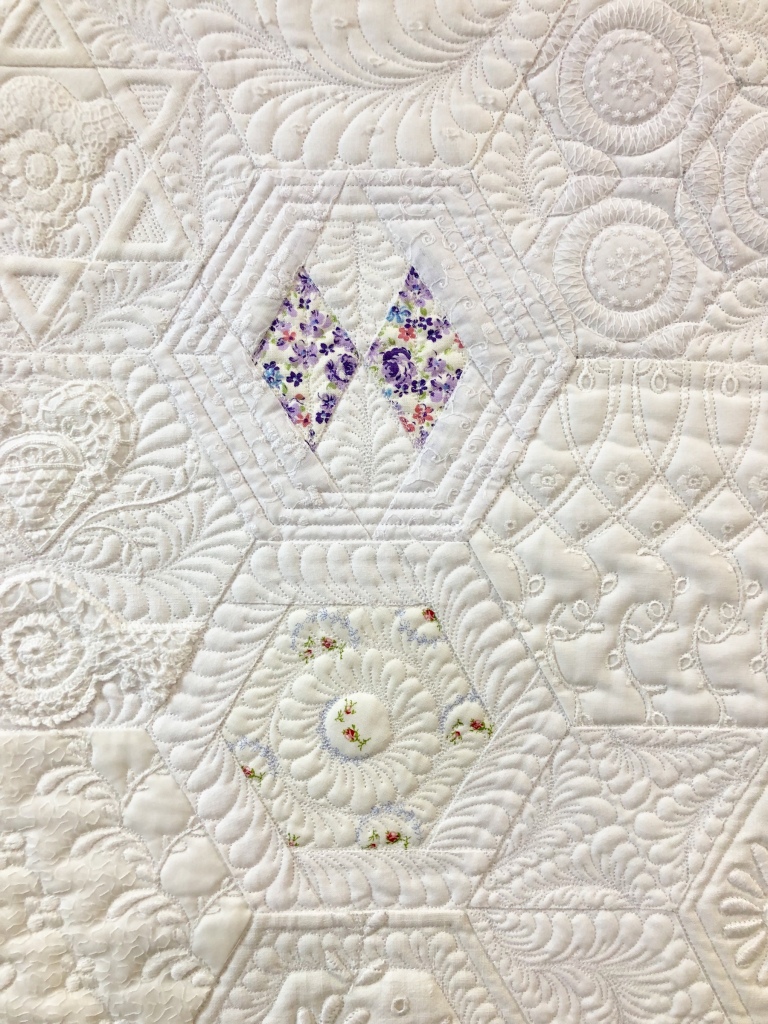
The nice thing about experimenting is knowing you can and most likely will make changes. See the top left hexagon? I was not happy with the diamond with the green, it was an easy revision.

As the block count grew so did the rearranging.

I think one of the hardest things was to not put a pop of quilting fabric in each of the hexagons. I’m using a small design board, it is propped up in a chair, the jug is holding the board in place. But see the hexagon right above the jug? The one that looks like an upside down radioactive symbol? That one made me chuckle every time I looked at it…


The entire quilt top is machine pieces. One of the things I LOVE about the Marti Michell templates is they allow you to easily and accurately mark the quarter inch seam allowance points! I can’t imagine piecing this quilt without these markings! Click on this link to take you to her web site: https://frommarti.com/collections/template-sets/products/template-set-h-large-hexagons


Yes! Consider this a shameless plug! I love every template and template set Marti Michell sells. In set “H” you get 3 templates that will allow you to accurately cut and mark 11 different shapes. Genius!

After sewing three hexagons together, the pressing direction allows you to splay open the seam allowances. I hate having a huge and cumbersome lump to quilt over and this pressing method solves that.

All of the full, half and quarter hexagons have been sewn together, I’m happy with the arrangement so my next step is to decide on a border.

Way back when I was making this quilt (July 2018) I was in my “put scallop swags in every quilt border”phase. For a change I decided to leave this border empty and quilt a “to be determined later” design.

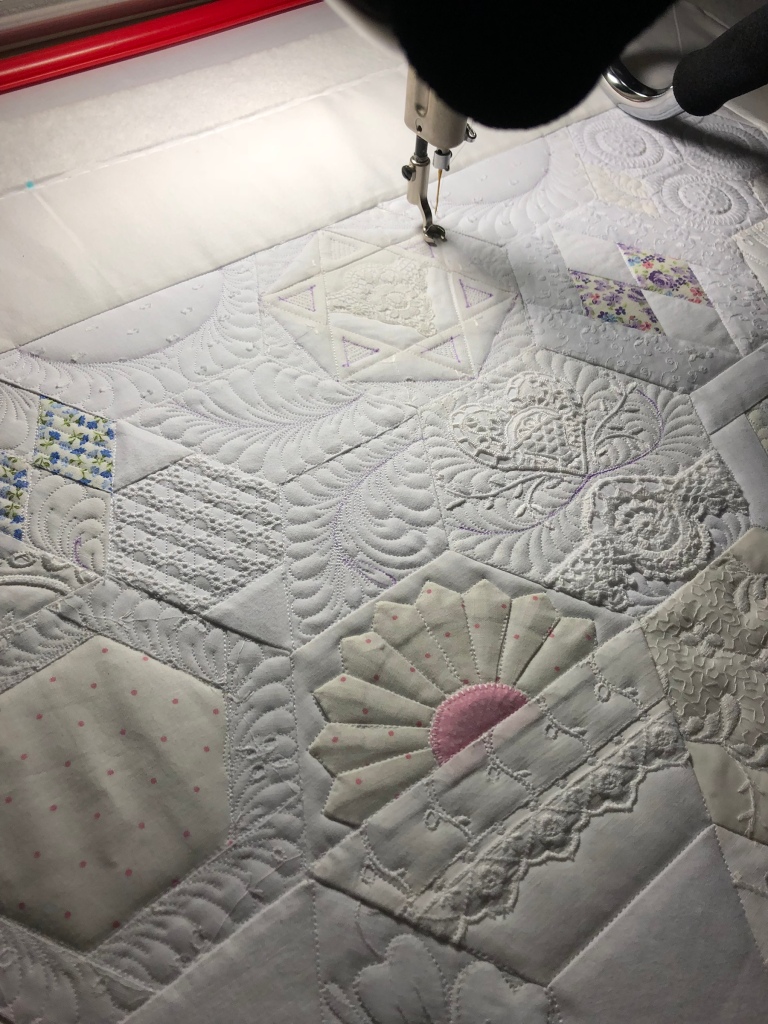
Scroll up 2 images and note how many seams there are in this relatively small (42×45”) quilt top. You can see that to stitch in the ditch (SID) I had quite the task ahead of me. Why do I SID? It serves several functions, it keeps all the blocks (hexagons) true to their shape, it secures the overall quilt sandwich for later intense custom quilting and it allows me to “work” with each block on the longarm prior to deciding how each will be quilted. SID is a very important step, take the time do do it right, you’ll never be sorry.
The next group of pictures will take you through many of the areas of the quilt:


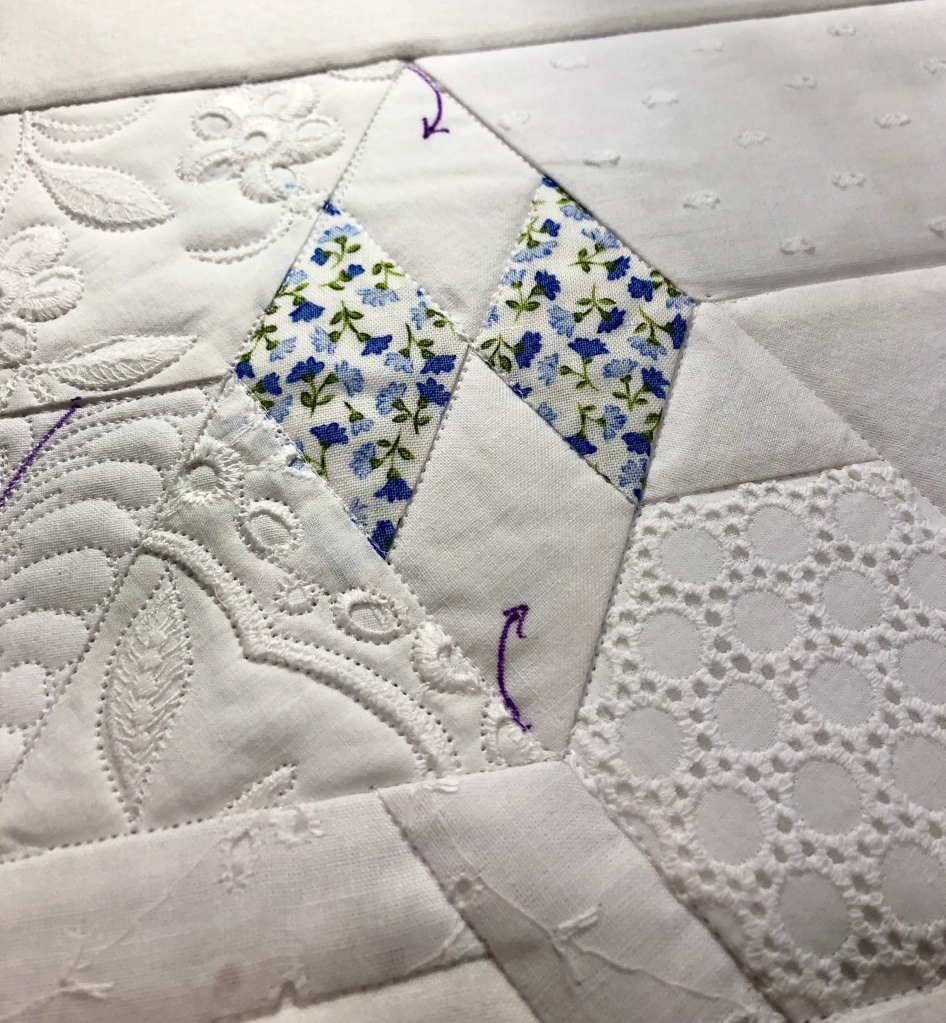
When I’m doing the quilting I have developed a symbol system. The two curved arrows in this picture above tell me I want a single curved stem of feathers as well as the direction they will be quilted. I’m using a very nice air/water erasable marking pen by Leonis.

Just another example of different ways I mark for quilting.


When deciding on how to do the hand guided custom work, sometimes I follow the design in the fabric and other times I add the designs with my quilting work.

Remember the plain white border? Remember how I said I was going to leave my swag phase behind? I changed my mind for a couple of reasons. When I quilt I like to have in mind the idea of mixing straight lines with curved lines. I think of it as Hard and Soft quilting The hexagons and all their pieces are certainly straight lines; the Hard, and swags are the Soft.
I also knew that in order to keep a sense of quilting balance I would need to heavily quilt the borders. The body of the quilt needs to be in sync with the borders.
Bring on the intense border quilting:

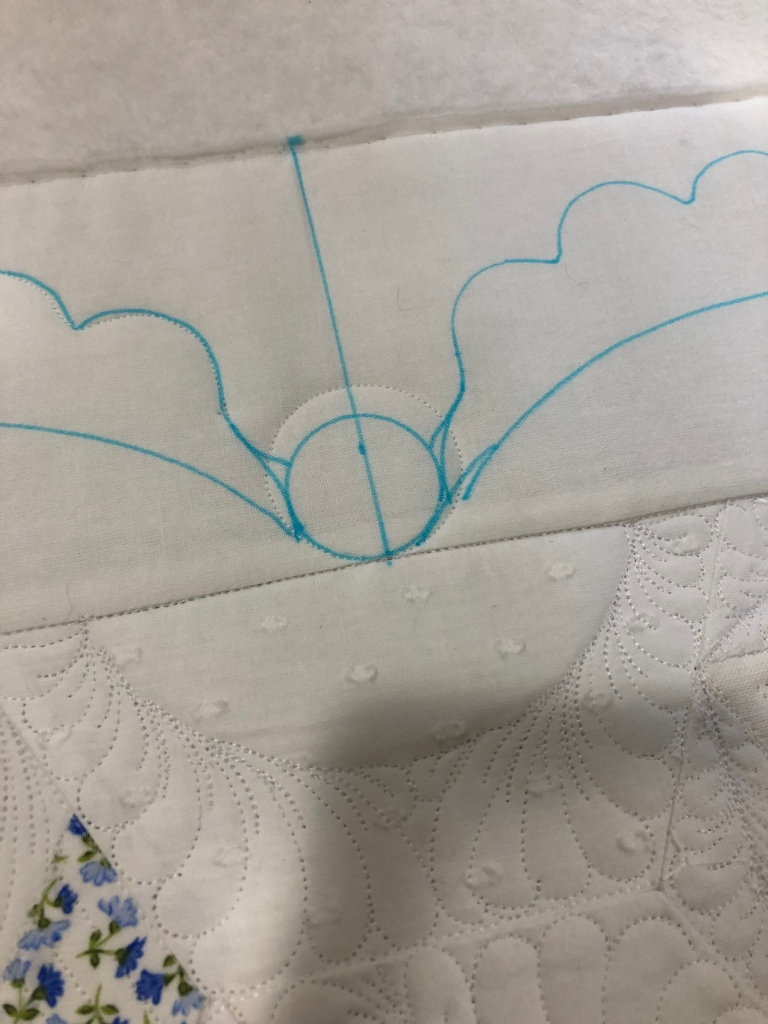
I’ve changed to a blue water erasable marking pen. Why? Honestly probably because it was at hand. I like the blue and the purple making pens equally.

Again, you can see I’ve used marked symbols to direct me as I’m quilting. I snapped this picture to show you that sometimes I forget to follow my symbols. The red outline shows you where I was in a “quilting daze” and forgot to stop mid way in the swag. Do you know it takes at least 8 or 9 times as long to pick out quilting as it does to actually quilt!

Fixed!

I was especially pleased at how the quilted swags fit so nicely at the corners. And notice how much more depth the little feathers have after I quilted in a vein in each one.

After each of the border swags were finished I still had quite a bit of negative space to fill.
The tiny little match stick quilted lines give the border negative space a great look as well as add dimension to the feathers.

It looks very dark in between the feathers because I’ve used a water pen to dissolve the blue and purple marking pens.


And again, a picture of the finished quilt:

Such a joy to create! Never be afraid to mix white with ivory, especially when working with vintage pieces, they compliment each other so nicely.
What are the particulars? Needle thread: Wonderfil Specialty Threads Deco Bob #104. The bobbin; Güttermann Skala 240 #111. The back fabric is 100% cotton bleached muslin, the batting is a single layer of Hobbs white 80/20. I quilt on a 26” Innova. All my work is either free hand or ruler, I do not have a self guided computerized machine.
The actual quilting time was 24 hours. Speaking of quilting time, do you keep a journal? Invaluable!!

I hope you’ve enjoyed my trip down memory lane as I’ve uploaded and talked about the pictures of this quilt! Blessings to all!
Rhonda

I’m new to this type of quilting and all I can say is:
WOW !!! Beautiful, intricate, worth all the work.
Thank you & Blessings to you as well.
Virginia
LikeLiked by 1 person
Absolutely Beautiful. Thanks for sharing!
LikeLiked by 1 person
🙂❤️🙂
LikeLike
As always, this quilt is lovely. Thanks for sharing!
LikeLiked by 1 person
🙂❤️🙂
LikeLike
Beautiful. Love all of your hexes, And I’m so enjoying your FB linen quilt classes. What a fun group you have pulled together to learn from a master.
LikeLiked by 1 person
Thank you!
LikeLike
THANK YOU!! Sent from my Galaxy
LikeLiked by 1 person
Hello sweet friend! ❤️🙂❤️
LikeLike
Lovely, simply lovely…..I wish I had the time, someday!
LikeLiked by 1 person
Thank you! ❤️🙂❤️
LikeLike
I love your hexies so much and have for many years!
LikeLiked by 1 person
Thank you!! 🙂❤️🙂
LikeLike
Dear Rhonda, Thankyou so much for these emails. I love the depth of info you include. I am a beginner/intermediate quilter and I prefer more rustic design but I have saved the linens and crochet from my mother and grandparents. Your teaching is showing me how to pull them together. I intend to make wall hangings to preserve them for family. Today’s generation doesn’t do work like this, at least my girls don’t, so it’s so important to keep what has gone before. Once again, thank you, and God bless you. Dawn Enright Hamilton, NZ.
LikeLiked by 1 person
Thank you for your kind words! ❤️🙂❤️
LikeLike
So pretty! I’m wondering how you finish off all the ending threads. You must have thousands of stop and starts. (I’m sure I’m showing my ignorance of the topic here.)
LikeLiked by 1 person
Oh yes, many many stops and starts. Because this is a Show or a Display piece not intended to be laundered like a utility piece might be I backtrack quilted all my stops and starts. The thread I chose is wonderful for this method!
LikeLike
Beautiful, beautiful quilt. You are an amazing quilter, Rhonda.
LikeLiked by 1 person
Thank you!
LikeLike
Another spectacular piece of art. Beautiful from start to finish.
LikeLiked by 1 person
Aaawww!! Thank you! 🙂❤️🙂
LikeLike
Amazing!
LikeLiked by 1 person
🙂❤️🙂
LikeLike
Another stunning piece of work!
LikeLiked by 1 person
Thank you! ❤️🙂❤️
LikeLike