


So now that you’ve collected your vintage pieces it’s time to get them clean and ready to use. My advice is to never use a piece in a project that has not been laundered in some fashion. The last thing you want to happen is for something to fade, deteriorate, bleed, etc. in your fabulous finished project. My goal is always to get newly found pieces into some sort of soak the same day I bring them into my home. This goes for delivered pieces also; things I might have purchased on any of the online sale/auction web sites. After opening the packages the vintage pieces go straight into a soaking tub.
On a go forward basis we will be talking about fabrics that are either 100% cotton or linen. Blends and/or manufactured fibers present their own set of issues. You will need to do your own research on how to deal with cleaning things such as velvets, silks, rayon, acetates, polyester blends, etc. Rayon is a natural fiber so why is it listed here? Rayon has trouble holding fast to dyes and as such it has a tendency to fade and/or bleed on surrounding fibers. And silk…cleaning soiled/stained silk just scares me.
The supplies I have on hand include things such as:
White plastic dish pans
Clear plastic bins that will hold at minimum 4 gallons of water before item to be soaked is added
A dedicated large plastic/silicone white spatula used to stir the water
Blue Dawn dishwashing liquid
Automatic Dish Powder
Sodium Perborate (to be detailed later)
Warm to hot tap water
I’m personally not a fan of soaking items in the bathtub. Besides the fact that I find it physically difficult, I cannot get an accurate measurement of the water and therefore end up guessing about how much detergent needs to be added. Also, I find I end up in trouble trying to gently handle a large wet quilt without popping quilting threads. I’ll detail my method of folding quilts for counter top soaking later.

Crochet and Hand-worked Wovens: How ‘’dinge’’ and stains happen to them:
Let’s talk about vintage crochet pieces first: doilies, table runners, lace, even large tablecloths were created by crochet in threads of various weights. Consider how crochet (and for that matter hand knitting) is made. The threads are almost constantly in touch with our hands. Think about what happens when you touch your glasses lens or a window pane with your finger. You leave a mark. Fibers are no different. As the crochet thread is dragged across your hands, part of you stays with that thread. Those hand oils will attract and hold dirt and/or dust in the fibers in our created project.
Be aware that the typical laundering process can actually cause more problems. The thread (fibers) with their multitude of surfaces hold fast to soap, detergents and fabric softeners used in either the washing machine and/or the dryer. Did you know that fabric softeners are generally comprised of water, soap and oils such as olive, corn or tallow? These additional deposits on the fiber can attract more dust, dirt, etc.
Then along comes another laundry helper/villain depending on your point of view: spray starch and/or sizing. It helps us in the short term, but abuses our linens in the long run. In days gone by crafters were even known to stiffen their crochet with a mixture of sugar water thus creating an invariable feast for as I call them: little creatures of the night…silverfish and beetles of every kind causing all sorts of bug damage to the fibers.
Spray starch also penetrates the thread fibers sealing in dirt, dust, and hand oils. Have you ever scorched a piece of fabric you were ironing? More often than not you have not damaged the fibers but rather, you’ve slightly burned the spray starch sitting on top of the threads. Do you also know that most scorch marks can most often be removed with non-diluted hydrogen peroxide?

Dresser scarves, pillow cases, hand towels, tablecloths are all good examples of woven textiles I work with. Those with handwork such as embroidery undergo the same process of excessive handling as they are being created. Hand oils, hand lotions, dust and dirt all find their way into each piece. As if that’s not enough, as these pieces are put to use, other perils are show up!
Think about a dresser scarf. It will sit on furniture polish and dust. Perfumes and nail polishes will be spilled, heavy objects will be sitting on the scarf as well as combs, brushes, coins and jewelry all affect the fibers.
The Science Behind Dinge and Stain Removal
All of these influences have a place in creating the dinge/patina of an old hand created piece. Have you ever held a new piece of muslin next to a vintage piece? Or how about a vintage white pillowcase next to a new one? The older piece, if it has been used will always have a bit of a different look to it because of the utility stresses it’s been exposed to throughout its’ long life. Remember, the products available to us today are nothing like the basic soaps of yesterday. I’ve got my own ideas about both soaking and laundering so let’s get started on what works and does not work for me.
Sorting your items to soak:
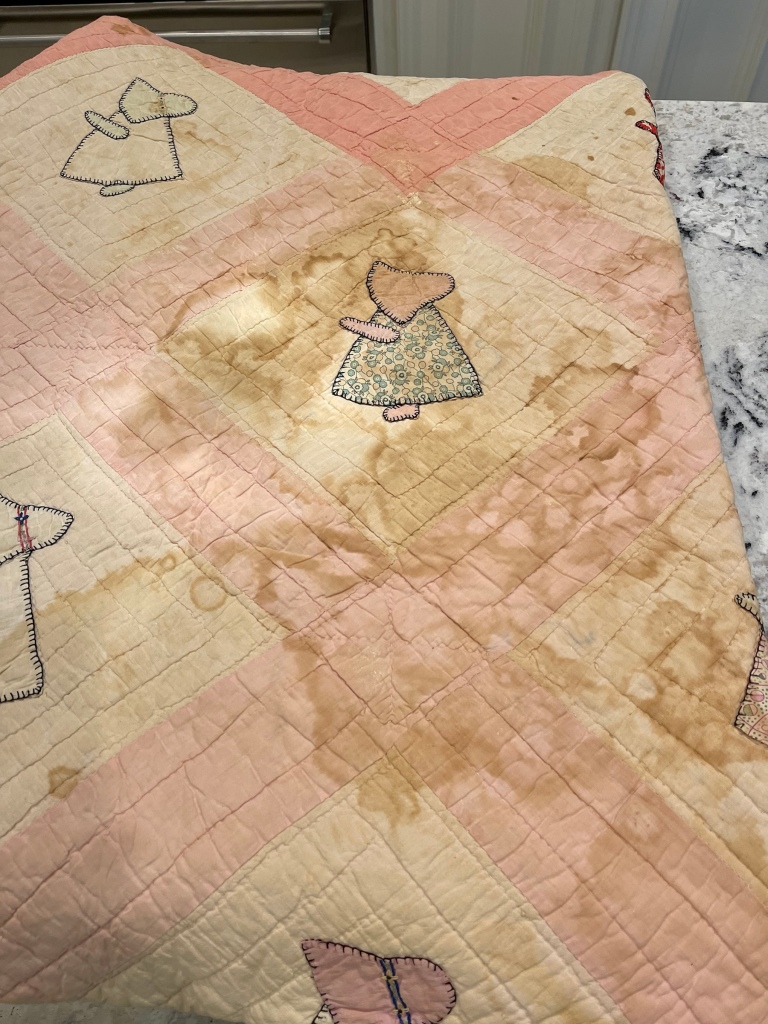
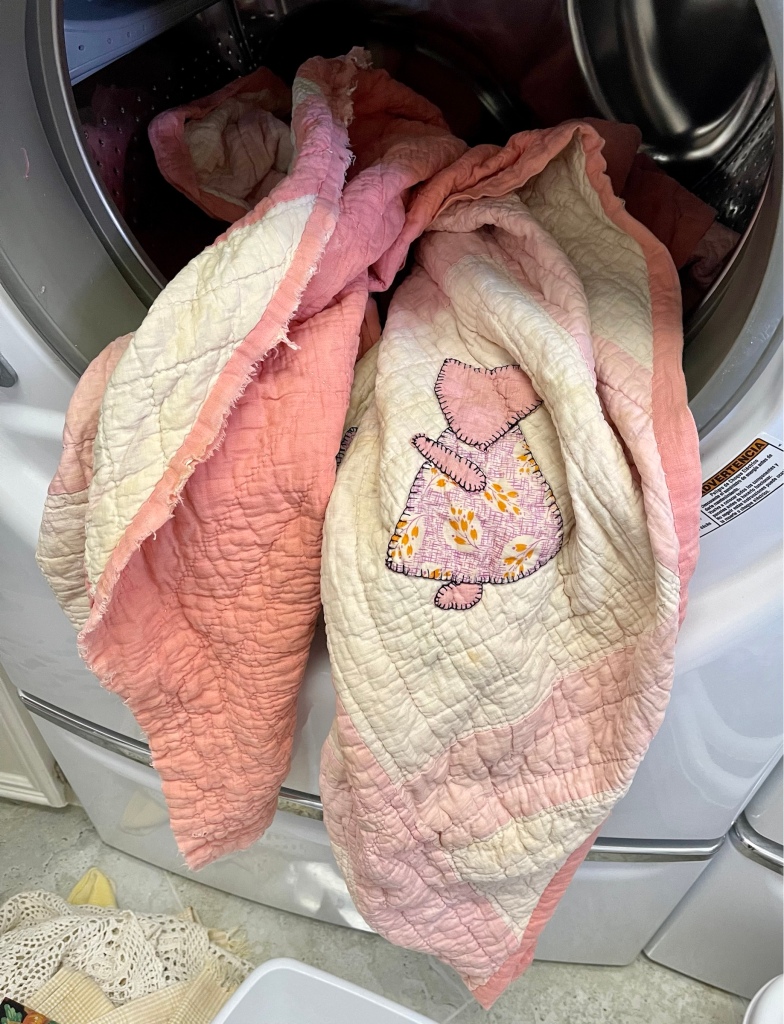
So now that you’re ready with supplies it’s time to sort through your items to be soaked. Let me say right here and now that depending on your item(s) no cleaning method is guaranteed to be 100% successful. You need to acknowledge that with vintage linens things can happen. Let me give you an example: I had an old quilt top purchased online, natural muslin and pink cotton fabrics. When delivered I was shocked at how grungy dirty the top was. I immediately soaked it in warm tap water with automatic dish powder. Within a matter of minutes, the soak water turned a horrible pink/mustard/brown. End results: the top, while very clean was now entirely various shades of pink. Not completely ruined, but not what I expected as the outcome. I just want you to understand that “things” can happen.
Sort your items into groups separated by those with any black or grey embroidery floss and those without. Black and grey flosses have a tendency to release some of their dies onto any fabrics coming into direct contact with them. We’ll talk about how to soak these items in a bit. Next, sort through and group solid colors together. I’m talking about dark colors such as reds, blues, browns. Soak these color items separately so as not to chance dark color fade or bleed.
Experimenting:
Let’s get into the technical stuff about what you’re going to add to the soak water. Don’t glaze over, this is good to know. If you’ve been reading my blog over the years you’ll notice my soaking methods have changed up a bit. I used to use an automatic dish powder along with powdered Biz®. Recently I’ve dropped the Biz® and just use the automatic dish powder. Why? Well I did a kitchen experiment: I bought a medium sized dresser scarf that was universally stained across almost the entire surface and I cut it into 2 identical pieces. I soaked one in automatic dish powder and one in Biz® powder for 24 hours. The results, the automatic dish powderpiece was free of stains, the other, not so much. Now don’t get me wrong, the Biz™ has its place but if it is more economical to just use the dishwasher product, well then, a penny saved… See the pictures below:


Comparing Biz™ and Oxiclean™:
Before we talk details about automatic dish powder, let’s examine Biz® and its polar opposite OxiClean™ because they’re both useful cleaning agents. Some think they’re interchangeable but do you know they work in completely different ways? Biz® is an enzyme cleaner and OxiClean™ is a bleaching/lightening cleaner. In very elementary terms, Biz enzymes attack and devour a stain, OxiClean™ lightens a stain.
The manufacturer of Biz™ lists its ingredients as: surfactants, enzymes, sodium percarbonate, sodium carbonate, sodium silicate, fabric brightening agent, fragrance and cleaning agents. So, what exactly is an enzyme as it related to cleaning your treasures? By definition an enzyme is harvested from beneficial bacteria. Enzymes found in laundry detergents cause a chemical reaction by breaking down dirt, grease, fats and blood. Enzyme cleaners come in both powder and liquid form but keep in mind that the shelf life of enzymes in a liquid state is shorter than that of a powder.
OxiClean’s manufacturer reports on their web site: “The OxiClean™ formulation is a combination of ingredients, the key ingredient being sodium percarbonate, sodium carbonate, surfactants and polymer.” You can see that there are some common ingredients between the 2 but keep in mind they work in a very different manner. Can you use one in place of another? Of course! You can use any cleaning product you desire, just know they generally are all different and of course, results will vary.
Automatic Dish Powder:
Let’s jump back to automatic dish powder. I have a national chain grocery store very close to my home and I’ve been buying their house brand of automatic dish powder for about a year. Previously I purchased a brand name but in my penny-pinching fashion I decided to give the much less pricey house brand a try. I bought it and liked the results! What’s in this house brand? Sodium Sulfate, Sodium carbonate, sodium silicate, Sodium percarbonate, a trade secret dispersing agent, binding agents and titanium dioxide.
RetroClean™:
Let’s talk about another popular product on the market: RetroClean™. If you’ve read the packaging, you’ll see it contains: Sodium Perborate. That’s right, one ingredient. Look above at some of the other products we’ve dissected. You’ll see sodium perborate is often one of the ingredients. Sodium perborate is a chemical readily available for purchase from a chemical supplier in white powder form. When sodium perborate is added to water the molecules of each combine to form Hydrogen Peroxide. Other uses of Sodium Perborate include but are not limited to: teeth whitening, mild antiseptic and a mild bleaching agent. What the packaging on RetroClean™ does not tell you is that Sodium Perborate is only effective in water temperatures above 60°.
Sodium Carbonate:
But there’s another ingredient in a few products listed above that has a similar name: Sodium Carbonate more commonly known as: Washing Soda or Soda Ash. A web site called “The Spruce” lists additional uses for sodium carbonate as: chemical manufacturing, food, glass manufacturing, personal care products, bubble bath, toothpaste, paper products, veterinary skin treatments, etc. Sodium Carbonate is very effective in removing many different kinds of stains from fibers. Have you ever had issue with toothpaste bleaching out a spot in a facecloth or a towel? It’s the Sodium Carbonate in the product!
Examine your items, consider the stains:
Are you still with me? If so let’s consider what stains we might be trying to remove from our vintage pieces: food, beverages, blood, hand or body oils, dust, dirt, mites, face makeup, hand or body lotions, soap scum, detergent residue, starching/sizing products, tallow (from fabric softeners), house paint, fingernail polish, perfume, ink, graphite, furniture polish, pet residue to include urine, feces and the likes. Regarding house paint and fingernail polish, all I can say is good luck. I did once read that some success might be had by soaking an item with house paint in glycerin. They indicated the glycerin could cause the thread fibers to expand and possibly release the paint from the item but to date I’ve not experimented with this idea. About 90% of the above stains are organic in nature. I think that’s why the automatic dish powder works so well for me. 100% of what needs to be removed in my dishwasher is organic so that stands to reason.
My tried and true recipe:
My go to recipe to soak my linens and quilts is as follows: ½ cup dishwashing powder to every 3 gallons of warm/hot tap water. Example: if I’m filling my soaking tub with 3 gallons of warm/hot tap water, I will add 1/2 cup of automatic dish powder. I first fill the dish pan or plastic bin to the desired level, add in the appropriate amount of dish powder, stir for a minute or two (note: the entire amount of powder will not immediately dissolve, it’s never been an issue) add the linens one at a time allowing captured air to be released.
Keep your linens submerged. It might be necessary to have something of weight to the top of the soaking linens. Choose an item that will not have a chemical reaction to your soak water, something like a ceramic baking dish, plastic containers filled with water, etc. Important: do not weigh down your linens with a metal that could rust!
The dreaded black and grey embroidery flosses:
But wait! Remember above when I talked about your linens that have black or grey embroidery floss and how those flosses release or bleed some of their dies onto fibers touching them? Well how do you handle this dilemma? It’s in this instance where I love Sodium Perborate! I’ve never had an embroidery floss fiasco with this product. Does my item get as clean? Sometimes you’ve just got to go with what works and accept the outcome.
Stuck at home in a blizzard and only have dishwashing powder? I’ve actually done the following with black and grey floss in items: in an empty dishpan lay out one vintage piece. Using plastic wrap, lay a piece of plastic wrap on top of your linen. Lay down the next linen and cover it with plastic wrap. Layer up as needed based on the amount to be soaked. Mix your hot tap water and dishwasher powder in a separate container. Slowly transfer the soak water to the dry plastic wrap layers using a large measuring cup. The layer of plastic wrap will keep the villain flosses from transferring their color(s) to any other fibers. Yes, this took time, but in the end, it worked.

After the soak:
How will you know how long to soak items? I believe 24 hours is a good STARTING point. If you position your stained pieced so that you can have a visual on the bad areas, you will know if they’ve been in the tub long enough. Once I’ve either become terribly impatient or it’s evident the stains are gone, I carefully pour out the soak water and drain the linens/quilt on a colander in a sink for an hour or two. I am a huge advocate of time management and as I never seem to have enough time, I also advocate for the convenience of the washer/dryer with vintage pieces. My soaked and drained pieces go directly into my front load washing machine. I use a fragrance-free laundry detergent, normal cycle, warm water wash, cold rinse, high spin. I also add ¼ to ½ cup of distilled vinegar to the fabric softener dispenser. What does the vinegar do? It will assist in removing any soap/detergent residue that might remain in the fibers and it will also soften the fibers a bit. Then it’s on to the dryer, normal dry selected and I toss in ½ of a fragrance-free dryer sheet.
Dawn Dish Soap:
Let’s talk about how wonderful Blue or Clear Dawn Dish Soap is for those of us who work with fibers that fade. You know, the beautiful red 100% cotton quilting fabric for example. No matter the price, the manufacturer, the cleaning method, some fabrics will fade when they become wet. But why? Fade occurs when a fiber cannot retain all its dye particles. The reasons the fibers cannot retain dye is varied but the results are the same: fade or bleed. There’s a product on the market to address just that and it’s called Synthrapol. It’s intended use is to bind the errant dye particles floating in water and surround them to keep them from reattaching to fibers.
Dawn Dish Soap does the same thing at less than half the retail price. If you have to clean an item that you know will fade, launder it in Dawn. Last I checked there are various colors of Dawn. Use only blue or clear, don’t chance that the color of the green or brown or pink Dawn product might remain inyour linens. Again, using my front load washing machine I added 1/8th cup of blue Dawn to a normal size wash load. I expected there to be a great deal of sudsing, I was mistaken, there was none! I chose warm water wash, cold water rinse with an additional cold rinse just to be on the safe side and my double bed sized badly red fabric faded quilt came out like new!
How to fold a quilt for soaking in a countertop plastic bin:
I like to soak my vintage quilts in a large plastic storage bin on the kitchen countertop. I also like to fold the quilt so as to have some of the stains visible in the soak water so I fold them design side out. It does not matter how they are folded or how thick a quilt bundle you have, just as long as the entire quilt can stay underwater. I lay my quilt out on the floor, fold in half width-wise three times, four of it’s still too wide for the container. I then fold from top to bottom two or three times, always checking that my quilt bundle will fit down in my container freely. Once I am happy with the folded quilt, I prepare the soak water and slowly, very slowly lower the folded quilt into the water. Why slowly? You need to allow air to escape the quilt bundle. Once the fibers are wet, they will swell and will no longer freely allow the trapped air to escape because this trapped air will not allow your item to stay submerged. Now just know that while you’ve done your best with the air, you will probably have to weigh down your quilt with something heavy like a ceramic baking dish or smaller plastic containers (with lids) full of water.
Did your big soaking plastic bin come with a lid? Use it! It will help to retain the heat of the tap water! Again, the amount of time needed to soak a quilt depends entirely on what the stains might be, how badly the quilt is stained and how long the stains have been in or on the fibers.

How do I get the big folded up quilt out of the water? I can either begin to bail out water using something like a large measuring cup or I tip the pin allowing water to flow into my sink. I prefer the latter. Once the bin is tipped sideways I let the water drain for at least 30 minutes. By this time the quilt has folded or rolled over on itself again and is usually in the shape of a wet cylinder. I carefully pick up the wet cylinder and place it on end standing up in a colander, still utilizing my kitchen sink. I let the quilt continue to drain for at least an hour at which time I carefully move the quilt to my front load washing machine. Remember above I gave the parameters for washing linens, I use the same selections for a quilt and yes, I put the quilt in my dryer with ½ of a dryer sheet.

Rust:
Then along comes the question of how to remove rust from cotton or linen fabrics. I’ve researched so many different ideas on rust removal, experimented with a few and had very little success. Rust impregnates the fibers, becoming part of the threads as it spreads. The longer rust is in a fiber, the more difficult it becomes to remove. I’ve tried with little success to remove rust without damaging surrounding fibers.
A general list of stains I’ve had little to no success removing:
Some colognes/perfumes, nail polish, house paint, furniture stain, rust, certain adhesives and some beverage stains. Sometimes you’ve just got to accept that a vintage piece is not ready to give up it’s battle scars!
I hope this lengthy article helps you! I’ve quoted directly from product web sites, listed unpronounceable ingredients directly from packaging and performed many non-scientific experiments with many products. If just one piece of information helps you than I will consider it a success!
Oh yes, what’s my source for Sodium Perborate? In a word: eBay. Here’s a picture on the actual packaging.

And here’s a picture of one of their listings from a minute ago:

Happy soaking/cleaning and then creating with wonderfully clean vintage linens,
Rhonda


Oxalic acid will remove rust by reacting with iron oxide (insoluble stain) to become soluble iron oxalate. I sprinkle the crystals directly onto the stain in wet fabric. Iron oxalate is clear, so just rinse it down the sink with running water.
Oxalic acid is crystalline and poisonous – it’s not absorbed very well through your skin, so just wash your hands. DO NOT INGEST OXALIC ACID! Keep it in a safe place to avoid contact by kids / pets / family members.
LikeLiked by 1 person
Fascinating! So the chemical reacts with the rusts and this reaction removed the rust from the fibers of the fabric. Thank you for sharing!
LikeLike
Thank you! I have found our store brand (kroger) dishwasher powder soap has the main ingredient “sodium perborate”. Now time to get soaking. 😀
BTW: It took me awhile to find this type of dishwasher soap. Time to stock up.
LikeLiked by 1 person
Glad you found it, harder and harder to come by!
LikeLike
I have found a seventh generation dish detergent with all the ingredients listed, it has been difficult to find one. Keep on the look out for a store brand but no luck so far. Cascade doesnt seem to contain the sodium percarbonate anymore either. Please someone correct me if you find it.
LikeLiked by 1 person
Yes, it’s frustrating when ingredients change!
LikeLike
How generous you are to provide this excellent information. Thank you so much!
LikeLiked by 1 person
❤️
LikeLike
Thank you for the information on washing vintage linens.
Your article reminded me of the training I got when I was a child learning how to embroider: Wash Your Hands before you pick up your work! And wrap it in a clean piece of cloth in between times. We learned how to avoid much of the dirt so we didn’t have to wash them as much.
LikeLiked by 1 person
❤️
LikeLike
Thank you so much for all of your fabulous details on laundering vintage linens…I buy them at auction sometimes by the shelf!!! I need to be more diligent with doing tge washing right out of the gates….I use an English product called Napisan which works wonders but going to try your s3cret weapon…. automatic dish powder…who would have thought???? With sincere thanks again…Beverly
LikeLiked by 1 person
Hello,
I use Deckbrite (sodium percarbonate) mixed as detailed on package. It works wonders on 100% cotton tshirts that have gone dingy, but be wary of embroidery if present. Also works on white/cream carpets (test an inconspicuous area first).Thanks for sharing your info!
LikeLiked by 1 person
Hi Rhonda, I love all your hints and I want to try the dishwasher soap. But when I checked Walmart’s website for the ingredient list, their Great Value dishwasher detergent no longer contains sodium percarbonate. I am so bummed, have you bought any lately and noticed that?
LikeLiked by 1 person
Oh no! I’m very sad to hear this news! I have been buying Cascade lately, just because it’s convenient to pick it up at my grocery store. ☹️
LikeLike
Thanks, I’ll just buy the Cascade, hopefully it still has that ingredient.
LikeLiked by 1 person
What a wonderful article! Thank you for sharing your expertise. I own a quilt made by my grandmother in the 1940s, maybe just after the war; she used a wool army blanket as the batting. The top and back are muslin and assorted cotton prints. How would you handle something like that? Thanks, again. 🙂
LikeLiked by 1 person
Hi Karen, is there evidence that the quilt has ever been laundered in some fashion? The wool army blanket gives me some concern, do you know much about these wool blankets such as have they been preshrunk? Will they shrink, etc. and I’m assuming the wool blanket is green?
LikeLike
I wish I could give you some information regarding the cleaning of this jacket but I have no experience whatsoever with tackling such a project. I think that if it were my jacket and I was concerned about the cleaning of it that I would head off to a very very reputable dry cleaners. Best of luck to you!
LikeLike
What a great tutorial! Thank you!
LikeLiked by 1 person
Thanks!
LikeLike
Hi Rhonda. I absolutely loved this article. So much helpful detail. I am a longarm quilter who has just started quilting vintage quilts for clients. Would it be okay to reproduce your article to include with completed quilts for my clients? I would of course be certain to give credit for this wonderful information to you!
LikeLiked by 1 person
Sure! Thanks for asking!
LikeLike
Last night I went through a box of vintage linens I purchased at an antique market. There must be 30+ pieces; table cloths, dresser scarves, doilies, hankies, a bread basket warmer (?) etc. As I carefully unpacked each piece I wondered about who made it, how was it used, was it a gift? A few of the pieces have some stains on them and I am so glad I came across your article, I will bring trying your methods.
LikeLiked by 1 person
One of the few DIY cleaning/laundry articles I have saved. Thanks.
LikeLiked by 1 person
Thank you so much Rhonda. It works!!! I’m here in Texas, in the wilds of Texas so I sent away for the powdered dish soap you used and just tried it. I have a sink next to my washer so no heavy lifting. My quilt fit nicely in the sink. I use a trick I’ve been using so long I can’t remember who told me about it; when soaking fabric I place an unopened, clean clear very large plastic bag on top of the water. With gentle hands I work all the air bubbles to the side leaving the fabric totally submerged, yet clear to see and no need to weigh it down. It works every time. Thanks again for the very clear tutorial, you are the first person I’m going to “Follow” as I’m sure I’m got much more to learn from you. Mariana
LikeLiked by 1 person
Thank you for your kind words and I’m so glad that the technique worked for you! I do hope that you were not anywhere near the horrible wildfires that seem to be springing up everywhere in Texas! Stay safe and be blessed!
LikeLiked by 1 person
This may sound like a dumb question but do you change the soaking water after 24 hours or can the item stay in that soaking solution for longer? I’m trying your recipe for the first time for an old quilt and wasn’t sure if l should launder it after the 24 hours then re soak should it need it and keep repeating the process? Thank you!
LikeLiked by 1 person
Oh definitely not a dumb question, my minimum soak is 24 hours, I have left things for as long as 48 hours.
LikeLike
Thank you for this very informative article. I went to the Canton Flea Market in November 2021 and bought way too many quilt tops. They are old and dirty. I’ve always washed my linens in the bath tub but I really like your method much better. When I had my old Maytag washer, I soaked the tops for 3 days before draining the washer and then starting again. But cutting all the threads took days while watching TV. I think this time I will buy a ice chest with a drain and try that. That way I can carry it out to the garage and empty it there. I’m going to print out all the instructions today and read it again. Thank you so much. I just love how you restore linens, I do too, but not as nice as you do.
LikeLiked by 1 person
Thank you for this informative article. It occurs to me that a large plastic cooler with a drain plug might work well for countertop soaking of large articles as it would be insulated (holding the heat) and the drain plug would make it easy to empty. Do you foresee any problems with that? Also, is it safe to use a metal colander for draining or would plastic be preferable?
LikeLiked by 1 person
Hum…I never thought of using a cooler with a drain plug…it would probably work great. As far as metal, I would shy away, you know for sure there will be no chemical reaction with plastic.
LikeLike
Hello, when using the sodium perborate, what’s the ratio/amount to use and do you add it to the dishwashing powder solution or do you soak with only the sodium perborate? I just received it in the mail from the vendor you recommended and have some linens with black embroidery thread I’m ready to tackle. Thanks for the help!
LikeLiked by 1 person
Do not use Sodium Perborate with dishwasher powder.
From the article:
My tried and true recipe:
My go to recipe to soak my linens and quilts is as follows: ½ cup dishwashing powder to every 3 gallons of warm/hot tap water. Example: if I’m filling my soaking tub with 3 gallons of warm/hot tap water, I will add 1/2 cup of automatic dish powder. I first fill the dish pan or plastic bin to the desired level, add in the appropriate amount of dish powder, stir for a minute or two (note: the entire amount of powder will not immediately dissolve, it’s never been an issue) add the linens one at a time allowing captured air to be released.
Keep your linens submerged. It might be necessary to have something of weight to the top of the soaking linens. Choose an item that will not have a chemical reaction to your soak water, something like a ceramic baking dish, plastic containers filled with water, etc. Important: do not weigh down your linens with a metal that could rust!
LikeLike
Excellent article, Rhonda! When my girls were in grade school, we of the PTA had an annual clothing sale of infant and young children’s clothes. We inspected everything and often sent the sellers home with a recipe of dishwasher detergent and something else that I can’t remember. I do remember that it removed years old baby formula stains. This is a wonderful article. I will recommend it to all my quilting friends in the two guilds to which I belong. Thank you very much for posting it. Nancy, Naperville, IL
LikeLiked by 1 person
Thank you! ❤️❤️
LikeLike
Thank you for all this good info 😌.
LikeLiked by 1 person
Thanks!🙂
LikeLike
This is the MOST comprehensive resource I’ve come across on this topic. OMG thank you!!! I’m sure this post took a long time to photograph and write up so thanks for sharing your knowledge with us, especially all the different types of products and what they do. This is fantastic.
LikeLiked by 1 person
Thank you! 🙂
LikeLike
Just wow!! I read it from beginning to end. Took me all afternoon with interruptions but I finished! I am definitely saving this article. Thank you!
LikeLiked by 1 person
Thank you! 🙂
LikeLike
This was just what I needed. I’ve been using the dry dishwasher powder and had great results. My attempt to find Retro Clean even on eBay didn’t seem to find the resource you have here. Soooo glad to get this info and have already ordered it! Thanks and I’m so enjoying making these vintage quilts. I appreciate your sharing your knowledge.
LikeLiked by 1 person
Thank you for your kind words! So glad to be able to share the resource!
LikeLike
THANK YOU
LikeLiked by 1 person
You are welcome! 🙂
LikeLike
I’m a total convert to your cleaning methods for linens. etc. Thank you so much for sharing your extensive expertise with all forms of quilt and linen care. That doesn’t even count your “long-distant” teaching prowess and community building. Thank you!
LikeLiked by 1 person
Thank you for your kind words! 🙂
LikeLike
Thank you for this comprehensive tutorial and explanations. I was literally pulling my hair out cleaning a slip cover that got a big black mark on it from a rubber bungee strap (I bought the chair with the cover last night and had it held in the back of my truck with the straps). The things I’d tried so far hadn’t worked, then I read your post and the light bulb went on in my head: the black mark was probably greasy (greasy road dust since I use those straps for everything I haul in the truck) – I pulled out the Dawn detergent and scrubbed those marks right out. Thank you, thank you, thank you!
LikeLiked by 1 person
Wonderful news!! So happy the Dawn dishwashing liquid worked!
LikeLike
Hi Rhonda, this is a tutorial I’m going to print several copies of and place in each of my two laundry rooms … my own home and my place of work. I am lucky enough to care for the old linens and quilts in an historic park and your advice is priceless. Thank you. It will be so nice to be able to save some very uncared for linens. Unrelated to your instructions on cleaning I want to tell you a story that has puzzled me since it happened 62 years ago. I sneaked out of bed to sleep in front of the open fireplace when I was about 10 years old. Getting cold I covered myself with my father’s baby quilt his grandmother had made for him in the same pattern of little sunbonnet girls you show. I woke in the morning covered in ash, the quilt had burned in the night and was completely and totally gone. I was not burned; to this day I don’t know why not. The quilt was made in 1937. I’ve loved quilts ever since!
LikeLiked by 1 person
Wow! What a story! Seems to me a Higher Power knew it was not your time for serious injury or even death! But whew! What a memory!
I am so hopeful to salvage this Sunbonnet Sue quilt, now every time I’m.look at it I will be reminded of you and your incredible story! Thank you! 🙂❤️
LikeLike
Rhonda, I have been following you on your blogs and on Facebook for over a year. I thought perhaps I would find time to use some of my vintage hankies and such in one of your quilts. However, realistically that’s not going to happen. So, I would like to offer to you or to someone in your vintage group my collection. It is mostly hankies but there are some embroidery pieces and maybe a couple of pillowcases. I know I could sell these on Ebay or Etsy but I am not a fan of either. So, I would like to give my stash to you to share or use as you see fit. I can send you pictures if you are interested. You have made the days of so many people brighter over the last year and I would feel so good if you would accept them. I live in Richmond and could either bring them to you or meet you halfway. Let me know what you think. Wendy Martin
LikeLiked by 1 person
Oh Wendy, your generosity overwhelms! I would love to arrange to meet you and see no problem visiting with you in your home once I’m rid of this monster cold bug that’s been with me for a week! I would be honored to share your things with the Retreaters at the I teach 3 times a year at the 1914 Boehm House in Moulton, TX.
Let’s stay in touch and I will private message you my contact information.
Thank you again for your generosity,
Rhonda
Plan B: could you send me an email to: rhondadort@gmail.com and then I will reply with my phone number, etc.
thanks!
LikeLike
Howdy! Thank you. Sandy Ellison
Sent from my iPad
>
LikeLiked by 1 person
You’re welcome!
LikeLike
This is another excellent tutorial.
Thank you.
LikeLiked by 1 person
Thank you sweet friend ❤️
LikeLike
Thank you so much Rhonda, once I get home I am going to print and put in my binder I will have to check the ingredients in the dishwasher detergent that I can purchase here in Canada I am getting my stash of linens ready for winter when I hope to find the time to get started. First I want to make a runner for my large coffee table I have so enjoyed your site and the Facebook site. Thank you Elaine Hein Northern BC Canada
Sent from my iPhone Elaine Hein
>
LikeLiked by 1 person
You’re very welcome!
LikeLike