Merry Christmas!

I though today I’d post pictures of a few the quilts and table mats I’ve made over the years with Christmas in mind. These are in no particular order:

stitch-connection-quilt

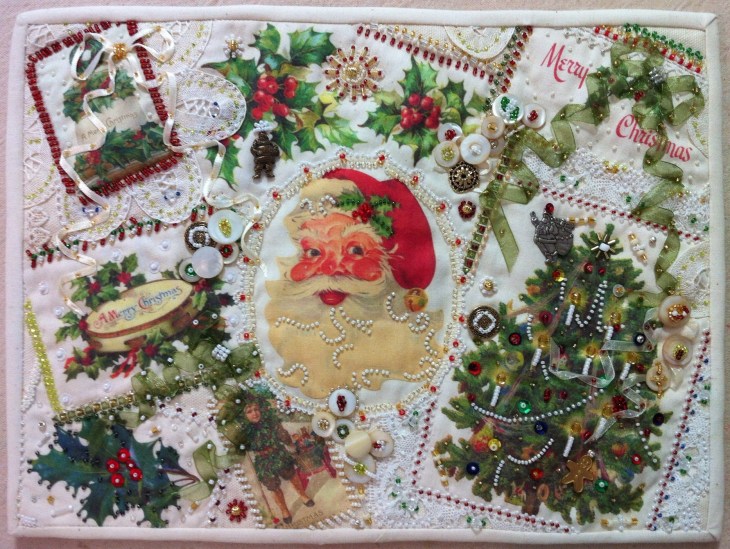
I think I made this about 10 or 11 years ago, I didn’t put a quilt label on the back so I am guessing. The motifs are machine embroidery designs I purchased from  The Stitch Connection and embroidered on my Brother machine. I changed up the borders a bit from the original quilt pattern. What a great project from this equally great company! I machine quilted this project on my domestic Juki using a single poly batt.

***

img_0277

This small quilt measures 9’x12″ and was made as a donation for auction item to support Quilt teacher/designer Ami Simms. She began a program called the Alzheimer’s Art Quilt Initiative (AAQI) to raise money to fund Alzheimer’s research. I printed vintage graphics onto natural medium weight muslin fabric and embellished the surface with seed and bugle beads, ribbons, mother-of-pears buttins and small metal charms.  If memory serves me I believe this little piece raised approx. $350.00.

***

img_0953

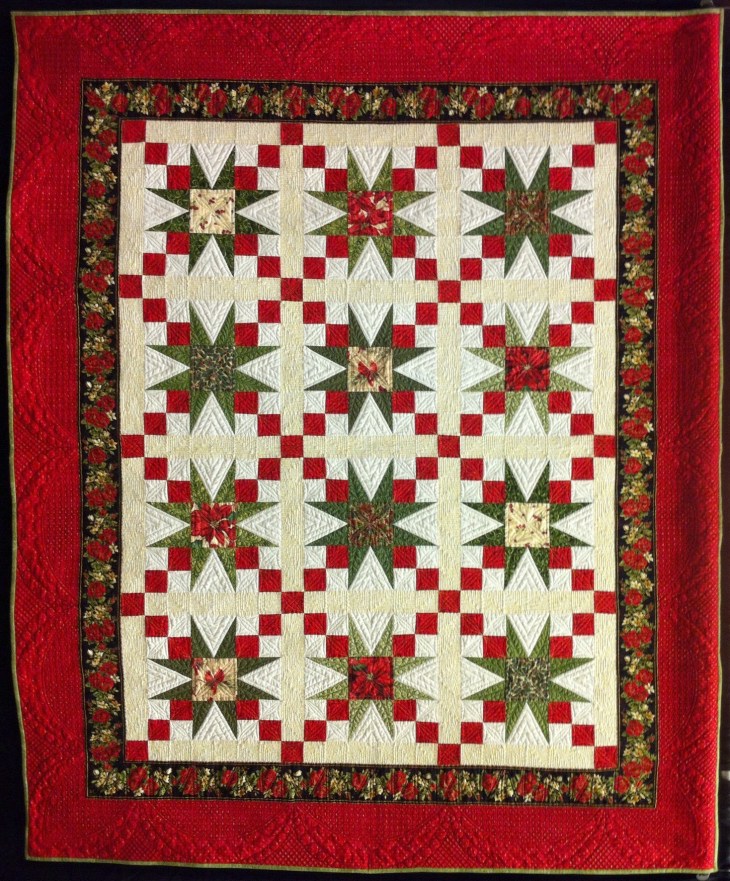
I started this quilt with a group of friends in the Seabrook, TX area. I’d never worked with a combination of both white and ivory background fabrics. The pattern is from a long forgotten magazine. I fussy cut the star center squares from Christmas/Winter bird fabrics. If you look carefully you’ll see the quilt is hanging a little odd. I was in a rush the evening before “quilt turn in day” for my guild ( Quilt Guild of Greater Houston )show. I frantically got the sleeve stitched on, the label attached just in time to beat the deadline. Imagine my surprise as I strolled through the show and saw my quilt hanging sideways… that’s right, I mistakenly sewed the sleeve down the side rather than across the top.  I finished this quilt in 2013. I machine quilted this project on my domestic Juki using a single batt. It has a tone on tone ivory backing.

***

hand-emb-2

Not really a quilt but rather a felted wool applique table decoration, this pattern is from  All Through the Night, Bonnie Sullivan. If you’ve ever made any if her project then you’ll already know she’s a fantastic artist! For this piece I both felted and hand over-dyed my own wool. I shop resale stores looking for old 100 % wool garments with interesting texture. This mat measures approx. 16′ across. This piece is hand appliqued using DMC embroidery floss.

***

visions-of-sugarplums

Another Bonnie Sullivan pattern! I had this piece finished, held it up to show my hubby the completed work and he said to me “What is a Vison?” I had neglected to stitch the second “i” in vision. Luckly I had room to squeeze it in! This piece is also 100% hand felted and hand over-dyed wool from old garments. I machine appliqued this project on my Bernina. It measures approx. 16″ across.

***

christmas-tablecloth

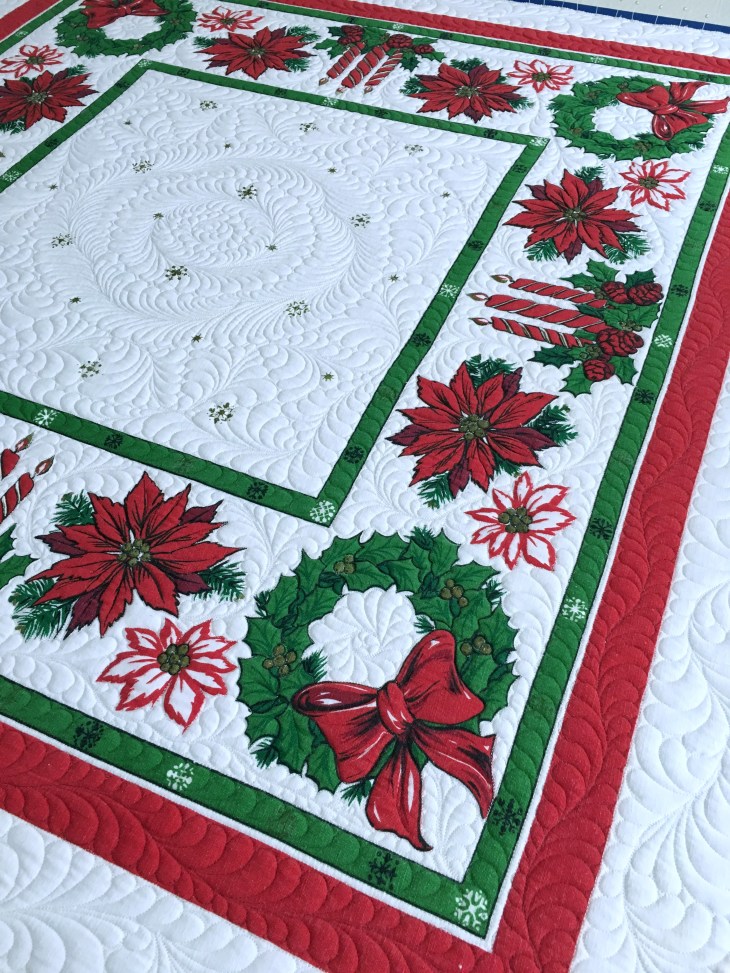
And finally, a project started and finished in 2016, this is a quilted vintage Christmas tablecloth measuring approx. 48″x51″. It is double batted and quilted with Glide thread everywhere except on the red border where I used YLI Smoke mono-filament. The backing fabric is 100% cotton bleached muslin. I quilted this piece on my Innova longarm, hand guided free motion.  The piece is completely finished, sadly I can’t find a picture of the finished and bound quilt. Maybe tomorrow…

Hope you enjoyed!

Blessings for a wonderful 2017!

Rhonda

How I create and embellish a Hexagon

The first picture below is how it began, 7 pieces of both white and off-white laces and/or trims and a vintage ladies acid lace handkerchief, layered atop a layer of white cut-away stabilizer topped with white (bleached) muslin. I always mark the top of a hexagon because sometimes when I get well into the embellishing I lose track of what’s up and what’s down.

When you start with an all all white ( or in my case white and off white) the world’s your oyster when it comes to choosing beads, buttons, ribbons, etc. The raw edges are stitched down with a Wing (or Hem Stitch) Needle and white thread. If you’ve never used a Wing Needle, I challenge you to buy one and have a ball playing with both your utility and decorative stitches on your sewing machine! You’ll have a blast! The Wing Needle track is a wonderful guide for bead placement. If you’ll look carefully you can see that I’ve begun to stitch white seed beads at the left center below.

image

My collection of beads and ribbons has grown to unusual proportions and I can get overwhelmed sometimes with what to use. I’ve taken steps to solve that problem by creating a “project tray” as I begin to embellish each hexagon. For me it help to narrow down the choices and it gives me a plan forward. I don’t always use everything in my project tray and I often add things as I go along.

The funny caterpillar looking thing in the picture below is actually a string of purple, green and white glass flower heads I purchased at the Houston IQA Festival in 2015. The small plastic bag of pink ribbon roses is straight from the store. They don’t look all that great when you buy them but they are easily manipulated into a “better looking” rose shape with just a needle and thread.

image

If I know I’m going to have a ribbon and undulating ribbon streamers on a project I try and do most of my beading ahead of the ribbon. It’s just easier to bead when there’s less for the thread to get caught up in! Thread: I’m a big fan of Nymo. I use either white or off white. I bought a bunch on eBay a few months back, I was disappointed when it arrived as it is tan but I’ve found I can use it easily when I’m working with color.

So…in the picture below you’ll see I’ve added seed beads to the green ribbon as well as ribbon roses to the left of the bow,  green etched glass leaves that I think I bought at Florilegium in Weston, Mo., the glass purple/green/white flower heads (that I gave yellow beaded stamens) and finally, small pearls.

image

The tiny sequin flowers that edge the Battenburg lace are from  CCartwrights. The little flower sequins come in a multitude of colors. Hold on to your wallets when you shop at CCartwrights, they have wonderful stuff!

imageimage

The small row of flowers in the top right corner (and the pink ones scattered in the project) are from Darice. Sadly I haven’t been able to find them, they’re not producing them in the soft pastel colors anymore. If you find them anywhere, BUY THEM ALL!

image

Below you’ll see the embellished hexagon. All that’s left to do is to add a layer of white 50/50 batting and a white (bleached) muslin backing. The backing is cut 5/8″ larger all the way around, the outside raw edge is folded to meet the edge of the hexagon. Press this seam and finally make the final fold over the edge of the hexagon to form a 1/4″ frame around the block.

download

Hope you’ve enjoyed! Happy Stitching,

Rhonda

Instagram: @RJCD     Pinterest: RDort1