Cleaning Vintage Linens by Rhonda Cox Dort
Cleaning Vintage Linens:
So now that you’ve collected your vintage pieces it’s time to get them clean and ready to use. My advice is to never use a piece in a project that has not been laundered in some fashion. The last thing you want to happen is for something to fade, deteriorate, bleed, etc. in a finished project. My goal is always to get newly found pieces into some sort of soak the same day I bring them into my home. This goes for delivered pieces also, things I might have purchased on any of the online sale/auction web sites. After opening the packages, the vintage pieces go straight into a soaking tub.
On a go forward basis we will be talking about fabrics that are either 100% cotton or linen. Blends and/or manufactured fibers present their own set of issues; you’ll need to do your own research on how to deal with cleaning things such as velvets, silks, rayon, acetates, polyester blends, etc. Rayon is a natural fiber so why is it listed here? Rayon has trouble holding fast to dyes, and as such it has a tendency to fade and/or bleed on surrounding fibers.
The supplies I have on hand include things such as:
White plastic dish pans
Clear plastic bins that will hold at minimum 4 gallons of water before item to be soaked is added
A dedicated large plastic/silicone spatula used to stir the water
Blue Dawn dishwashing liquid
Automatic Dish Powder
Sodium Perborate (to be detailed later)
Warm to hot water
I’m not a fan of soaking items in the bathtub. Besides the fact that I find it physically difficult, I cannot get an accurate measurement of the water and therefore end up guessing about how much detergent needs to be added. Also, I find I end up in trouble trying to gently handle a large wet quilt without popping quilting threads. I’ll detail my method of folding quilts for counter top soaking later.
Crochet and Hand-worked Wovens: How dinge and stains come to be present.
Crocheted Pieces
Let’s talk about vintage crochet pieces first: doilies, table runners, lace, even large tablecloths were created by crochet in threads of various weights. Consider how crochet (and for that matter hand knitting) is made. The threads are almost constantly in touch with our hands. Think about what happens when you touch your eyeglass lenses or a window pane with your finger. You leave a mark. Fibers are no different. As the crochet thread is dragged across your hands, part of you stays on that thread. Those left behing hand oils attract and hold dirt and/or dust in the fibers in our vintage linens.
Be aware that the typical laundering process can actually cause more problems. The thread (fibers) with their multitude of surfaces hold fast to soap, detergents and fabric softeners used in either the washing machine and/or dryer. Did you know that fabric softeners are generally comprised of water, soap and oils such as olive, corn or tallow? These additional deposits on the fiber can attract more dust, dirt, etc.
Then along comes another laundry helper/villain: spray starch and/or sizing. It helps us in the short term, but abuses our linens in the long term. In days gone by, crafters were even known to stiffen their crochet with a mixture of sugar water thus creating an invariable feast for, as I call them: little creatures of the night…silverfish and beetles of every kind, causing damage to the fibers.
Spray starch also penetrates the thread fibers sealing in dirt, dust, and hand oils. Have you ever scorched a piece you were ironing? More often than not you have not damaged the fibers but rather, you’ve slightly burned the spray starch sitting on top of the threads.
Woven Textiles
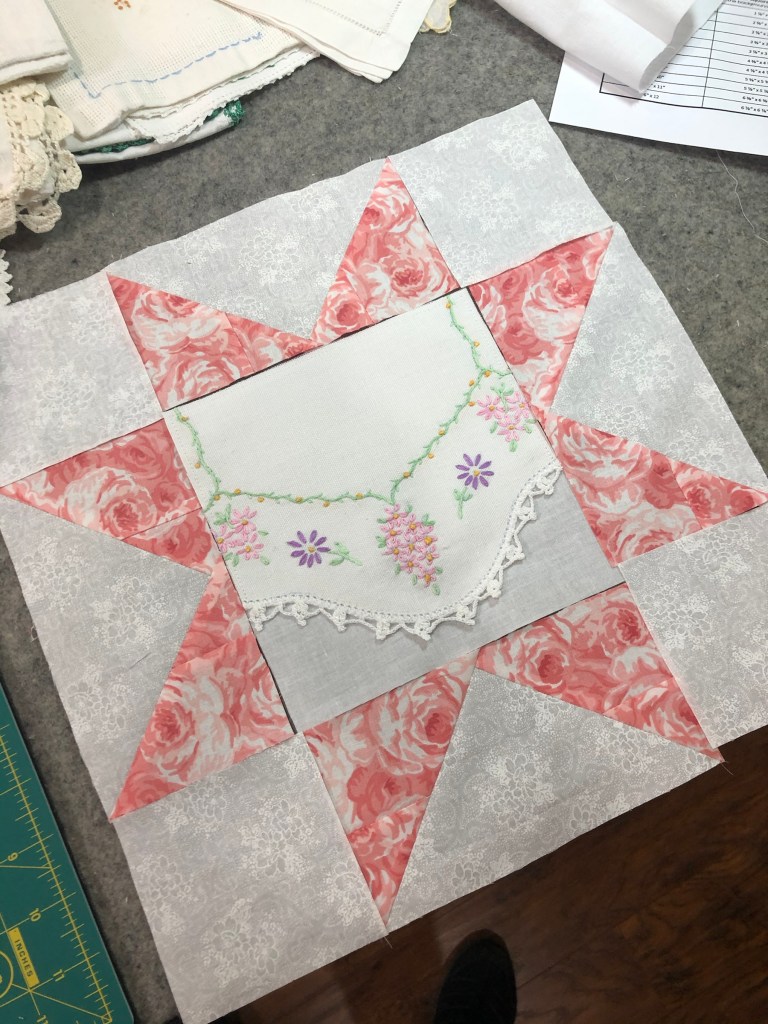
Dresser scarves, pillow cases, hand towels, tablecloths are all good examples of woven textiles I work with. Those with handwork such as embroidery undergo the same process of excessive handling as they are being created. Hand oils, hand lotions, dust and dirt all find their way into each piece. As if that’s not enough, as these pieces are put to use, other perils are show up!
Think about a dresser scarf. It will sit on furniture polish and dust. Perfumes and nail polishes will be spilled, heavy objects will be sitting on the scarf as well as combs, brushes, coins and jewelry all affect the fibers.
The Science Behind Dinge and Stain Removal
All of these influences have a place in creating the dinge/patina of an old hand created piece. Have you ever held a new piece of muslin next to a vintage piece? Or how about a vintage white pillowcase next to a new one? The older piece, if it has been used will always have a bit of a different look to it because of the utility stresses it’s been exposed to throughout its long life. Remember, the products available to us today are nothing like the basic soaps of yesterday. I’ve got my own ideas about both soaking and laundering so let’s get started on what works and does not work for me.
Sorting your items to soak:
So now that you’re ready with supplies it’s time to sort through your items to be soaked. Let me say right here and now that depending on your item(s) no cleaning method is guaranteed to be 100% successful. You need to acknowledge that with vintage linens things can happen. Let me give you an example: I had an old quilt top purchased online, natural muslin and pink cotton fabrics. When delivered I was shocked at how grungy dirty the top was. I immediately soaked it in warm tap water with automatic dish powder. Within a matter of minutes, the soak water turned a horrible pink/mustard/brown. End results: the top, while very clean was now entirely various shades of pink. Not completely ruined, but not what I expected as the outcome. I just want you to understand that “things” can happen.
Sort your items into groups separated by those with any black or grey embroidery floss and those without. Black and grey flosses have a tendency to release some of their dies onto any fabrics coming into direct contact with them. We’ll talk about how to soak these items in a bit. Next, sort through and group solid colors together. I’m talking about dark colors such as reds, blues, browns. Soak these color items separately so as not to chance dark color fade or bleed.
Experimenting:
Let’s get into the technical stuff about what you’re going to add to the soak water. Don’t glaze over, this is good to know. If you’ve been reading my blog (www.RhondaDort.com) over the years you’ll notice my soaking methods have changed up a bit. I used to use an automatic dish powder along with powdered Biz®. Recently I’ve dropped the Biz® and just use the automatic dish powder. Why? Well I did a kitchen experiment: I bought a medium sized dresser scarf that was universally stained across almost the entire surface and I cut it into 2 identical pieces. I soaked one in automatic dish powder and one in Biz® powder for 24 hours. The results, the automatic dish powder piece was free of stains, the other, not so much. Now don’t get me wrong, the Biz™ has its place but if it is more economical to just use the dishwasher product, well then, a penny saved…
Comparing Biz™ and Oxiclean™:
Before we talk details about automatic dish powder, let’s examine Biz® and its polar opposite OxiClean™ because they’re both useful cleaning agents. Some think they’re interchangeable but do you know they work in completely different ways? Biz® is an enzyme cleaner and OxiClean™ is a bleaching/lightening cleaner. In very elementary terms, Biz enzymes attach and devour a stain, OxiClean™ lightens a stain. The manufacturer of Biz™ lists its ingredients as: surfactants, enzymes, sodium percarbonate, sodium carbonate, sodium silicate, fabric brightening agent, fragrance and cleaning agents. So, what exactly is an enzyme as it related to cleaning your treasures? By definition an enzyme is harvested from beneficial bacteria. Enzymes found in laundry detergents cause a chemical reaction by breaking down dirt, grease, fats and blood. Enzyme cleaners come in both powder and liquid form but keep in mind that the shelf life of enzymes in a liquid state is shorter than that of a powder. OxiClean’s manufacturer reports on their web site: “The OxiClean™ formulation is a combination of ingredients, the key ingredient being sodium percarbonate, sodium carbonate, surfactants and polymer.” You can see that there are some common ingredients between the 2 but keep in mind they work in a very different manner. Can you use one in place of another? Of course! You can use any cleaning product you desire, just know they generally are all different and of course, results will vary.
Automatic Dish Powder:
Let’s jump back to automatic dish powder. I have a nation chain grocery store very close to my home and I’ve been buying their house brand of automatic dish powder for about a year. Previously I purchased a brand name but in my penny-pinching fashion I decided to give the much less pricey house brand a try. I bought it and liked the results! What’s in this house brand? Sodium Sulfate, Sodium carbonate, sodium silicate, Sodium percarbonate, a trade secret dispersing agent, binding agents and titanium dioxide.
RetroClean™:
Let’s talk about another popular product on the market: RetroClean™. If you’ve read the packaging, you’ll see it contains: Sodium Perborate. That’s right, one ingredient. Look above at some of the other products we’ve dissected. You’ll see sodium perborate is often one on the ingredients. Sodium perborate is a chemical readily available for purchase from a chemical supplier in white powder form. When sodium perborate is added to water the molecules of each combine to form Hydrogen Peroxide. Other uses of Sodium Perborate include but are not limited to: teeth whitening, mild antiseptic and a mild bleaching agent. What the packaging on RetroClean™ does not tell you is that Sodium Perborate is only effective in water temperatures above 60°.
Sodium Carbonate:
But there’s another ingredient in a few products listed above that has a similar name: Sodium Carbonate more commonly known as: Washing Soda or Soda Ash. A web site called The Spruce lists additional uses for sodium carbonate as: chemical manufacturing, food, glass manufacturing, personal care products, bubble bath, toothpaste, paper products, veterinary skin treatments, etc. Sodium Carbonate is very effective in removing many different kinds of stains from fibers. Have you ever had issue with toothpaste bleaching out a spot in a facecloth or a towel? It’s the Sodium Carbonate in the product!
Examine your items, consider the stains:
Are you still with me? If so let’s consider what stains we might be trying to remove from our vintage pieces: food, beverages, blood, hand or body oils, dust, dirt, mites, face makeup, hand or body lotions, soap scum, detergent residue, starching/sizing products, tallow (from fabric softeners), house paint, fingernail polish, perfume, ink, graphite, furniture polish, and the likes. Regarding house paint and fingernail polish, all I can say is good luck. I did once read that some success might be had by soaking an item with house paint in glycerin. They indicated the glycerin could cause the thread fibers to expand and possibly release the paint from the item but to date I’ve not experimented with this idea. About 90% of the above stains are organic in nature. I think that’s why the automatic dish powder works so well for me-100% of what needs to be removed in my dishwasher is organic.
The tried and true recipe:
My go to recipe to soak my linens and quilts is as follows: ½ cup dishwashing powder to every gallon of warm/hot tap water. Example: if I’m filling my tub with 3 gallons of warm/hot tap water, I will add 1 ½ cup of automatic dish powder. I first fill the dish pan or plastic bin to the desired level, add in the appropriate amount of dish powder, stir for a minute or two (note: the entire amount of powder will not immediately dissolve, it’s never been an issue) add the linens one at a time allowing air to be released.
Keep your linens submerged. It might be necessary to have something of weight to the top of the soaking linens. Choose an item that will not have a chemical reaction to your soak water, something like a ceramic baking dish, plastic containers filled with water, etc. Important: do not weigh down your linens with a metal that could rust!
The dreaded black and grey embroidery flosses:
But wait! Remember above when I talked about your linens that have black or grey embroidery floss and how those flosses release or bleed some of their dies onto fibers touching them? Well how do you handle this dilemma? It’s in this instance where I love Sodium Perborate! I’ve never had an embroidery floss fiasco with this product. Does my item get as clean? Sometimes you’ve just got to go with what works and accept the outcome.
Stuck at home in a blizzard and only have dishwashing powder: I’m actually done the following with black and grey floss in items: in an empty dishpan lay out one vintage piece. Using plastic wrap, lay a piece of plastic wrap on to of your linen. Lay down the next linen and cover it with plastic wrap. Layer up as needed based on the amount to be soaked. Mix your hot tap water and dishwasher powder in a separate container. Slowly transfer the soak water to the dry plastic wrap layers using a large measuring cup. The layer of plastic wrap will keep the villain flosses from transferring their color(s) to any other fibers. Yes, this took time, but in the end, it worked!
After the soak:
How will you know how long to soak items? I believe 24 hours is a good starting point. If you position your stained pieced so that you can have a visual on the bad areas, you will know if they’ve been in the tub long enough. Once I’ve either become terribly impatient or it’s evident the stains are gone, I carefully pour out the soak water and drain the linens/quilt on a colander in a sink for an hour or two. I am a huge advocate of time management and as I never seem to have enough time, I also advocate for the convenience of the washer/dryer with vintage pieces. My soaked and drained pieces go directly into my front load washing machine. I use a fragrance-free laundry pod, normal cycle, warm water wash, cold rinse, high spin. I also add ¼to ½ cup of distilled vinegar to the fabric softener dispenser. What does the vinegar do? It will assist in removing any soap/detergent residue that might remain in the fibers and it will also soften the fibers a bit. Then it’s on to the dryer, normal dry selected and I toss in ½ of a fragrance-free dryer sheet.
Dawn Dish Soap:
Let’s talk about how wonderful Blue or Clear Dawn Dish Soap is for those of us who work with fibers that fade. You know, the beautiful red 100% cotton quilting fabric for example. No matter the price, the manufacturer, the cleaning method, some fabrics will fade when they become wet. But why? Fade occurs when a fiber cannot retain all its dye particles. The reasons the fibers cannot retain dye is varied but the results are the same: fade. There’s a product on the market to address just that and it’s called Synthrapol. It’s intended use is to bind the errant dye particles floating in water, surround them to keep them from reattaching to fibers. Dawn Dish Soap does the same thing at less than half the retail price. If you have to clean an item that you know will fade, launder it in Dawn. Last I checked there are various colors of Dawn. Use only blue or clear, don’t chance that the color of the green or brown or pink Dawn product might remain in your linens. Again, using my front load washing machine I added ¼ cup of blue Dawn to a normal size wash load. I expected there to be a great deal of sudsing, I was mistaken, there was none! I chose warm water wash, cold water rinse with an additional cold rinse just to be on the safe side and my double bed sized badly red fabric faded quilt came out like new!
How to fold a quilt for soaking in a countertop plastic bin:
I like to soak my vintage quilts in a large plastic storage bin, on the kitchen countertop. I also like to fold the quilt so as to have some of the stains visible in the soak water so I fold them design side out. It does not matter how they are folded or how thick a quilt bundle you have, just as long as the entire quilt can stay underwater. I lay my quilt out on the floor, fold in half width-wise three times, four of it’s still too wide for the container. I then fold from top to bottom two or three times, always checking that my quilt bundle will fit down in my container freely. Once I am happy with the folded quilt, I prepare the soak water and slowly, very slowly lower the folded quilt into the water. Why slowly? You need to allow air to escape the quilt bundle. Once the fibers are wet, they will swell and will no longer freely allow the trapped air to escape because this trapped air will not allow you item to stay submerged. Now just know that while you’ve done your best with the air, you will probably have to weigh down your quilt with something heavy like a ceramic baking dish or smaller plastic containers (with lids) full of water. Did your big soaking plastic bin come with a lid? Use it! It will help to retain the heat of the tap water! Again, the amount of time needed to soak a quilt depends entirely on what the stains might be, how badly the quilt is stained and how long the stains have been in or on the fibers. How do I get the big folded up quilt out of the water? I can either begin to bail out water using something like a large measuring cup or I tip the pin allowing water to flow into my sink. I prefer the latter. Once the bin is tipped sideways I let the water drain for at least 30 minutes. By this time the quilt has folded over on its self again and is usually in the shape of a wet cylinder. I carefully pick up the wet cylinder and place it on end standing up in a colander, still utilizing my kitchen sink. I let the quilt continue to drain for at least an hour at which time I carefully move the quilt to my front load washing machine. Remember above I gave the parameters for washing linens, I use the same selections for a quilt and yes, I put the quilt in my dryer with ½ of a dryer sheet.
Rust:
Then along comes the question of how to remove rust from cotton or linen fabrics. I’ve researched so many different ideas on rust removal, experimented with a few and had very little success. Rust impregnates the fibers, becoming part of the thread as it spreads. The longer rust is in a fiber, the more difficult it becomes to remove. I’ve tried with little success to remove rust without damaging surrounding fibers.
A general list of stains I’ve had little to no success removing:
Some colognes/perfumes, nail polish, house paint, furniture stain, rust, certain adhesives and some beverage stains. Sometimes you’ve just got to accept that a vintage piece is not ready to give up it’s battle scars!
Happy Quilting and be blessed!
Rhonda