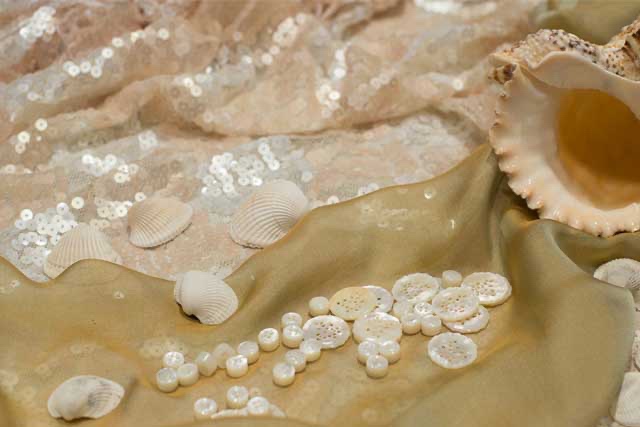
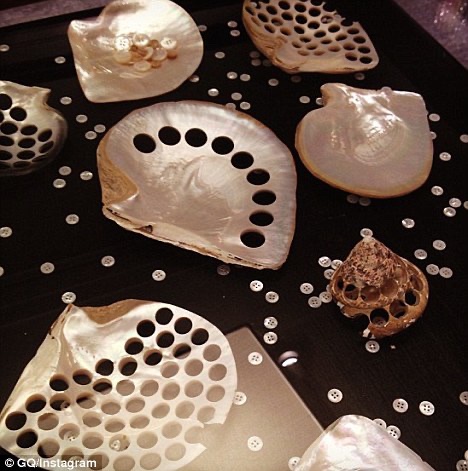
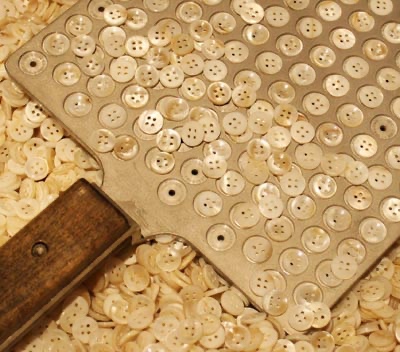
If you have and/or are planning to add mother-of-pearl (MOP) buttons to your Quilt(s) or any project there are some things to know about these little treasures.
Back in the day, MOP buttons were removed from garments before they were laundered as the process and the laundry detergent chemicals could and did cause much harm to these buttons made from shells.
If you’ve ever seen MOP buttons that are dull, chipped and peeling you can assume the buttons have been exposed to the laundry process.
There is a way to save these abused buttons, I’ll outline it below:
Sort through your buttons and remove any that are not MOP.
In the laxative section of your Drug Store look for Mineral Oil.
Place your buttons in a container and pour in enough Mineral Oil to cover everything.
Very gently stir the buttons over the next few days.
The Mineral Oil will penetrate the button surfaces and restore the lost luster. The oil will most likely also loosen and dirt etc. from the button surfaces.
Transfer the buttons to a colander and rinse them well using warm-hot tap water.
Place the buttons into a clean container, cover with warm tap water and a teaspoon of Baby Shampoo. Carefully wash the oil from the buttons. Do not leave them in the shampoo water for any length of time!
Again, using the colander and warm tap water, rinse the buttons and spread them out on a terry cloth towel to air dry.
You should see a remarkable difference in the before and after for your mother-of-pearl treasures!
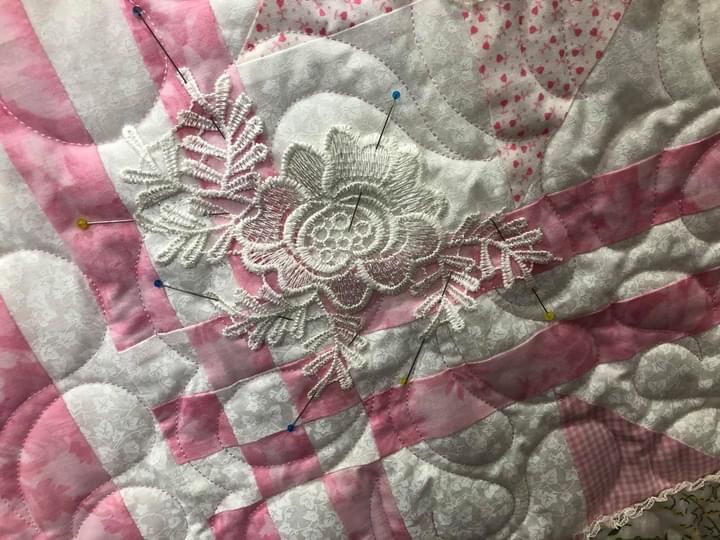
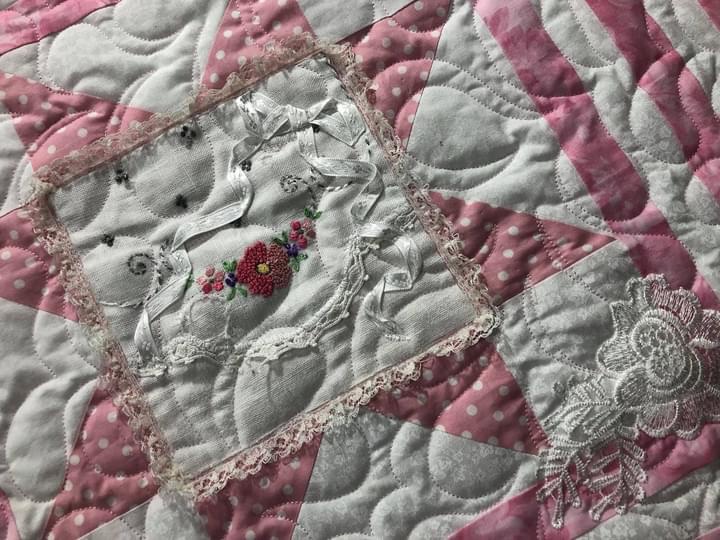
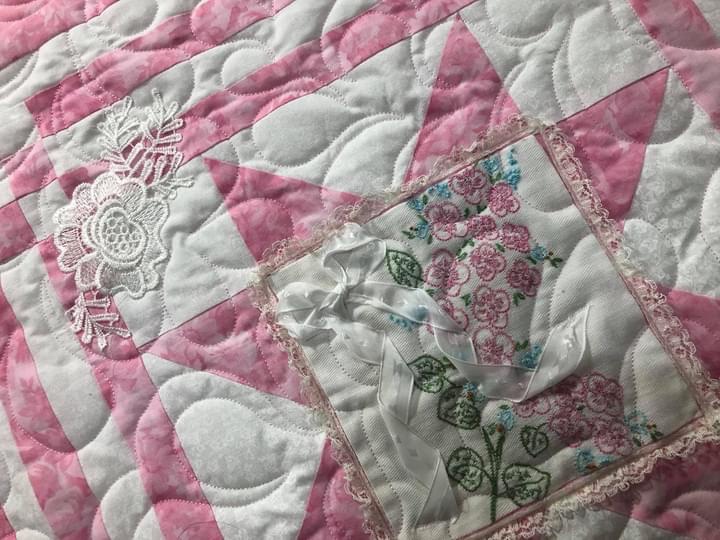
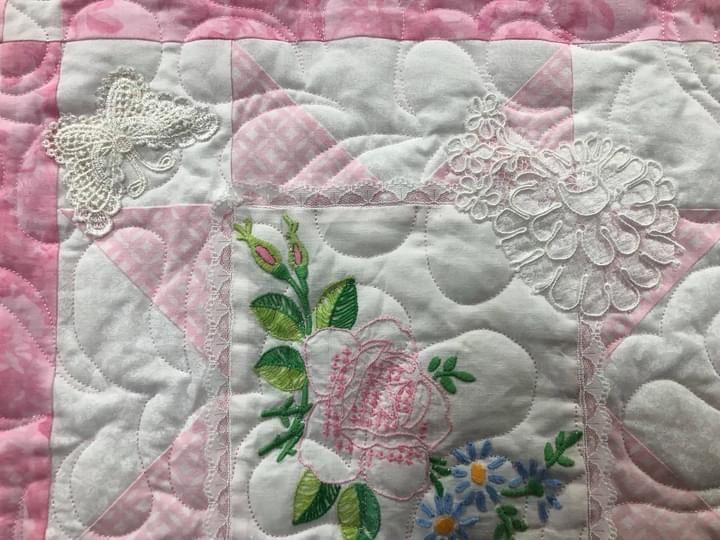
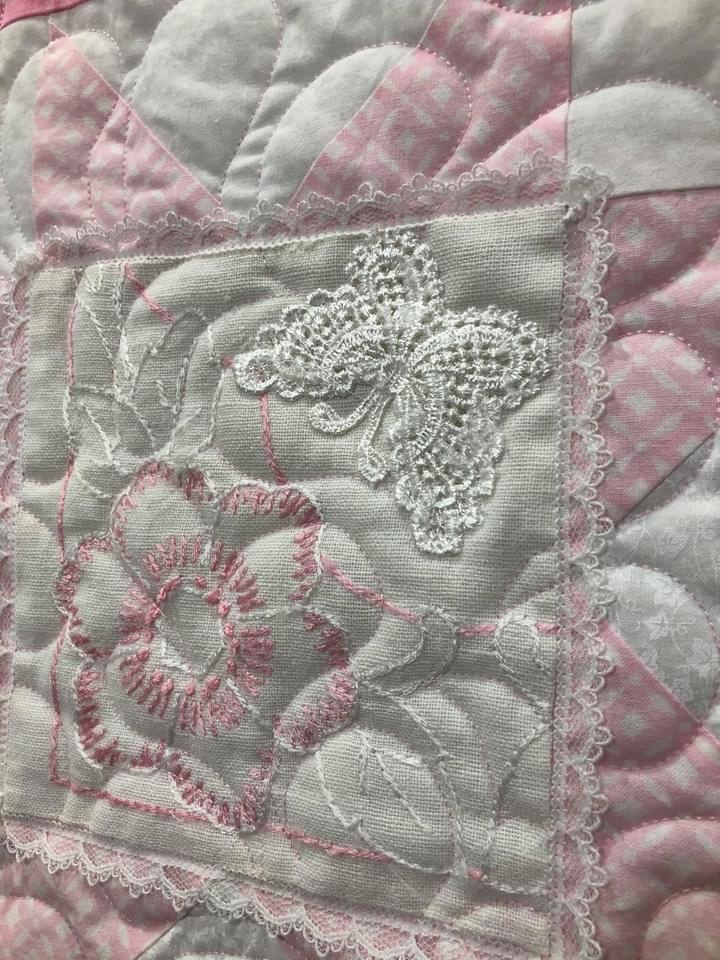
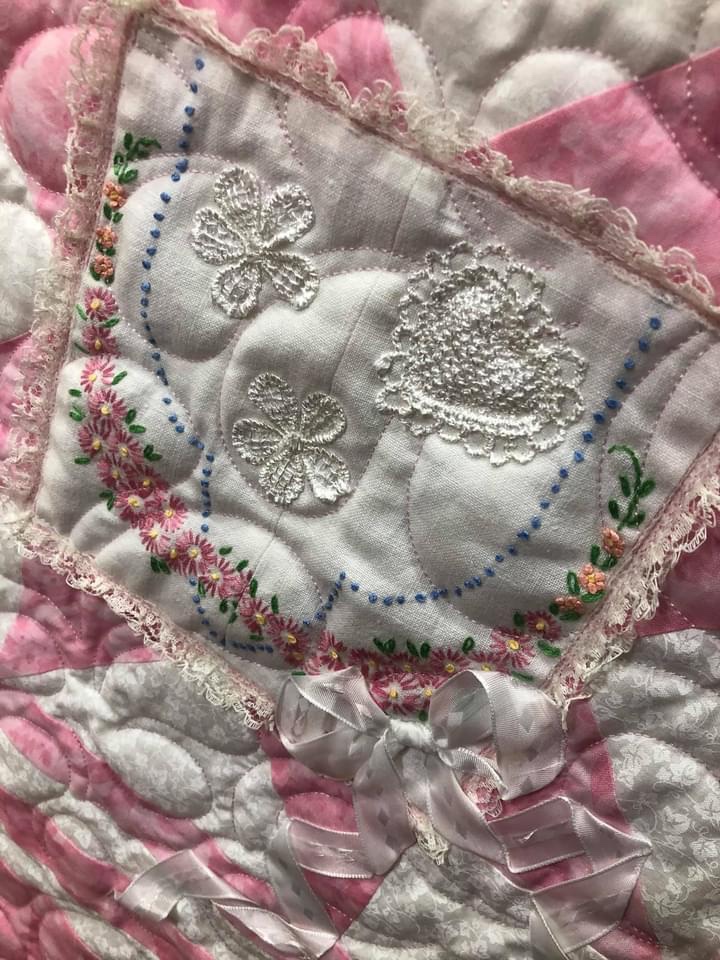
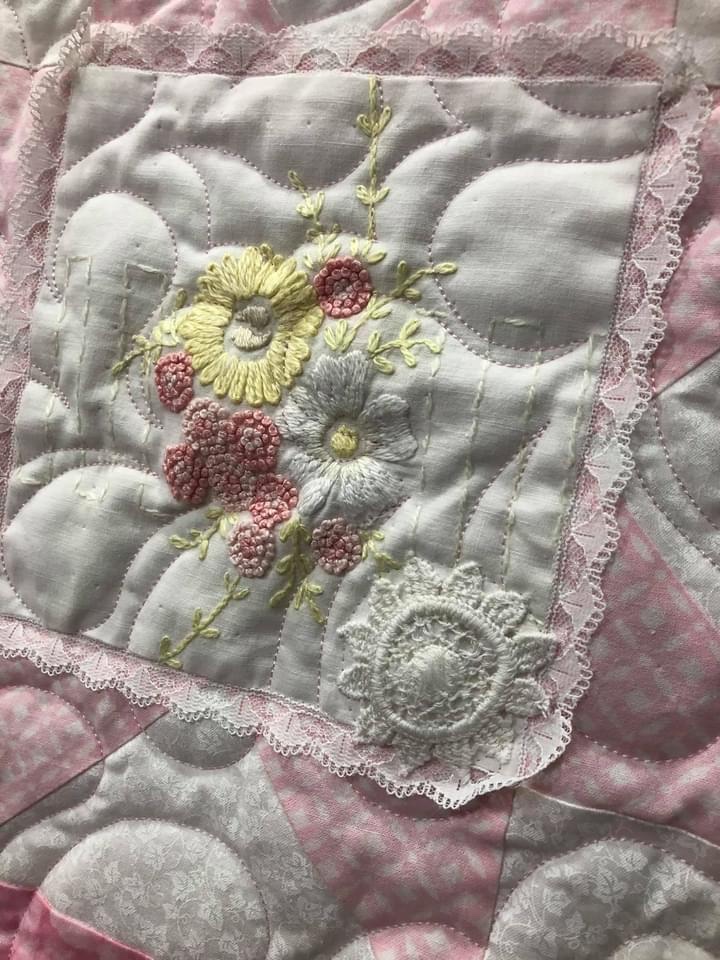
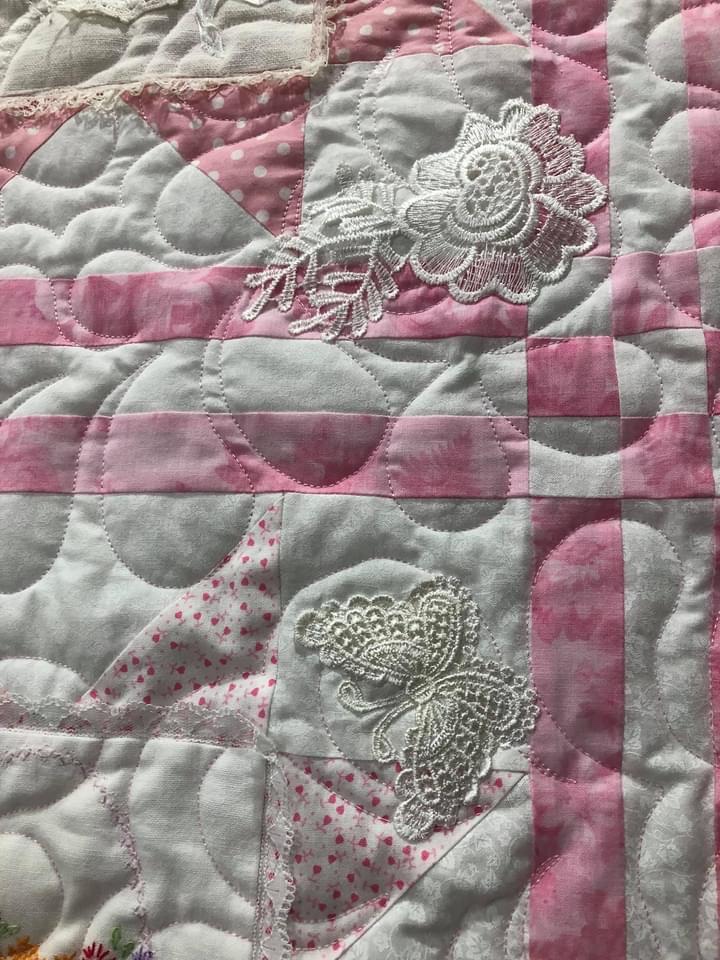
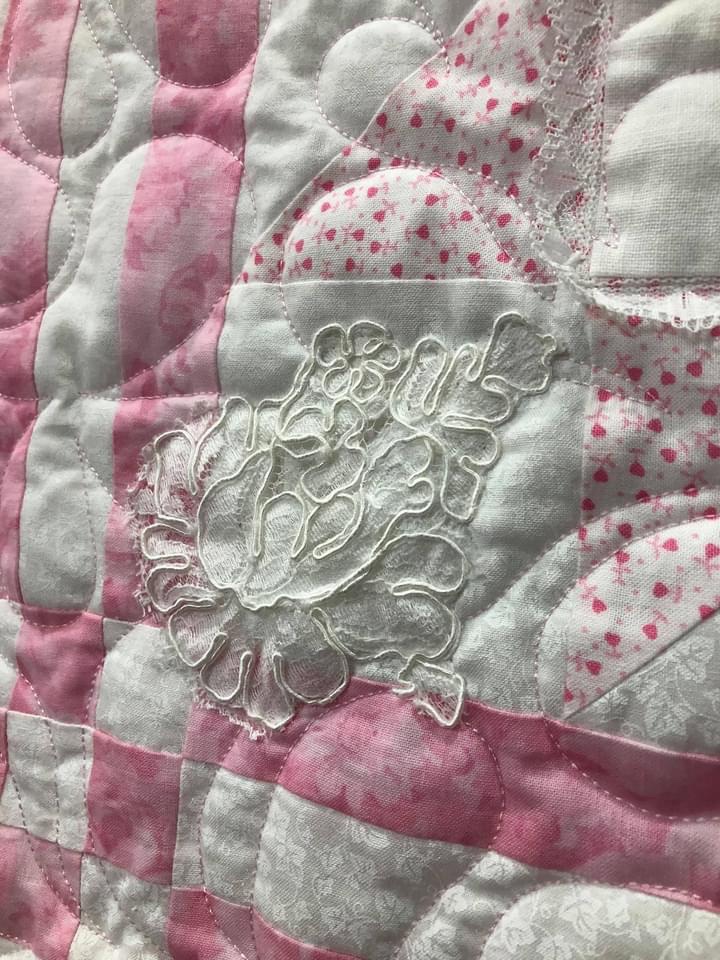
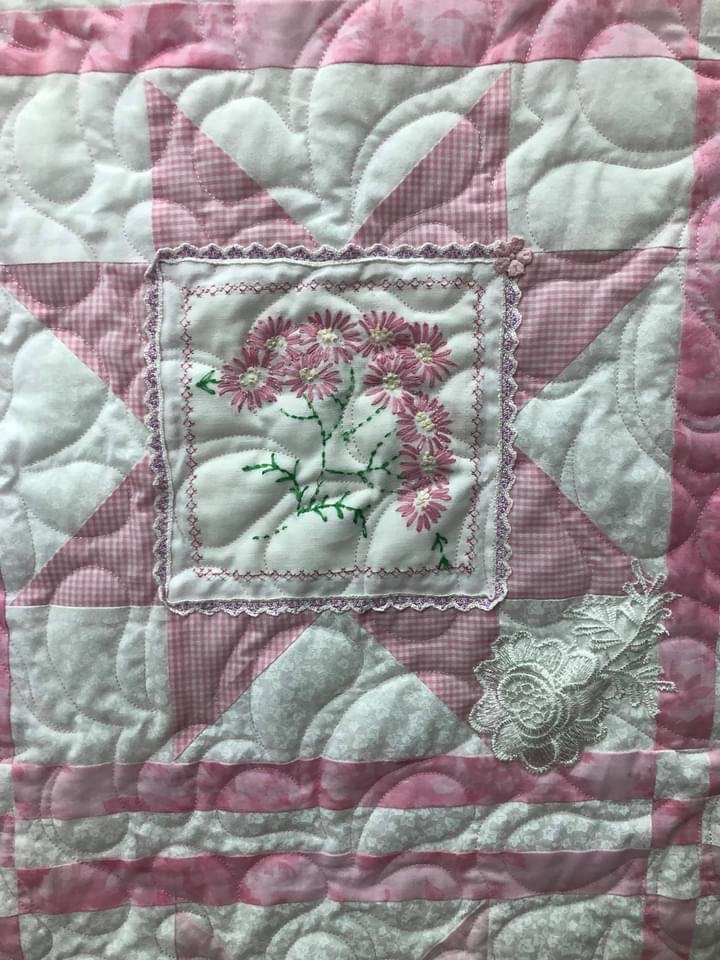
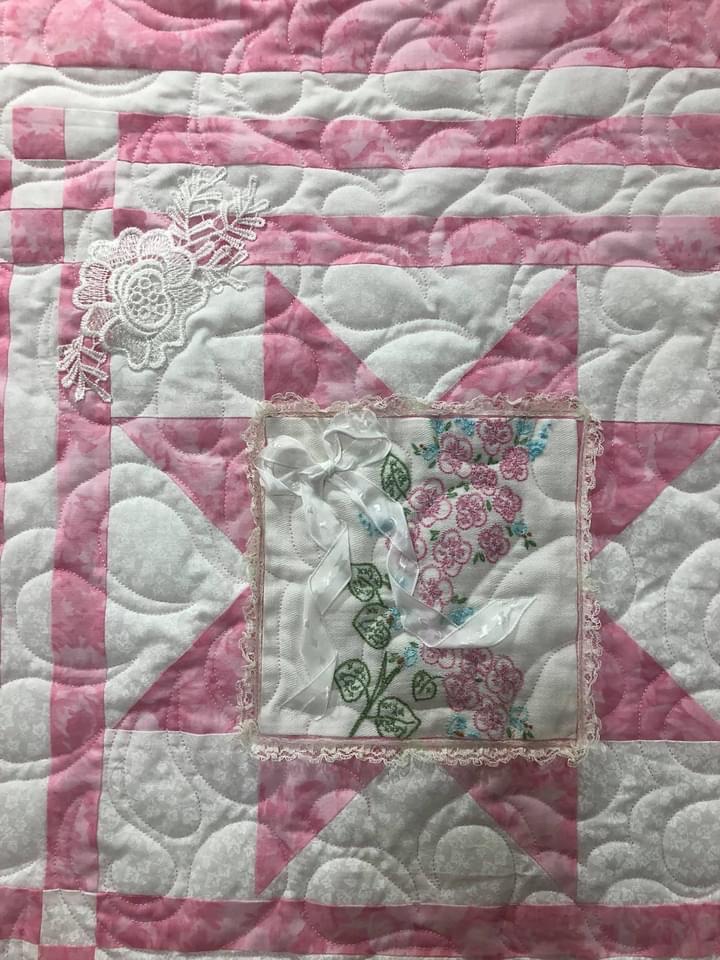
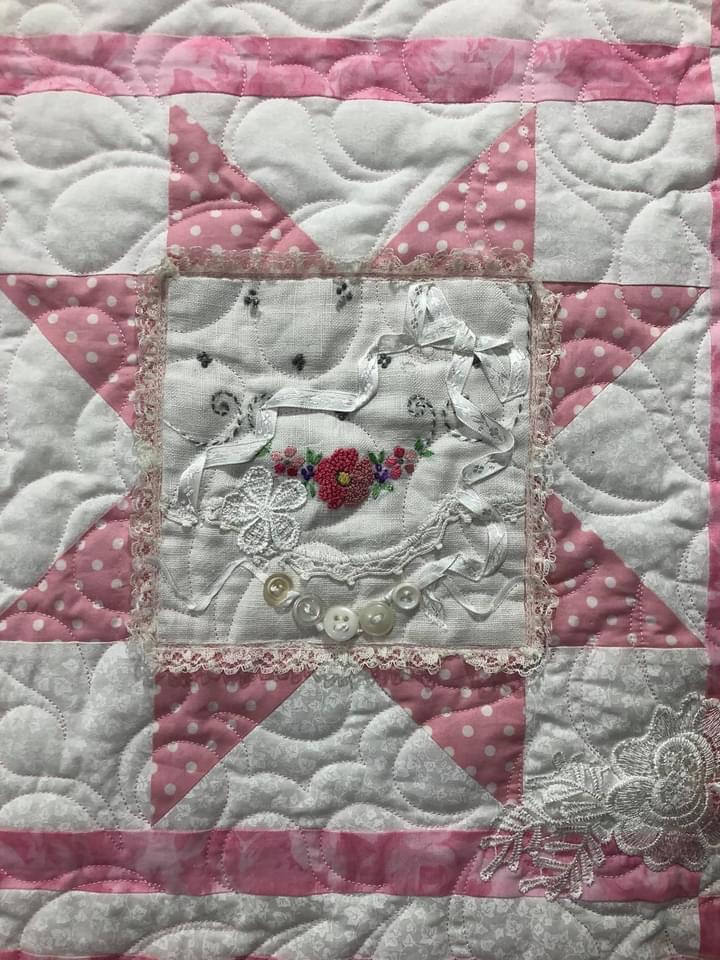
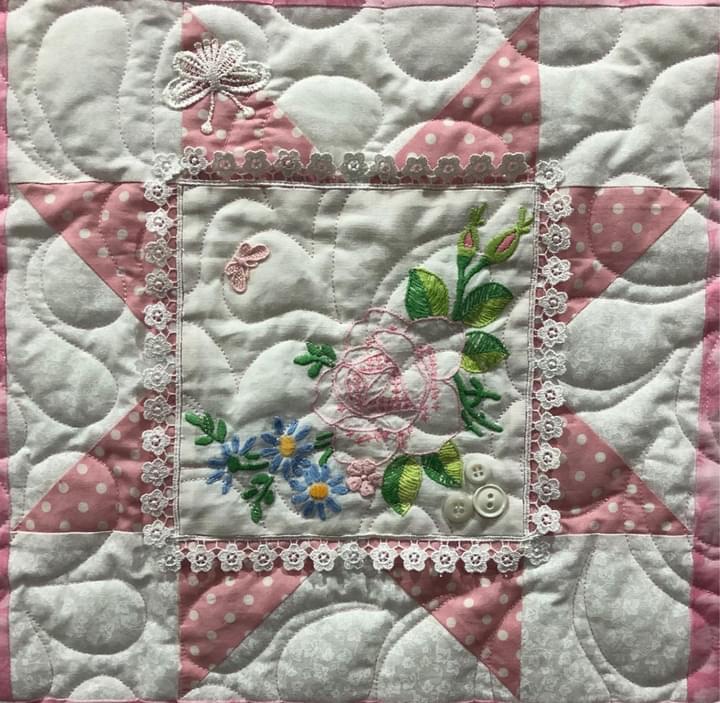
When considering embellishing elements for your quilt, don’t forget commercially produced laces and lace applique motifs. Once again you will find detailed information in the individual picture captions. Are you seeing that embellishing can add so much to an already pleasing quilt? Keep in mind: if you are intending the quilt will be a utility piece, your embellishments need to be able to survive the laundry process.
This flower and leaf lace motif was part of a much larger piece. I trimmed until I was happy with the size for my quilt. With 6 straight pins holding the lace in place, I machine stitched the flower/leaf piece to the quilt using the default stitch length setting on my sewing machine.
Another flower/leaf lace stitched to the quilt.
Don’t be afraid to overlay your laces.
If at all possible, place your embellishing pieces in groups of odd numbers. You’ll remember from a previous FB post that odd numbers create visual tension and therefore visual interest.
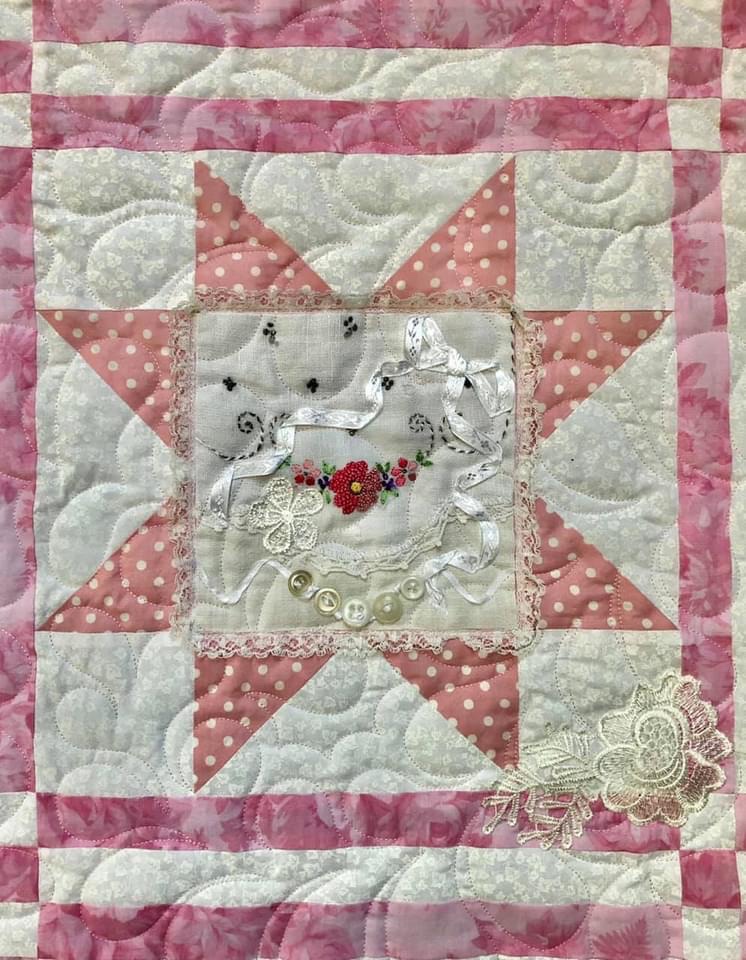
Not all added embellishment need to be laces. The circle with petals above was cut from a manufactured ivory doily with damage from use.
Some people still are asking if these embellishments were added before or after quilting. Can you see that the longarm quilting is hidden below this lace motif? This tells you the lace was added after the quilting took place.
Hope this gives you ideas about using things that might not be “old” but will work so well with your Vintage Lattice Star (or any other) Quilt!
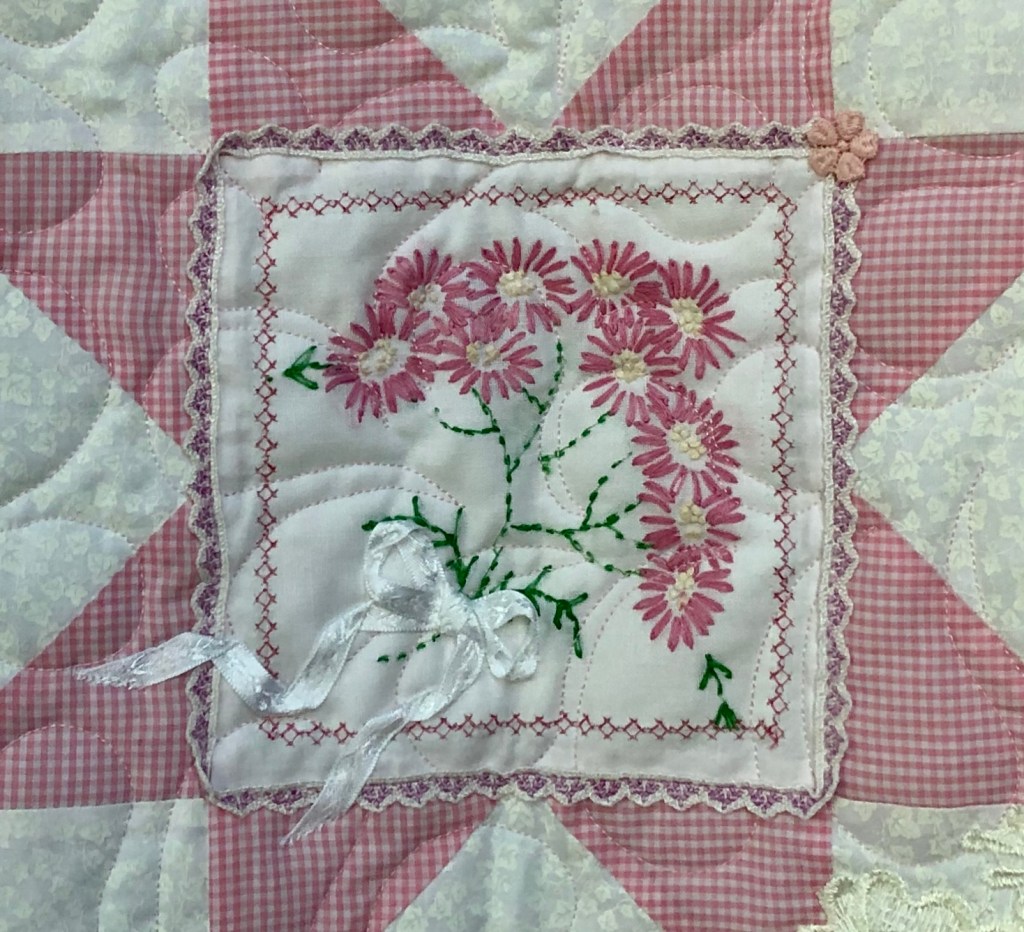
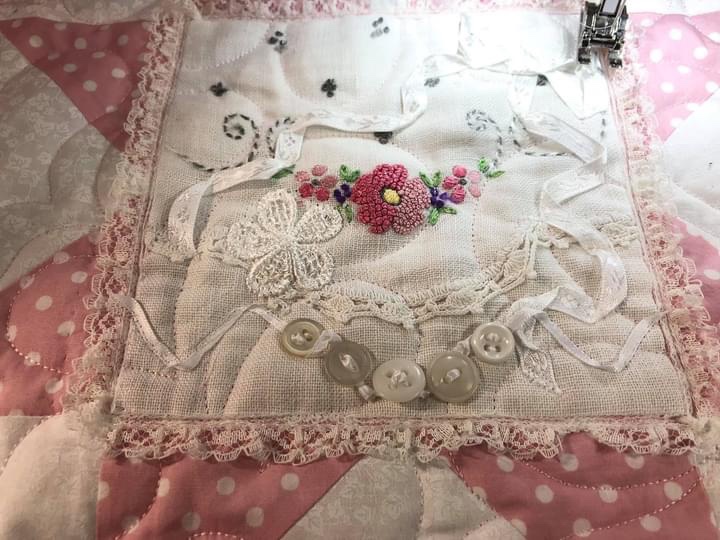
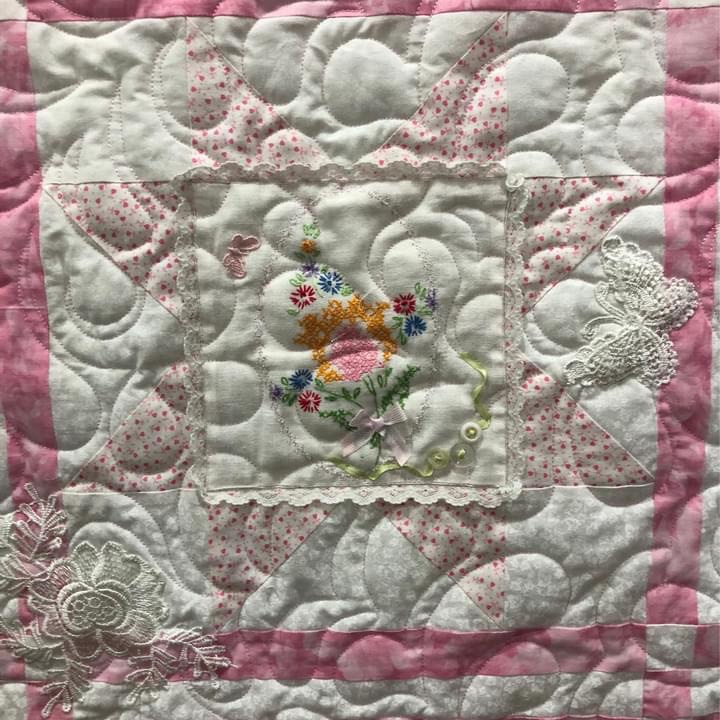
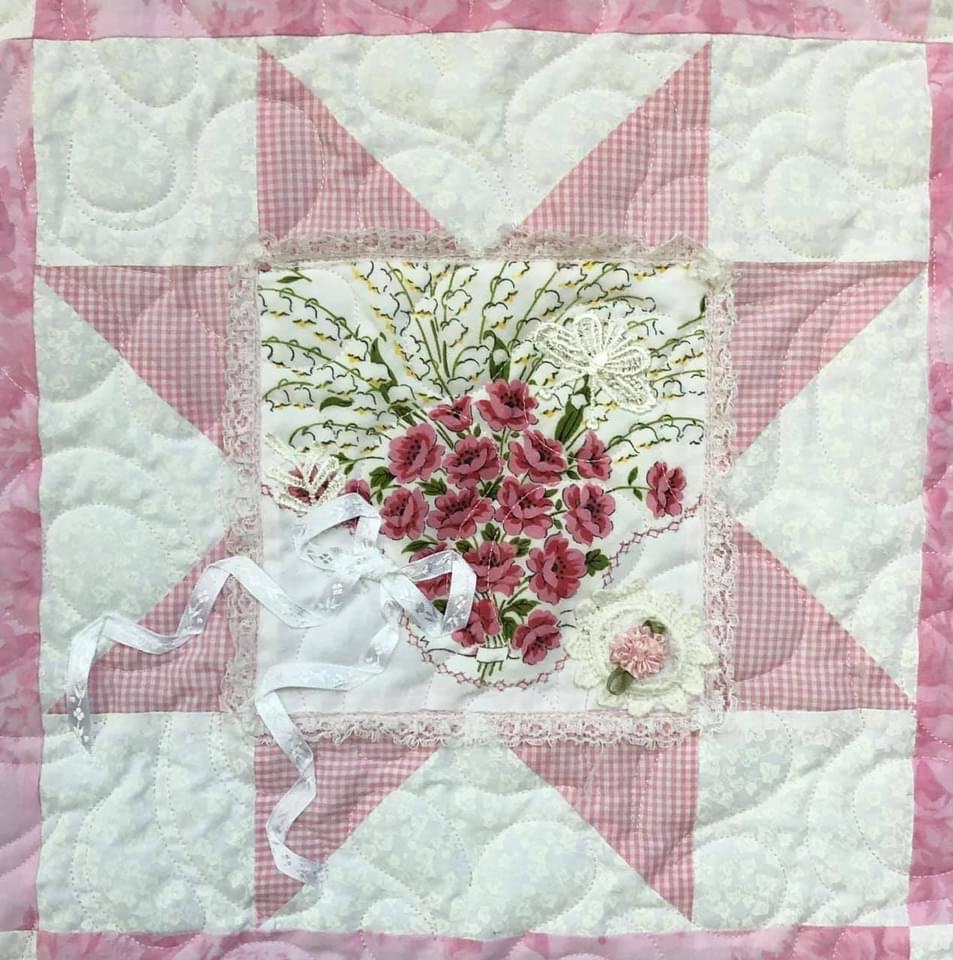
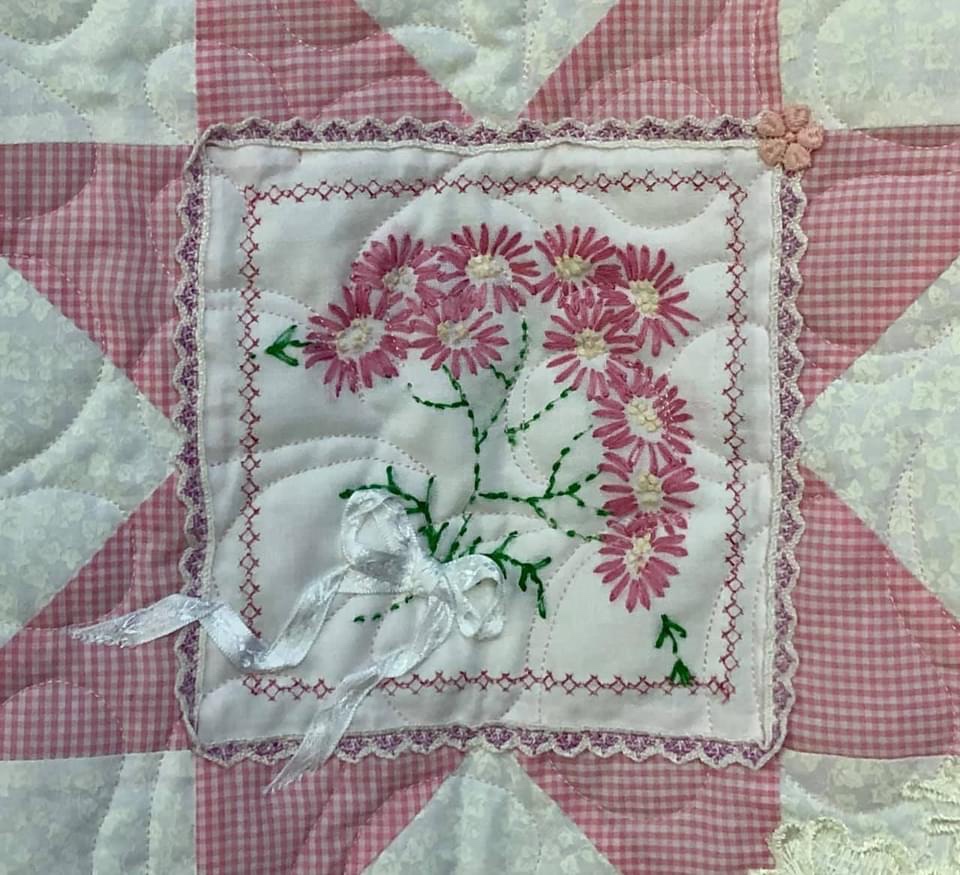
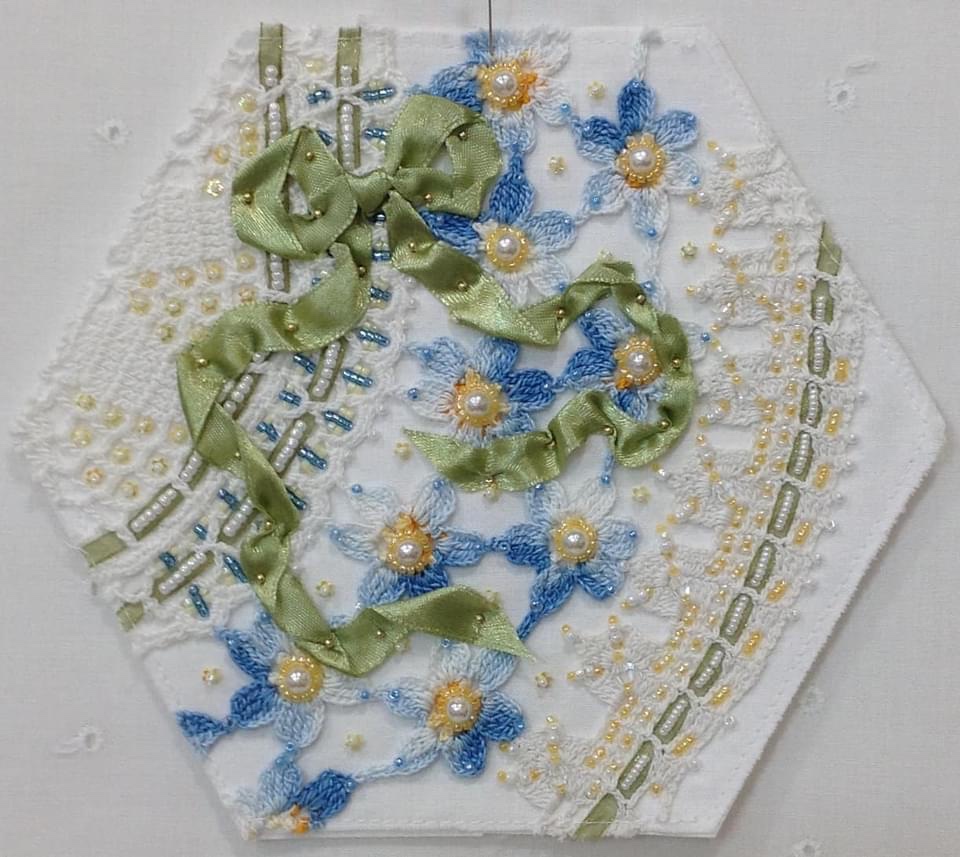
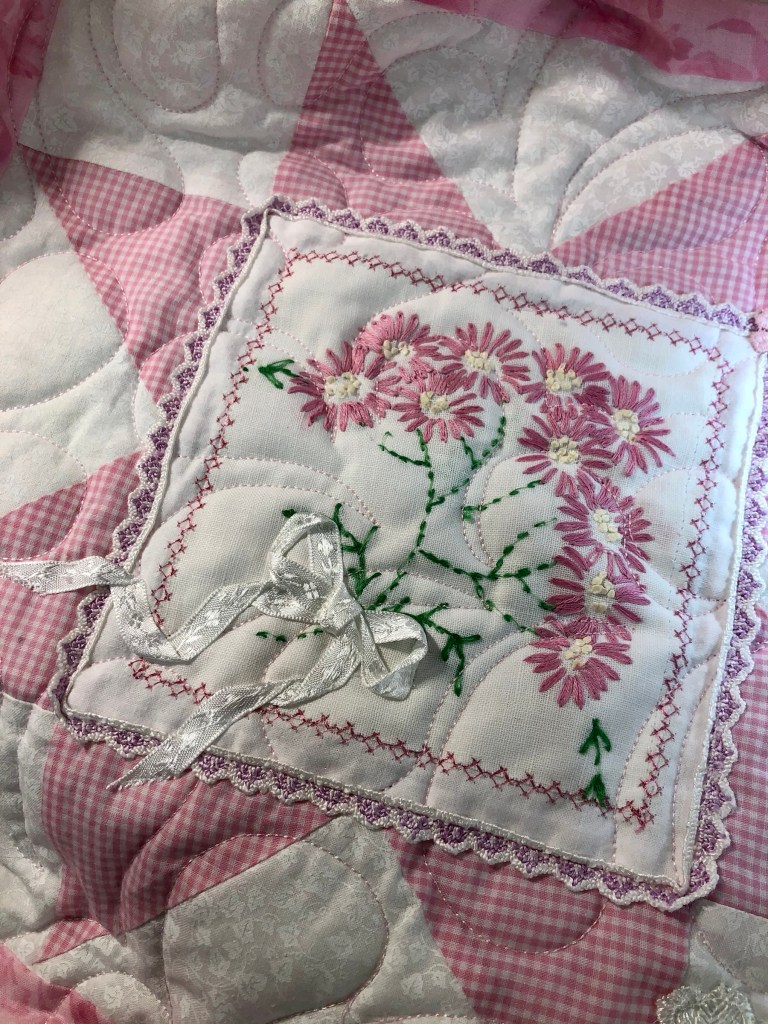
Let’s spend a little time and talk about how ribbons and buttons work so well together when embellishing vintage linens. Once again I am going to use the picture captions to give you step by step instruction about how I approach adding them to this pink and white Vintage Lattice Stars quilt.
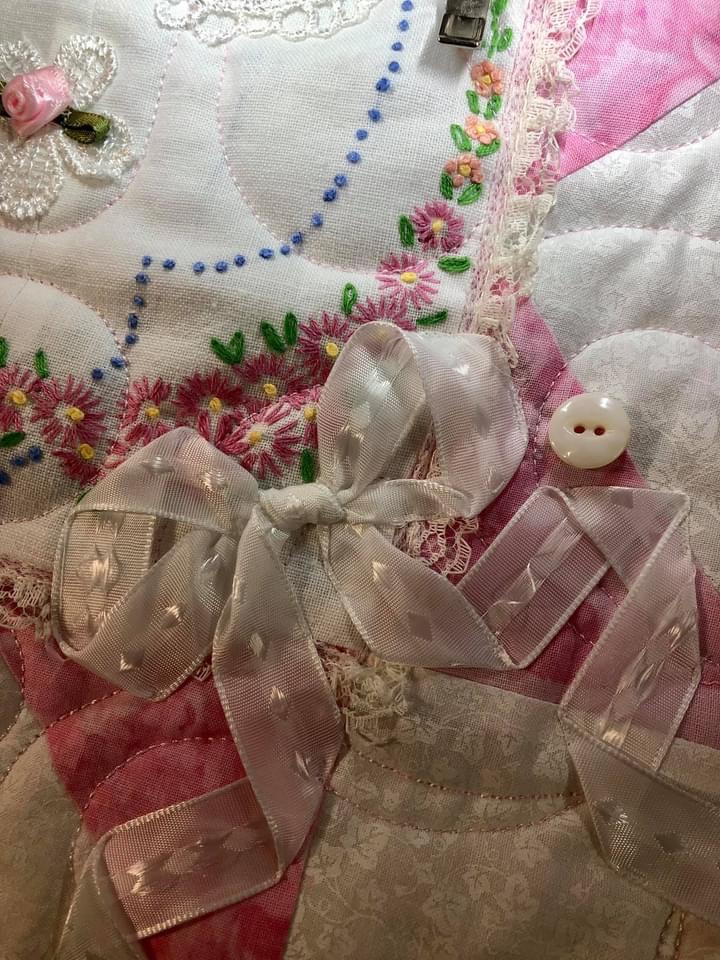
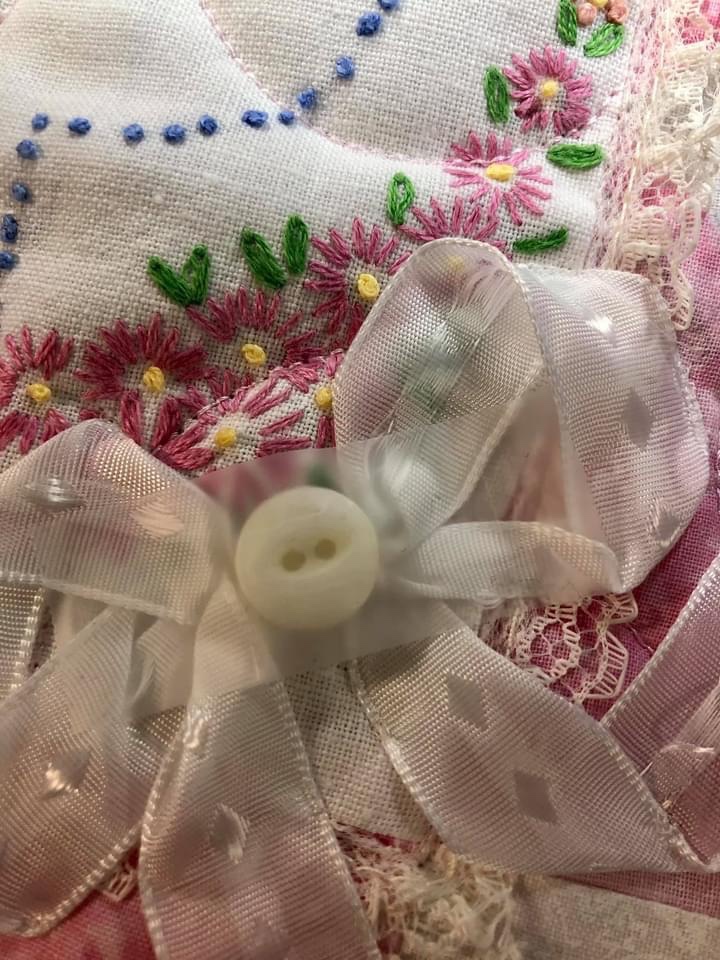
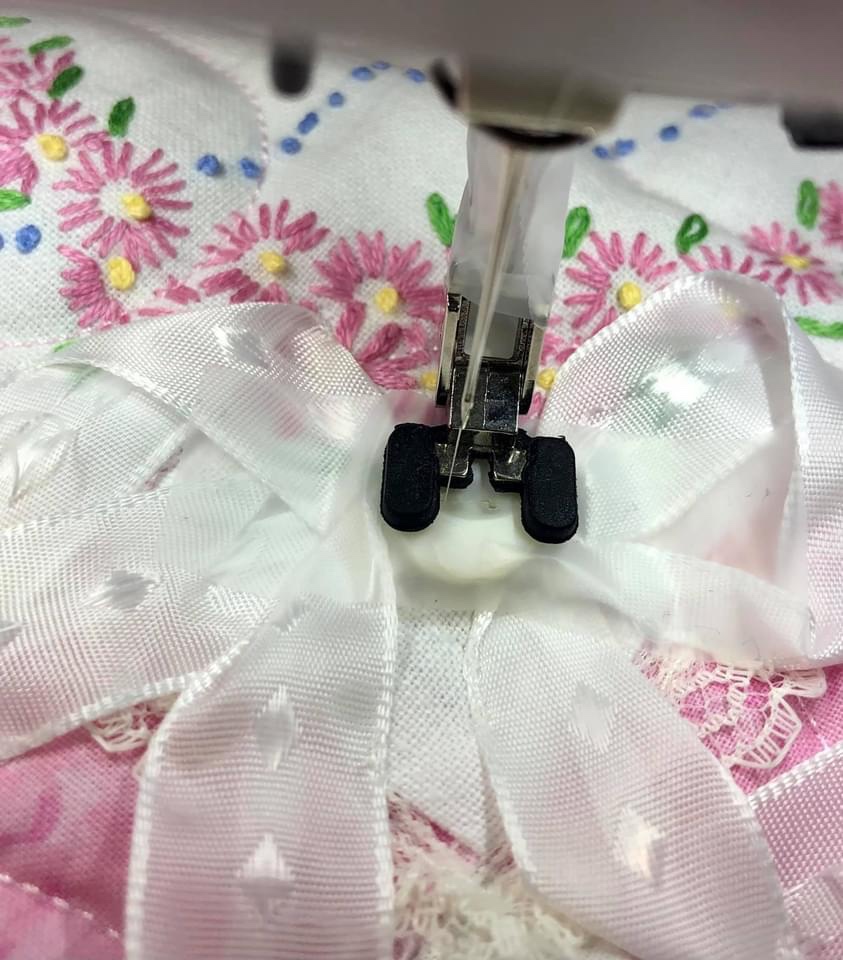
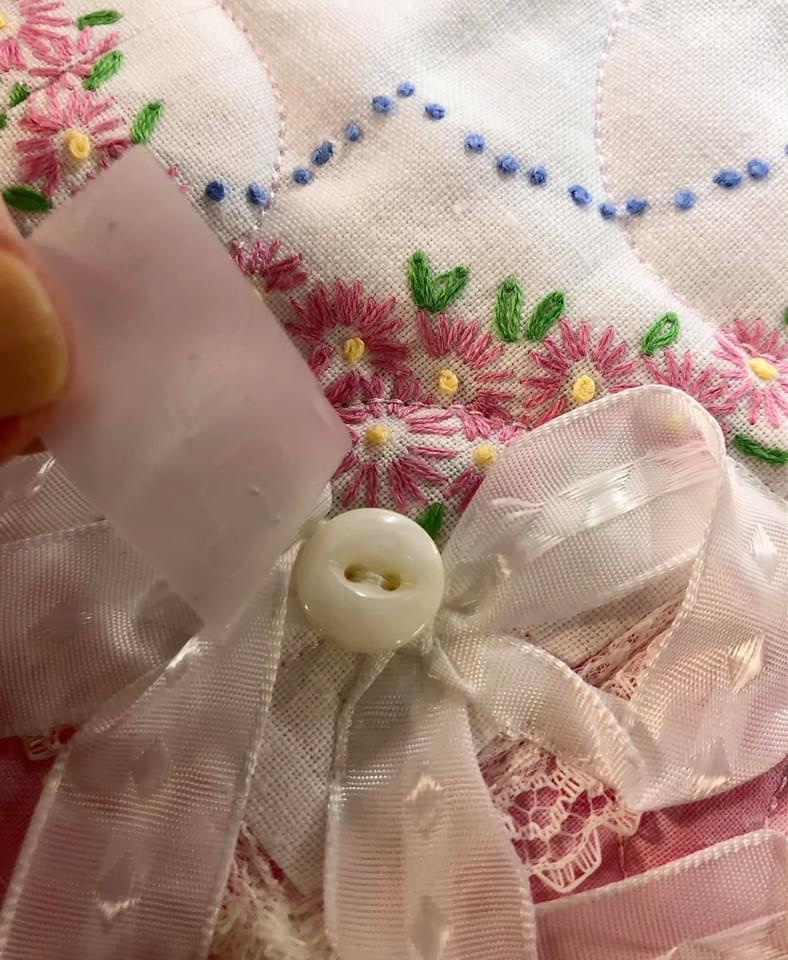
I like my white ribbon but I know I can give it some more character by adding a vintage button. And I’m going to use my sewing machine to sew the button on to the quilt.
Use transparent tape to keep the button from moving when sewing onto your quilt.
With my button taped in place, I’ve attached foot #18 to my Bernina. A little tip for those of you using the #18 foot…there is a movable “part” in the middle of the foot that allows for a “thread shank” when sewing on your button. This “part” gets in the way. I have this”part” taped up so it is disabled. This is not a button that will be used as a utility fastner and therefore I do not need a thread shank. Does all this sound like gobbly-talk? I have a garment construction background…sometimes I intermix the lingo with quilting…
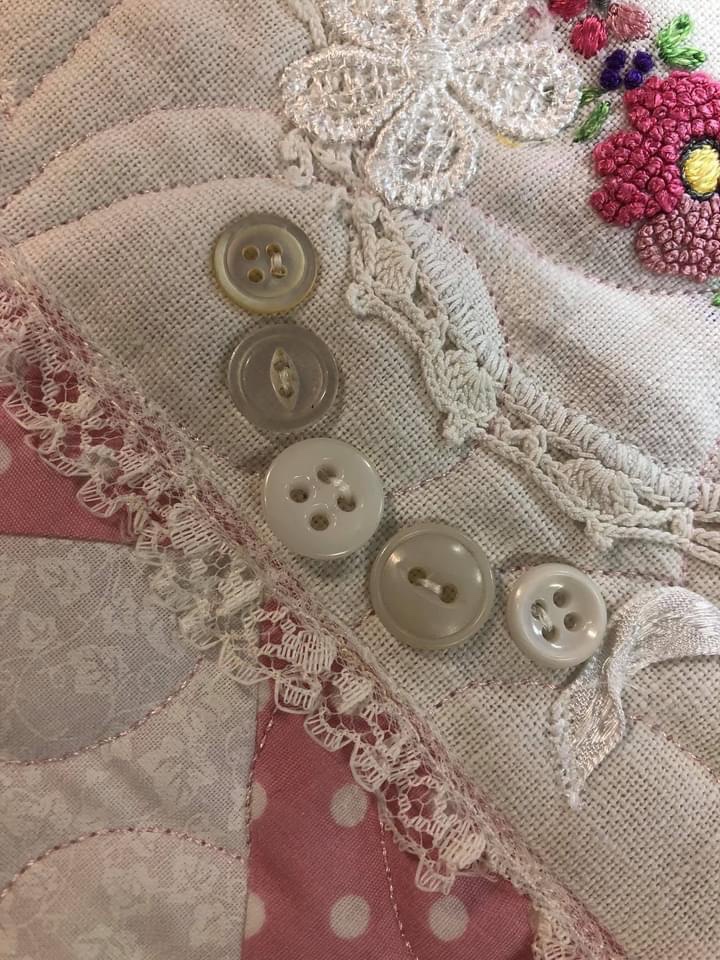
Once my button is sewn in place I easily remove the transparent tape. If you sew on a Bernina, you will find your button attaching stitch with the buttonhole options.
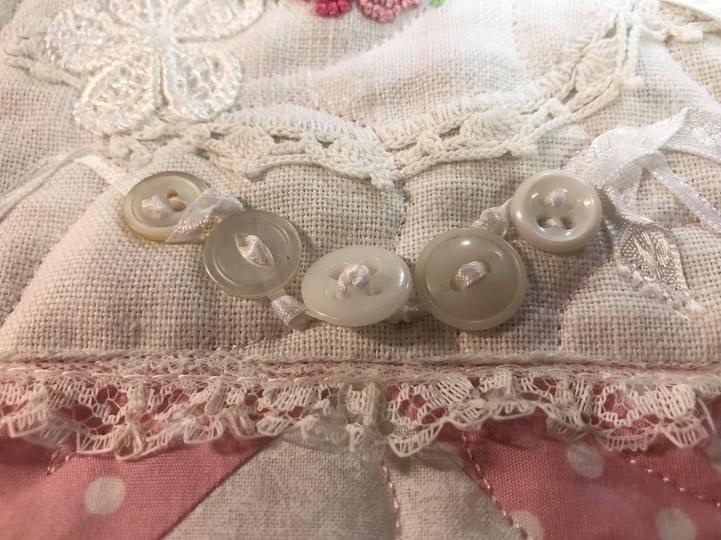
You can see I’ve sewn a 5 button swag. Make note about the 4 hole buttons…not all the holes need sewing machine stitching.
I digress here but…don’t you just love the French Knot flower blossom!!
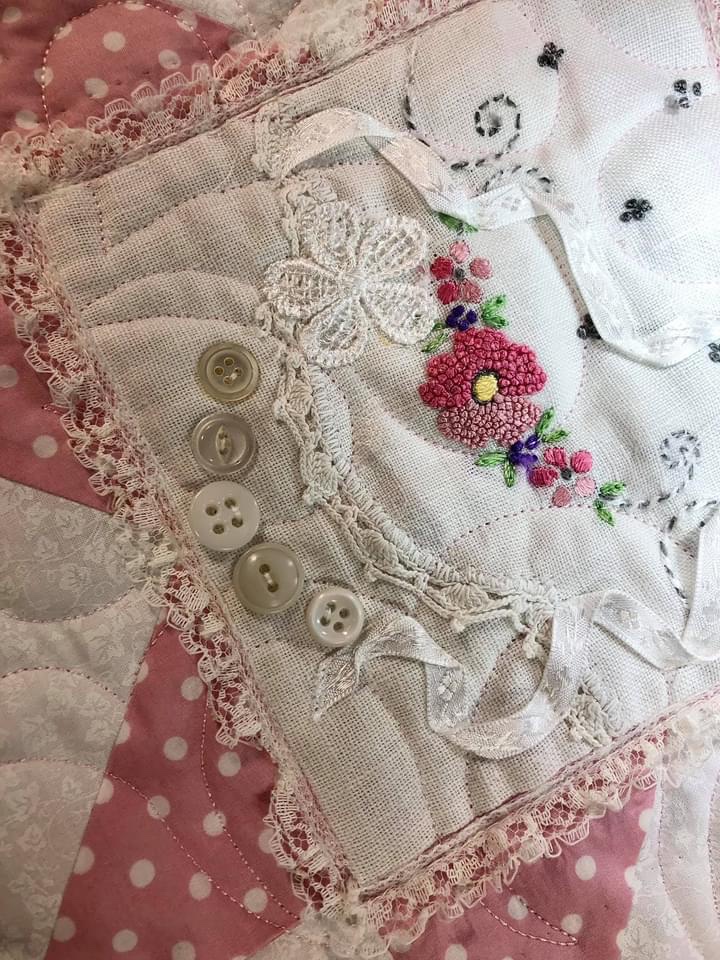
I’m using 1/8” wide white satin finish ribbon and a hand sewing needle with an eye large enough to handle the ribbon. I am not actually sewing the buttons with the ribbon, merely kind of weaving it up and down through two of the button holes. I do not sew the ribbon to the quilt top. Between each button I tie a simple knot for visual interest.
If I would have had a light pink narrow width ribbon it may have looked a little better than the white but I’m happy with this result. You can see in this picture that I tied a simple knot both between the buttons as well as on top of the holes on the center one.
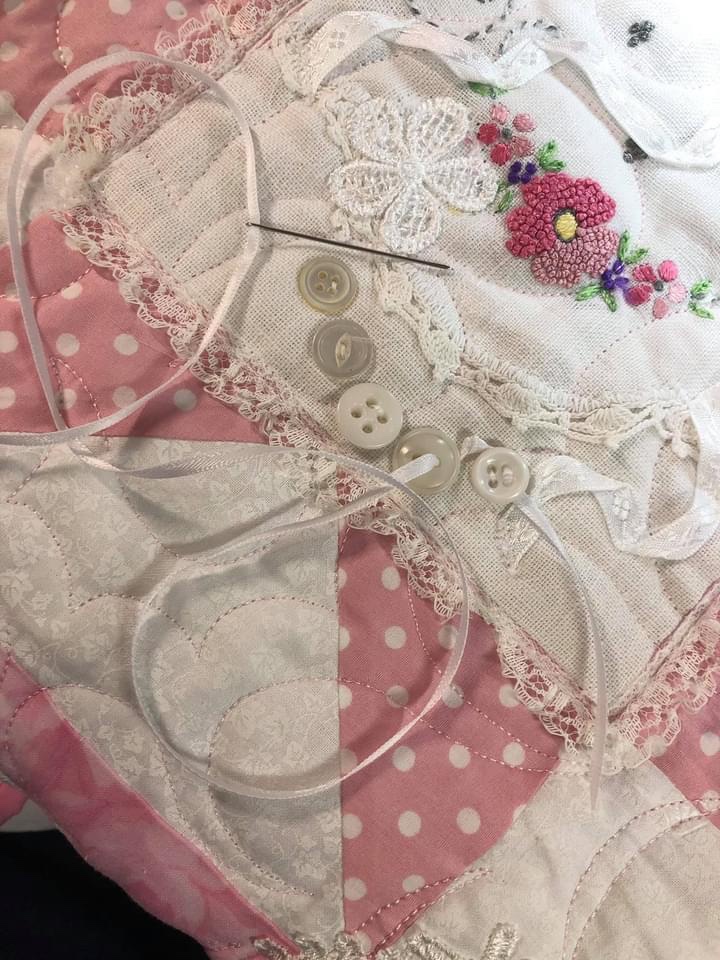
Just a closeup for a better look at the end result. If you have difficulty pulling your threaded ribbon needle through the button holes, the gently assistance of a small pair of pliers might help. Just do not pull so hard that you rip your button from your quilt!!!
Does it bother me that I have used two different white ribbons in the same block? Not at all! There are no quilting embellishing rules at this point!
So far I’ve showed you 1 button, 5 buttons and now 3 buttons. Odd numbers create nice visual tension and visual tension creates interest.
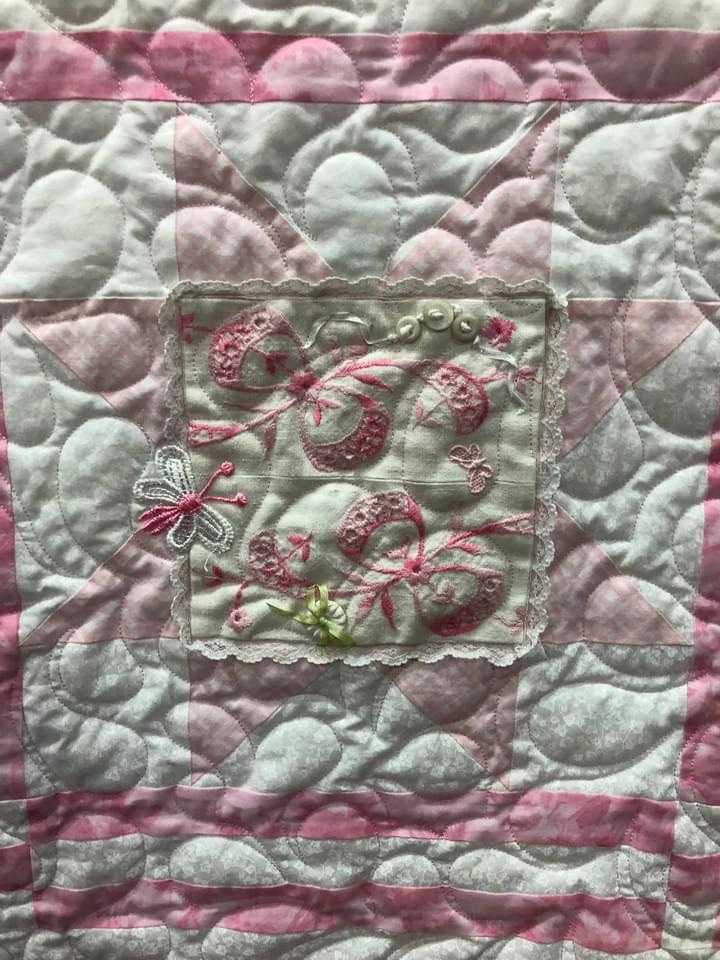
3 vintage buttons with a very narrow spring green ribbon connecting them all.
Sorry about the poor picture quality here but can you see the single white button with the narrow green ribbon bow? There are so many different things you can do with ribbons.
Again a single vintage button with the narrow green ribbon. Very simple yet eye catching embellishments you can add to your finished quilt!
I hope you see the possibilities in your own quilt creation!
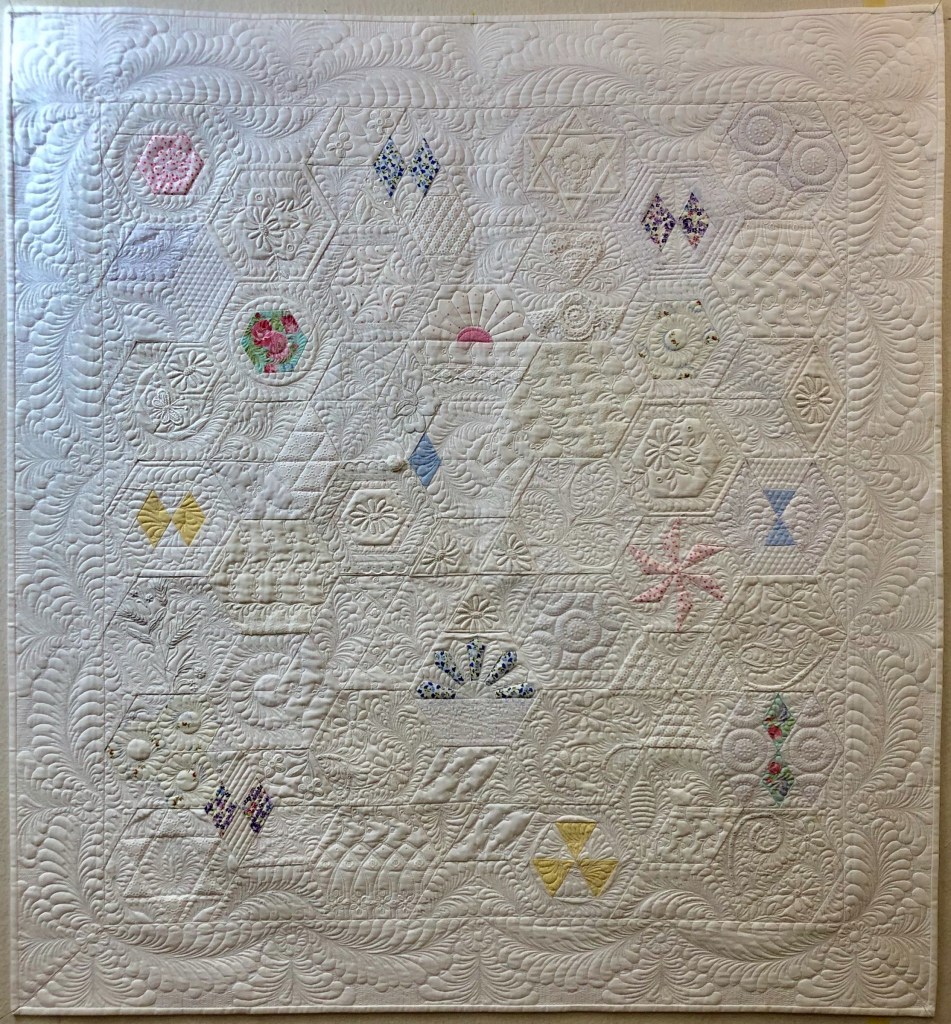
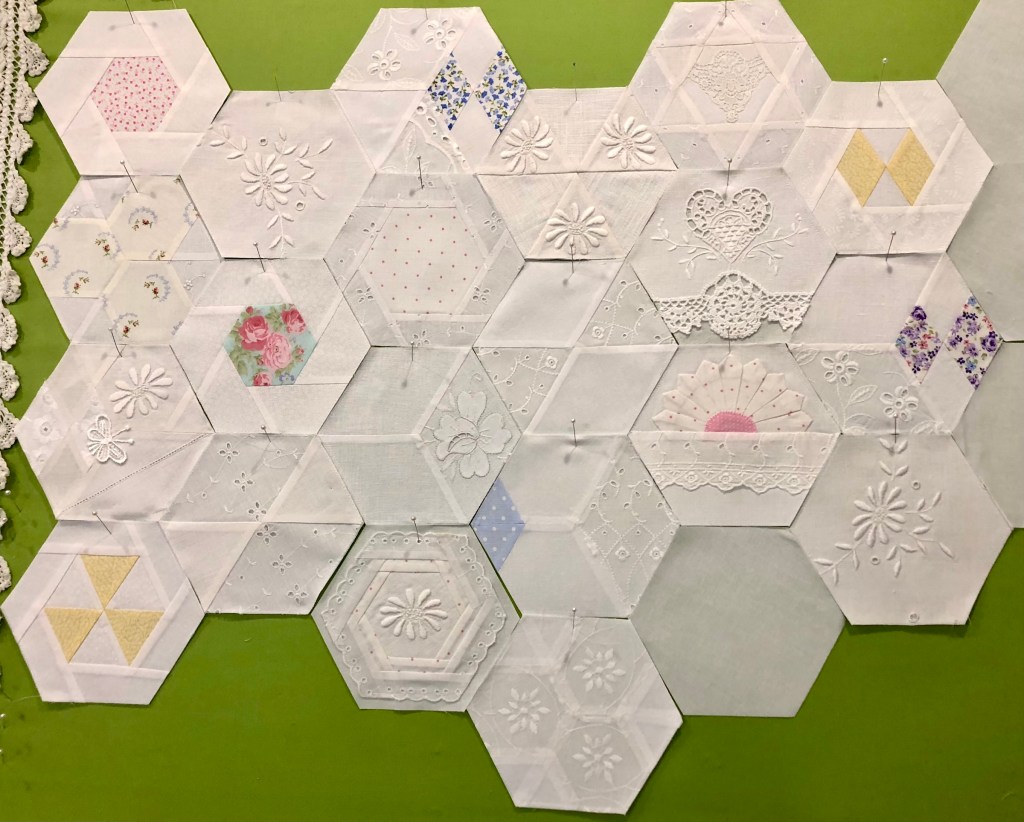
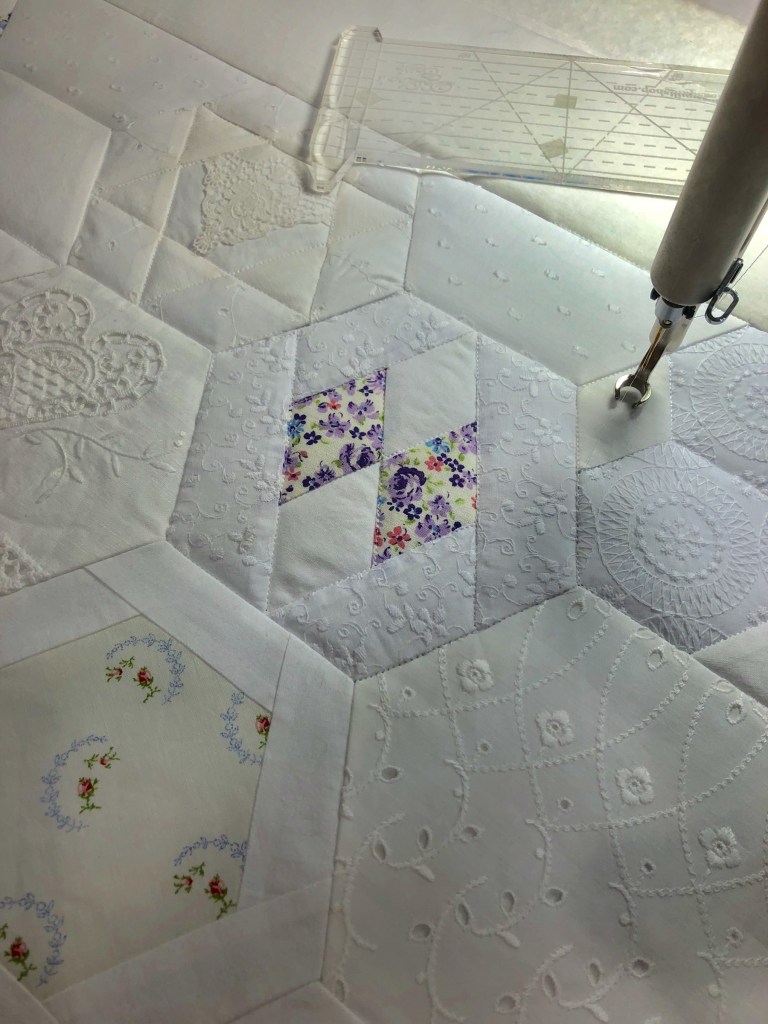
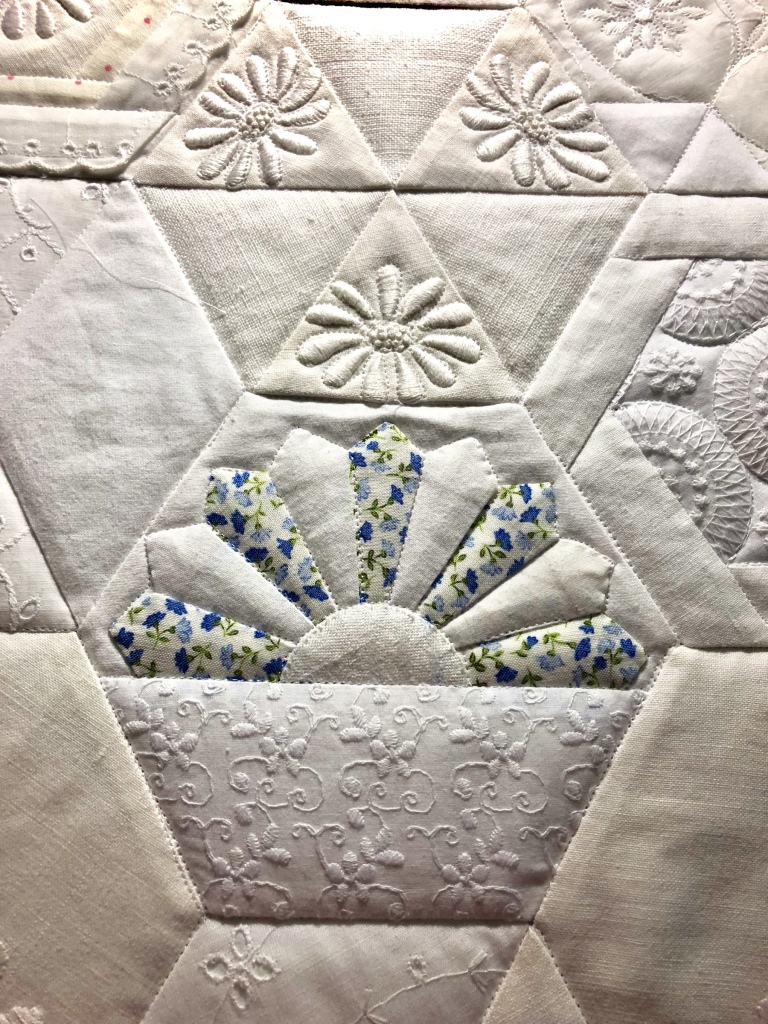
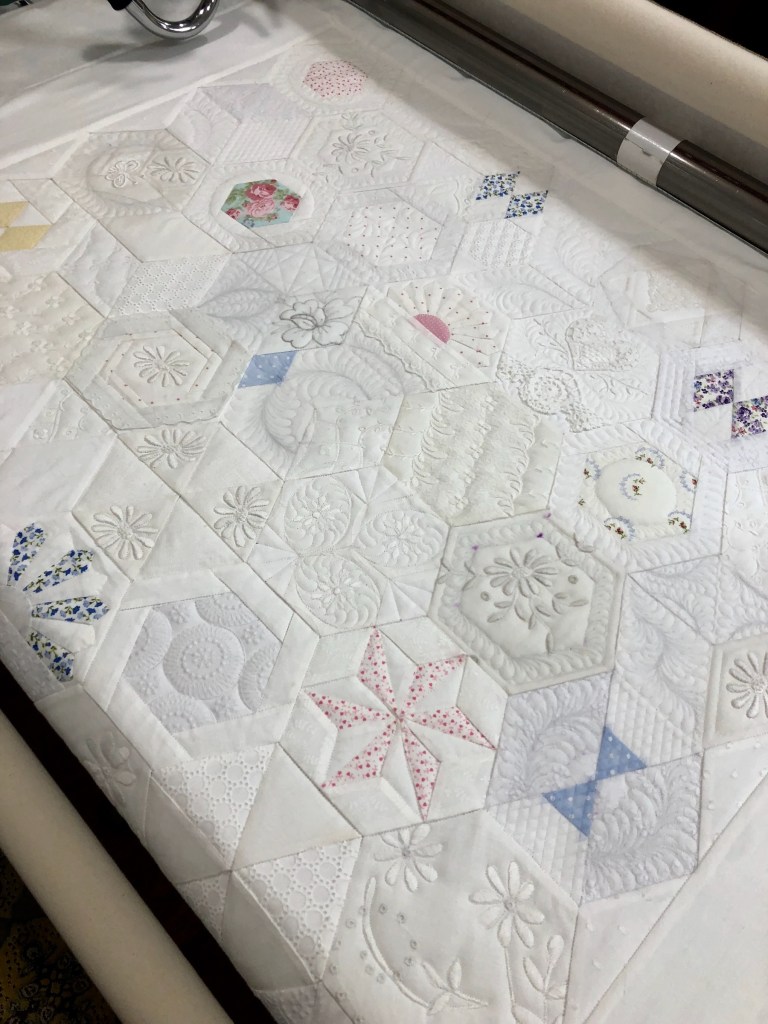
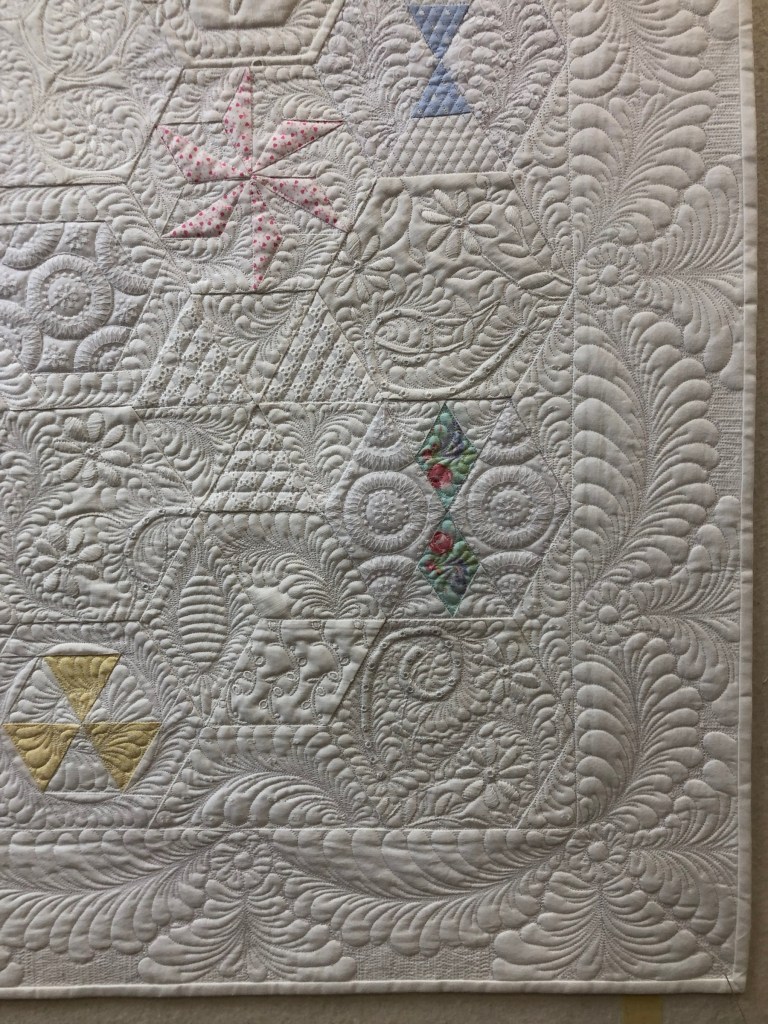
A wonderful experiment using whites, very pale ivories and new quilting fabrics for little pops of color.
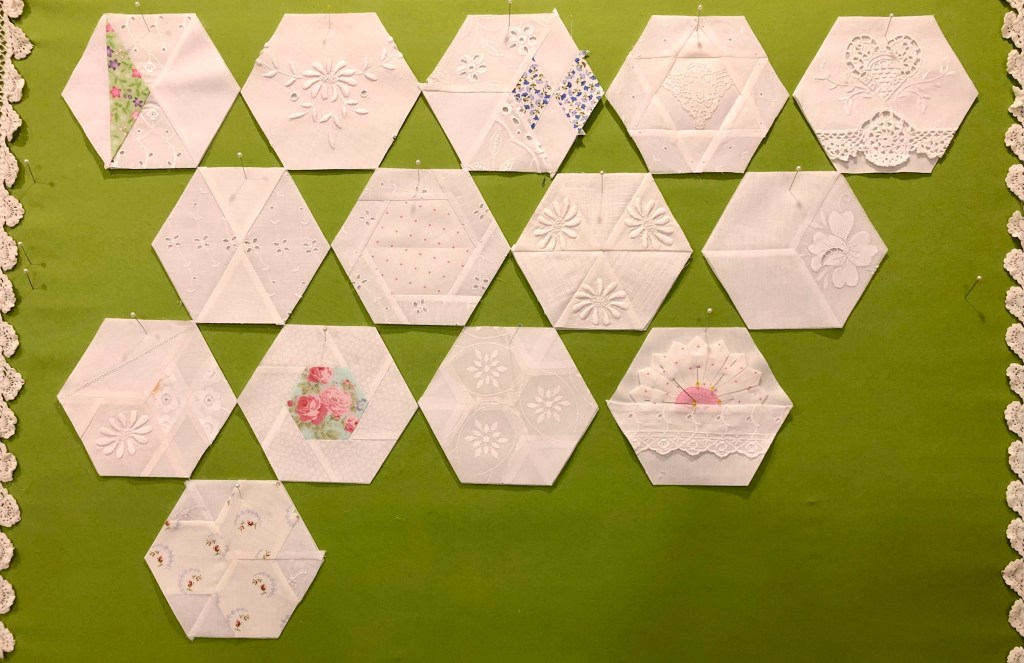
This whole hexagon block began life as a guest hand towel. For this project I decided ahead of time to use an under layer of medium weight bleached muslin. Muslin that was laundered twice in hot water and dried in the dryer.
The thing to keep in mind about vintage linens is that they have most likely been used as utility pieces and would therefore have been laundered many times and because of this they are probably not going to shrink.
Each side of the hexagon, when a 1/4” seam allowance has been taken, will measure 3” EACH SIDE.
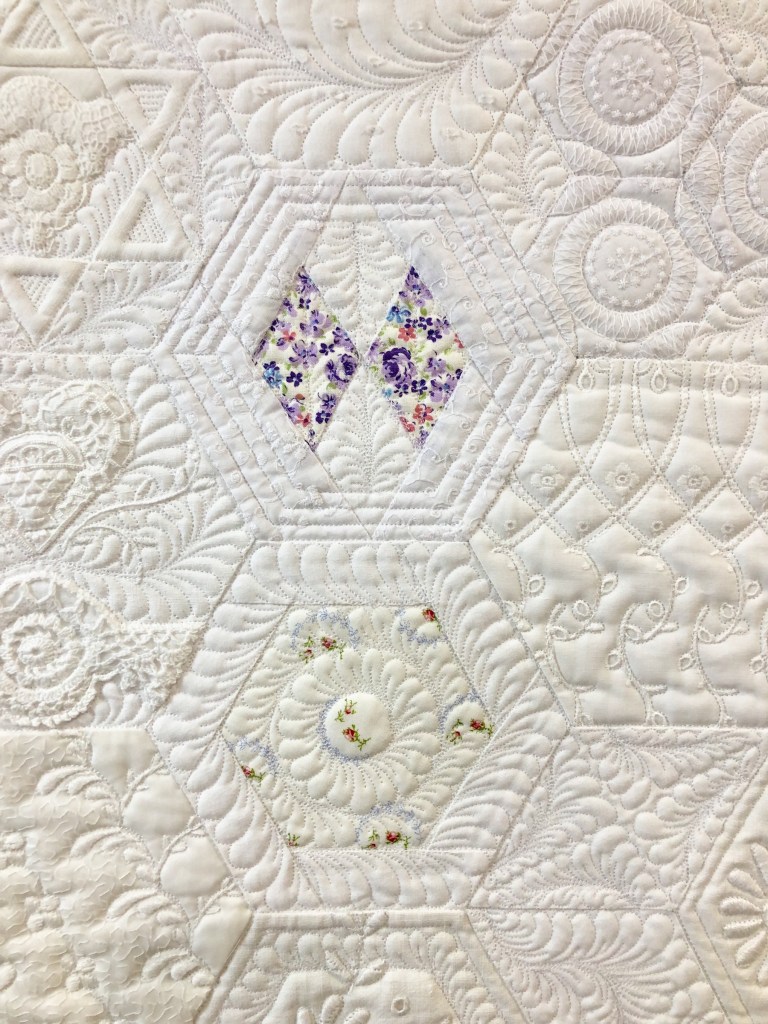
The nice thing about experimenting is knowing you can and most likely will make changes. See the top left hexagon? I was not happy with the diamond with the green, it was an easy revision.
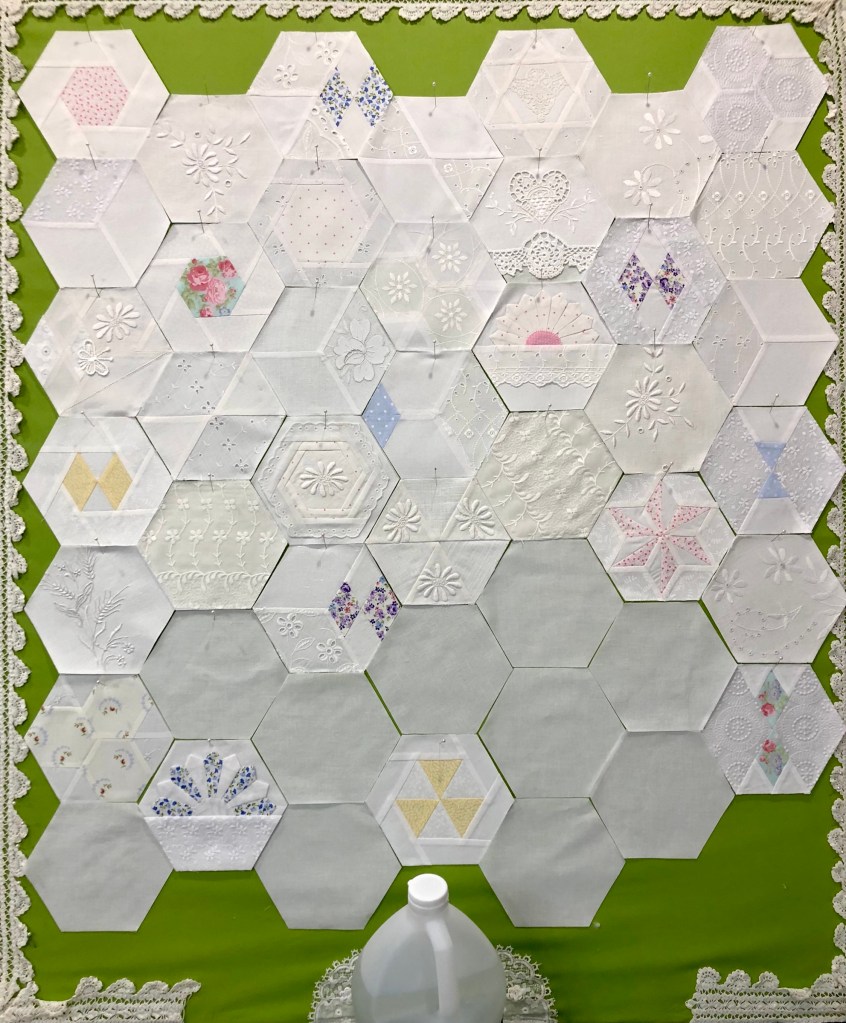
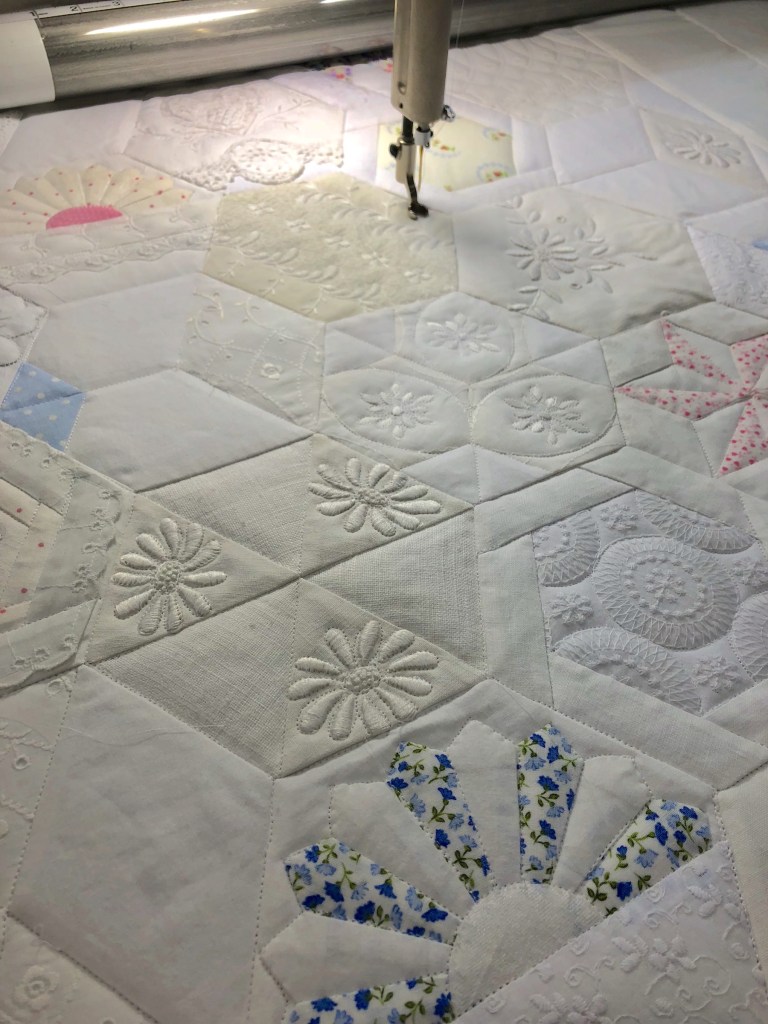
As the block count grew so did the rearranging.
I think one of the hardest things was to not put a pop of quilting fabric in each of the hexagons. I’m using a small design board, it is propped up in a chair, the jug is holding the board in place. But see the hexagon right above the jug? The one that looks like an upside down radioactive symbol? That one made me chuckle every time I looked at it…
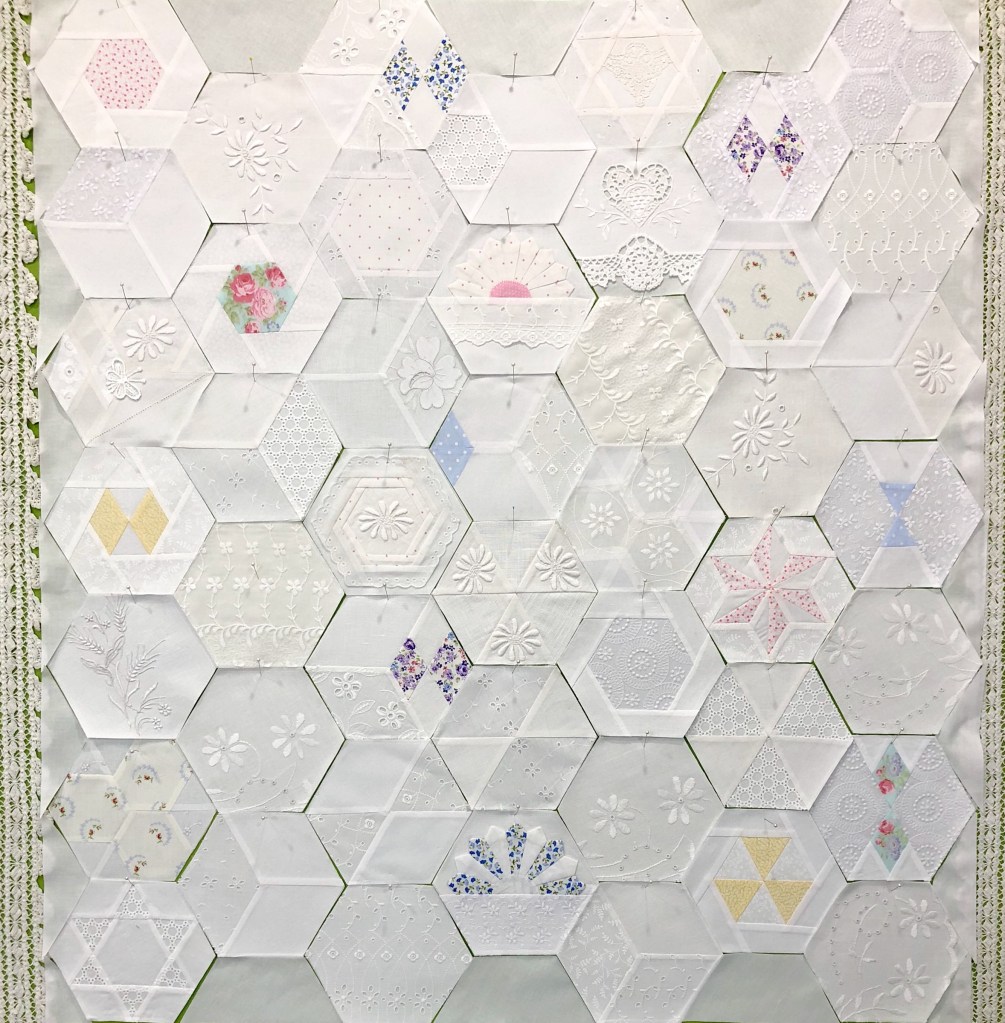
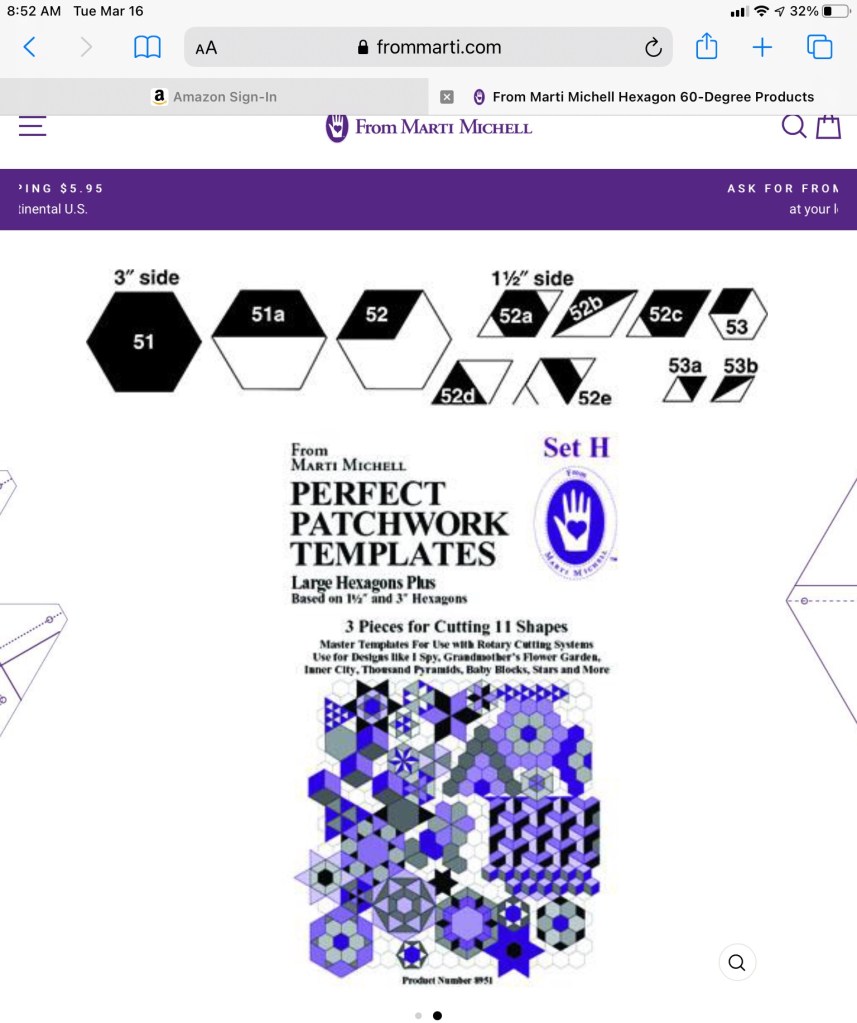
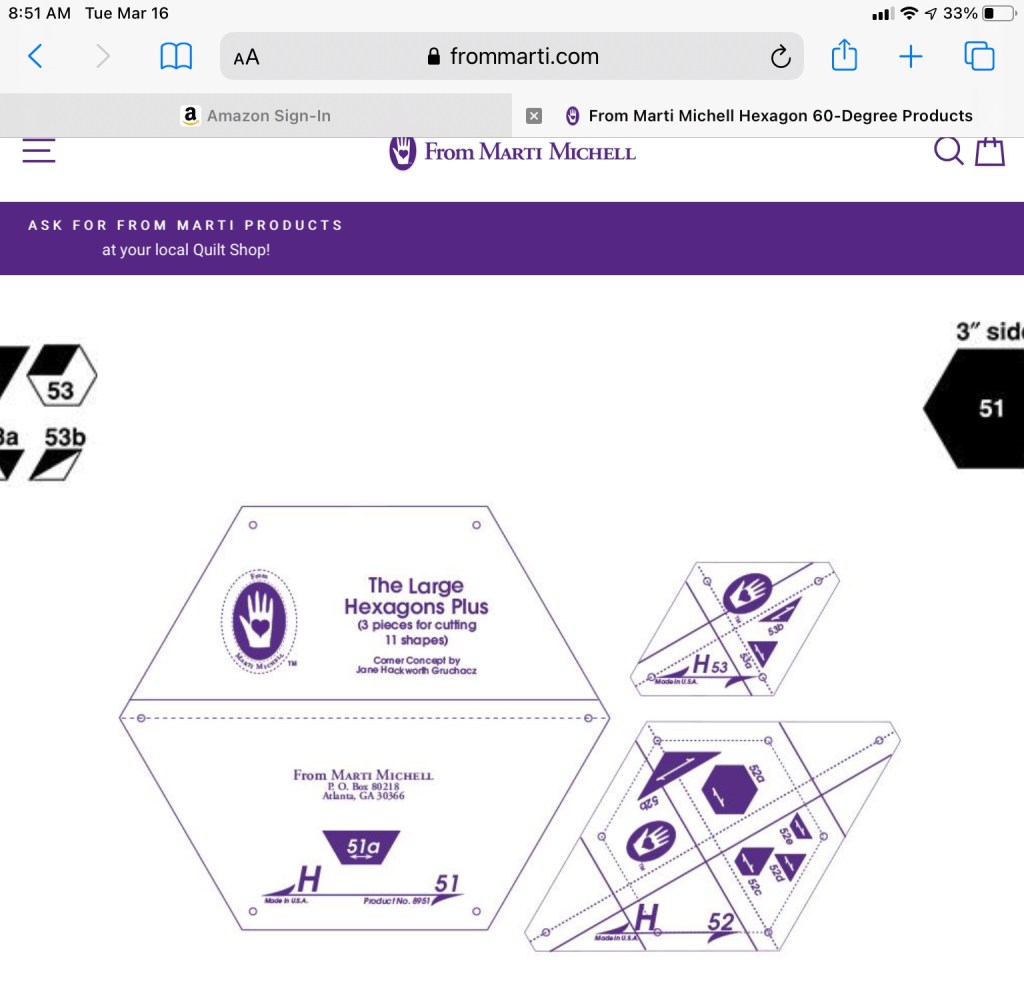
The entire quilt top is machine pieces. One of the things I LOVE about the Marti Michell templates is they allow you to easily and accurately mark the quarter inch seam allowance points! I can’t imagine piecing this quilt without these markings! Click on this link to take you to her web site: https://frommarti.com/collections/template-sets/products/template-set-h-large-hexagons
Yes! Consider this a shameless plug! I love every template and template set Marti Michell sells. In set “H” you get 3 templates that will allow you to accurately cut and mark 11 different shapes. Genius!
After sewing three hexagons together, the pressing direction allows you to splay open the seam allowances. I hate having a huge and cumbersome lump to quilt over and this pressing method solves that.
All of the full, half and quarter hexagons have been sewn together, I’m happy with the arrangement so my next step is to decide on a border.
Way back when I was making this quilt (July 2018) I was in my “put scallop swags in every quilt border”phase. For a change I decided to leave this border empty and quilt a “to be determined later” design.
Scroll up 2 images and note how many seams there are in this relatively small (42×45”) quilt top. You can see that to stitch in the ditch (SID) I had quite the task ahead of me. Why do I SID? It serves several functions, it keeps all the blocks (hexagons) true to their shape, it secures the overall quilt sandwich for later intense custom quilting and it allows me to “work” with each block on the longarm prior to deciding how each will be quilted. SID is a very important step, take the time do do it right, you’ll never be sorry.
The next group of pictures will take you through many of the areas of the quilt:
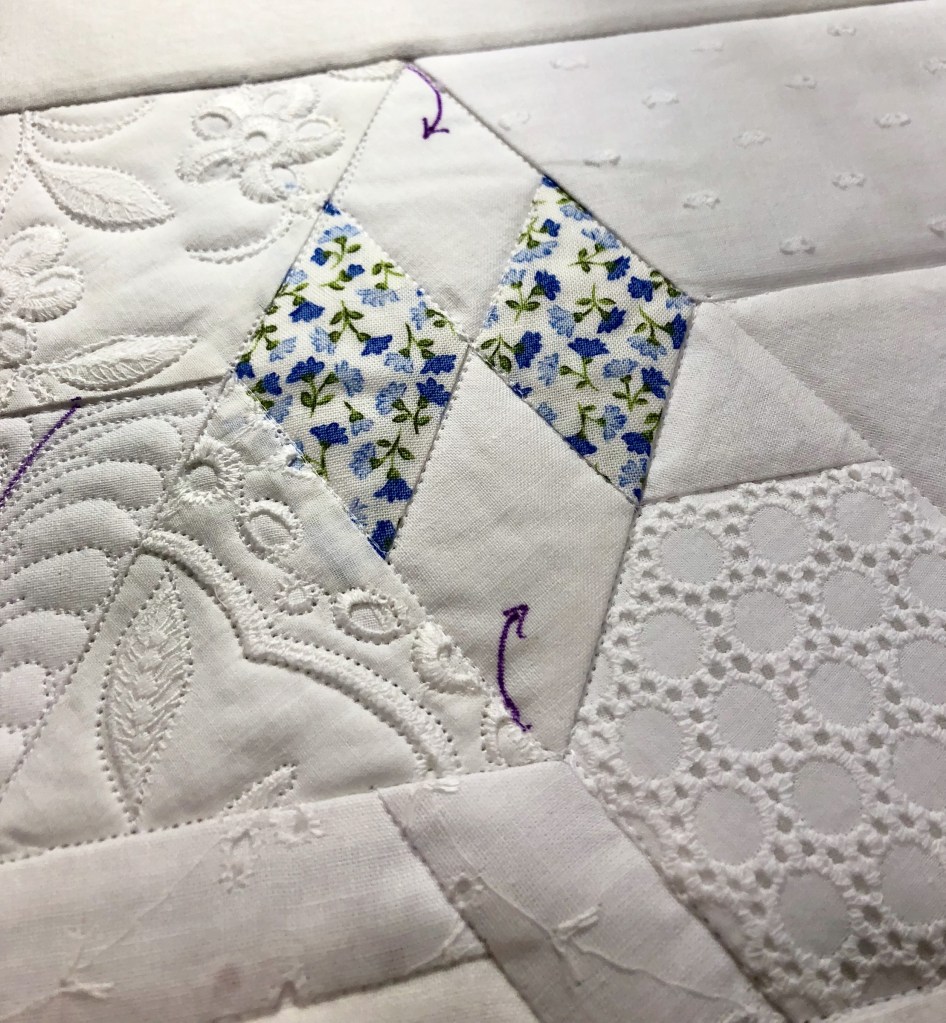
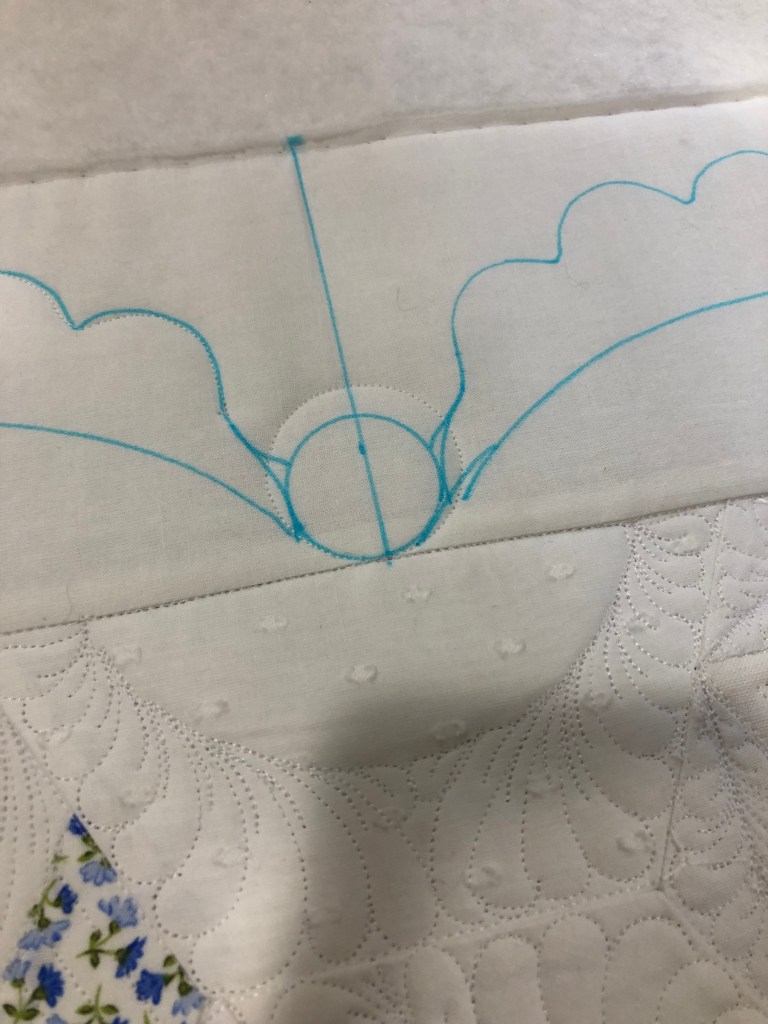
When I’m doing the quilting I have developed a symbol system. The two curved arrows in this picture above tell me I want a single curved stem of feathers as well as the direction they will be quilted. I’m using a very nice air/water erasable marking pen by Leonis.
Just another example of different ways I mark for quilting.
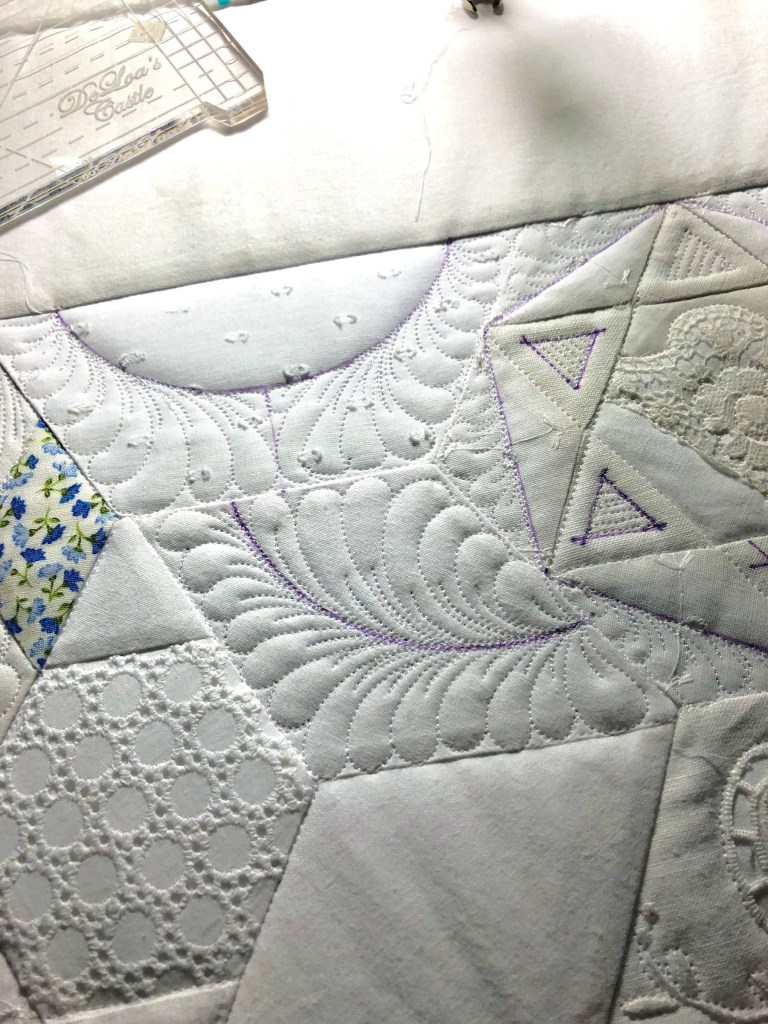
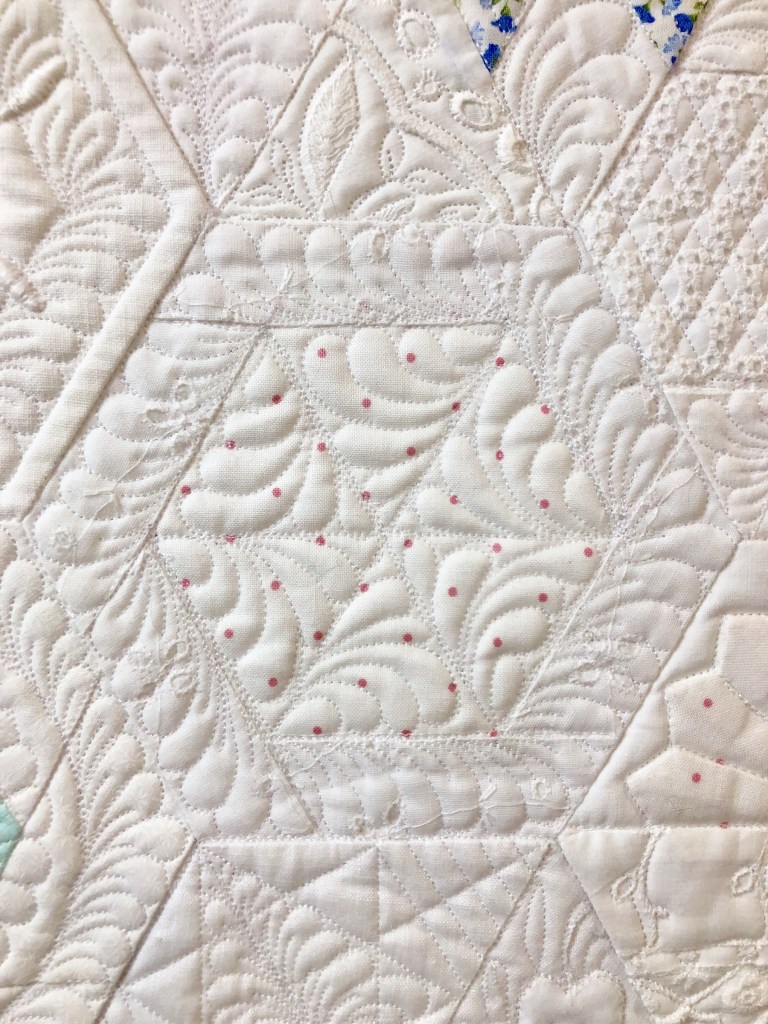
When deciding on how to do the hand guided custom work, sometimes I follow the design in the fabric and other times I add the designs with my quilting work.
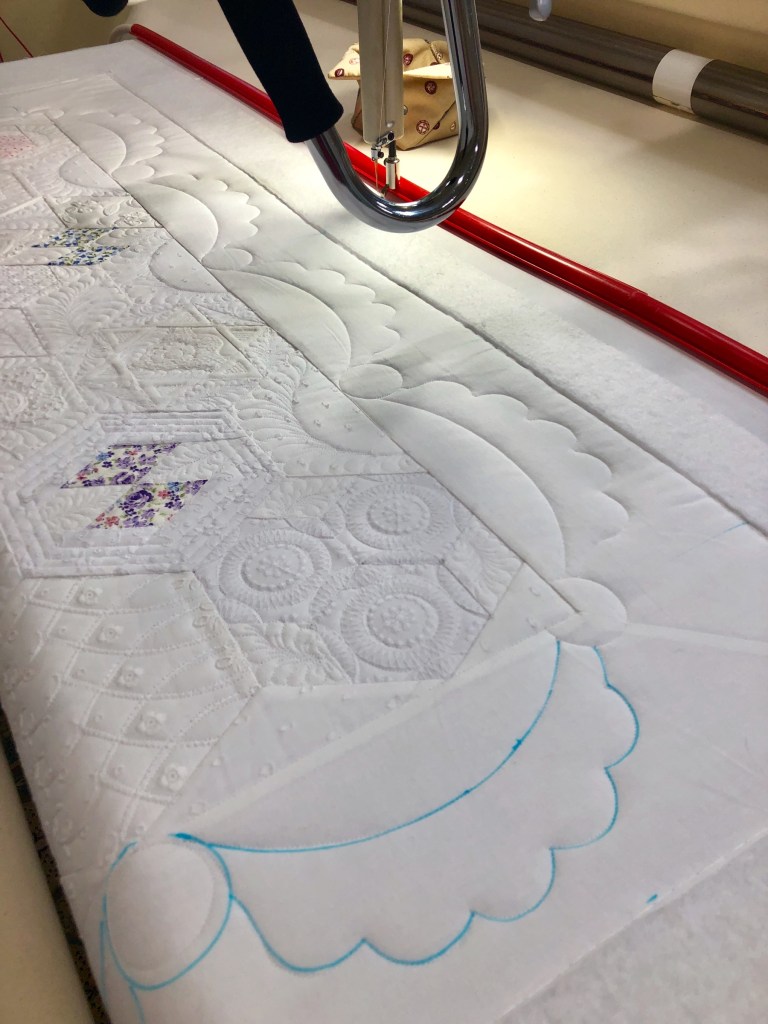
Remember the plain white border? Remember how I said I was going to leave my swag phase behind? I changed my mind for a couple of reasons. When I quilt I like to have in mind the idea of mixing straight lines with curved lines. I think of it as Hard and Soft quilting The hexagons and all their pieces are certainly straight lines; the Hard, and swags are the Soft.
I also knew that in order to keep a sense of quilting balance I would need to heavily quilt the borders. The body of the quilt needs to be in sync with the borders.
Bring on the intense border quilting:
I’ve changed to a blue water erasable marking pen. Why? Honestly probably because it was at hand. I like the blue and the purple making pens equally.
Again, you can see I’ve used marked symbols to direct me as I’m quilting. I snapped this picture to show you that sometimes I forget to follow my symbols. The red outline shows you where I was in a “quilting daze” and forgot to stop mid way in the swag. Do you know it takes at least 8 or 9 times as long to pick out quilting as it does to actually quilt!
Fixed!
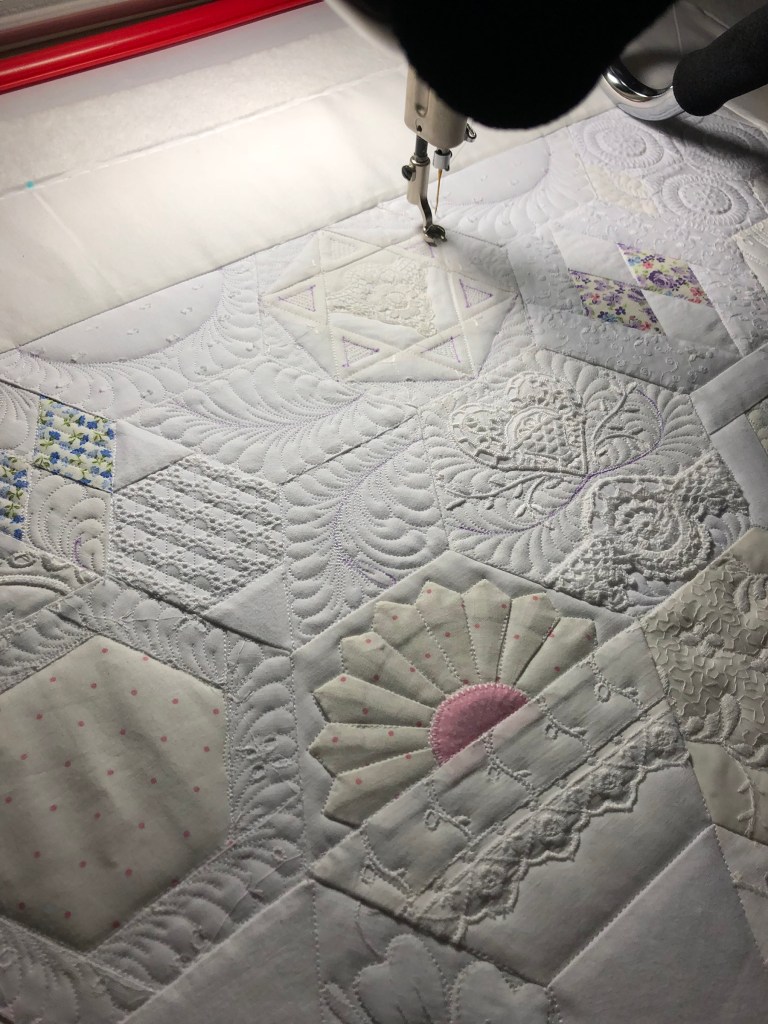
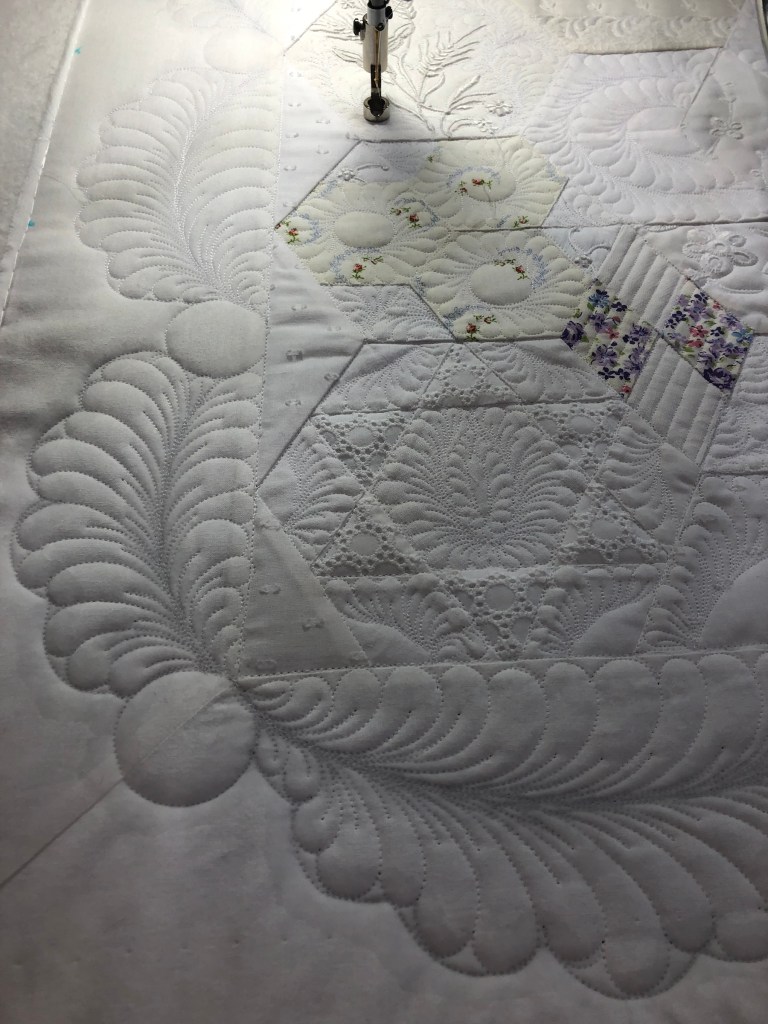
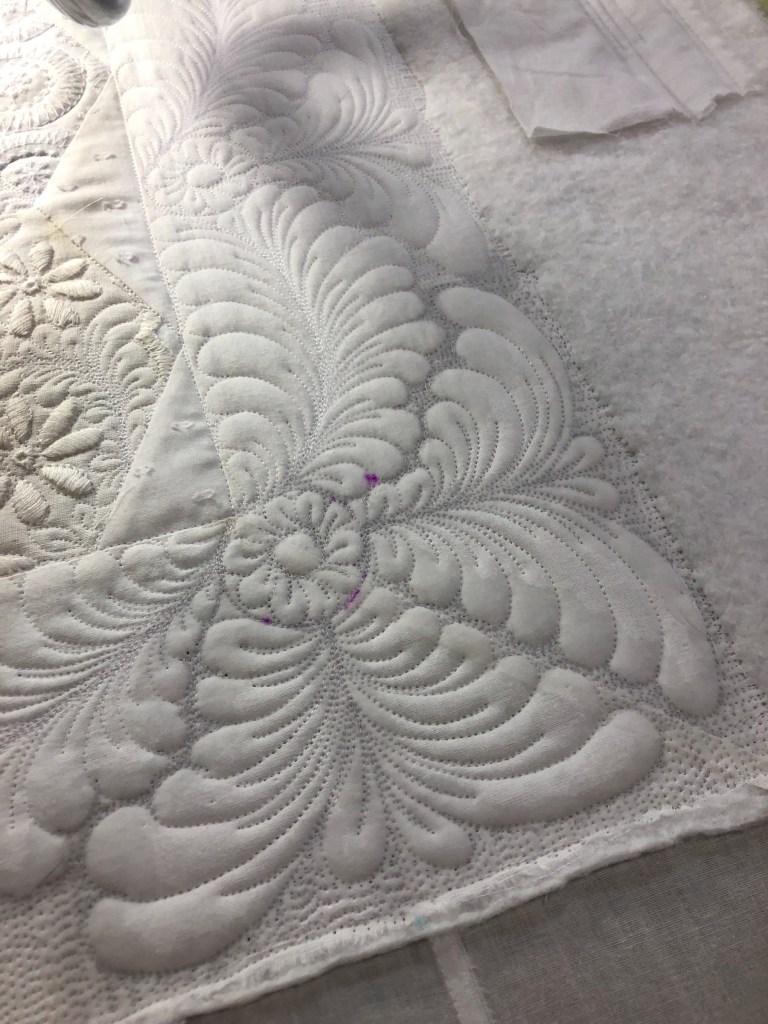
I was especially pleased at how the quilted swags fit so nicely at the corners. And notice how much more depth the little feathers have after I quilted in a vein in each one.
After each of the border swags were finished I still had quite a bit of negative space to fill.
The tiny little match stick quilted lines give the border negative space a great look as well as add dimension to the feathers.
It looks very dark in between the feathers because I’ve used a water pen to dissolve the blue and purple marking pens.
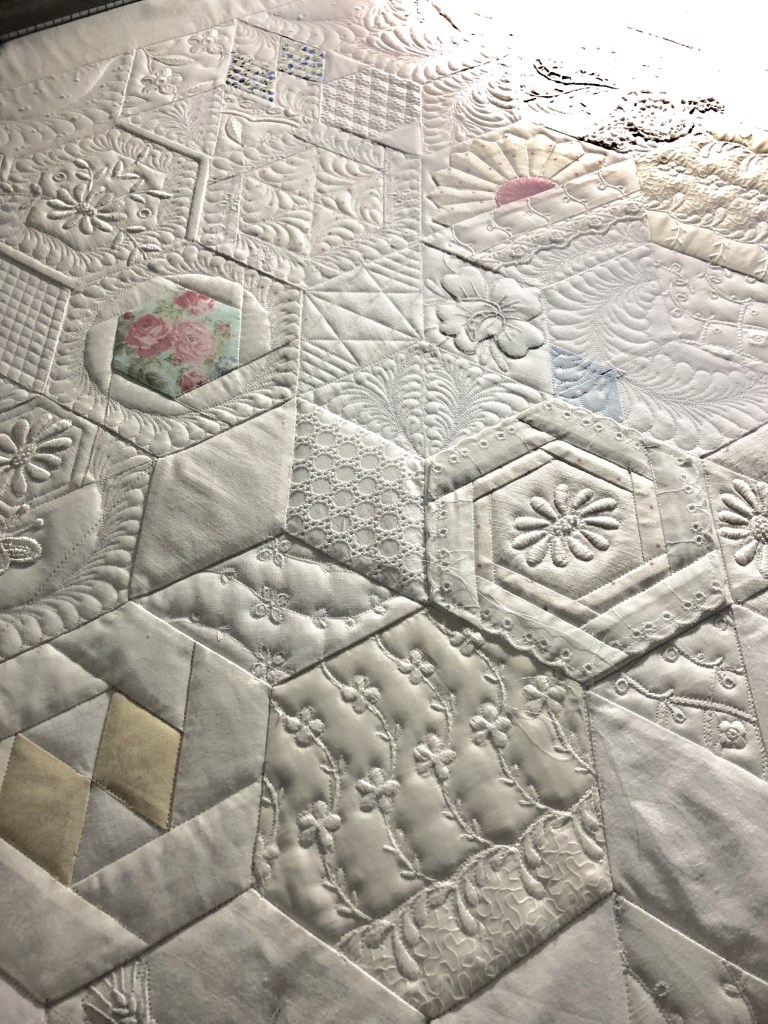
And again, a picture of the finished quilt:
Such a joy to create! Never be afraid to mix white with ivory, especially when working with vintage pieces, they compliment each other so nicely.
What are the particulars? Needle thread: Wonderfil Specialty Threads Deco Bob #104. The bobbin; Güttermann Skala 240 #111. The back fabric is 100% cotton bleached muslin, the batting is a single layer of Hobbs white 80/20. I quilt on a 26” Innova. All my work is either free hand or ruler, I do not have a self guided computerized machine.
The actual quilting time was 24 hours. Speaking of quilting time, do you keep a journal? Invaluable!!
I hope you’ve enjoyed my trip down memory lane as I’ve uploaded and talked about the pictures of this quilt! Blessings to all!
We are at the point where many of you are finishing either your Class 2 quilt top or you have your project already quilted! Bravo to all you speedy and talented quilters!!!
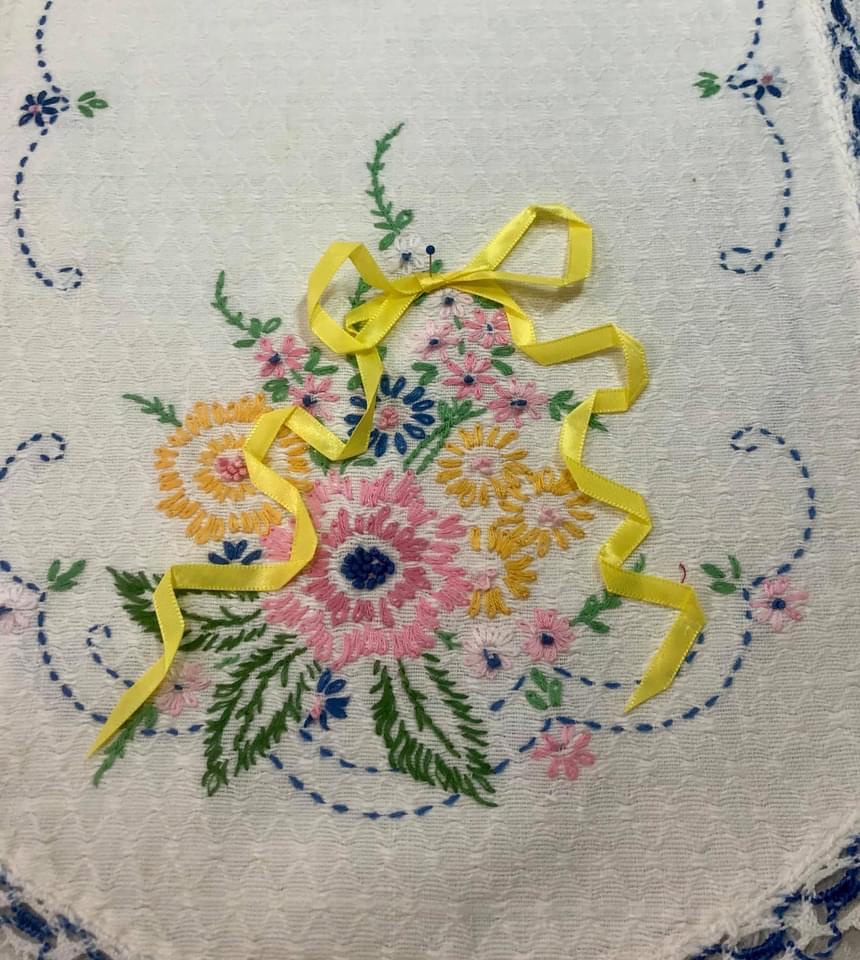
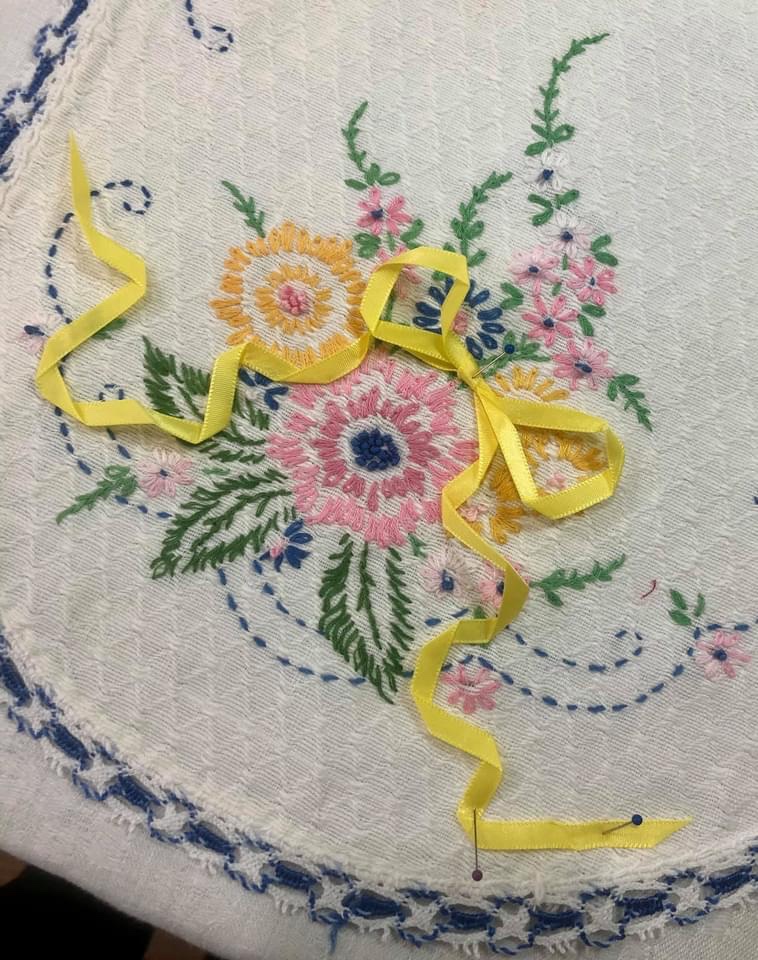
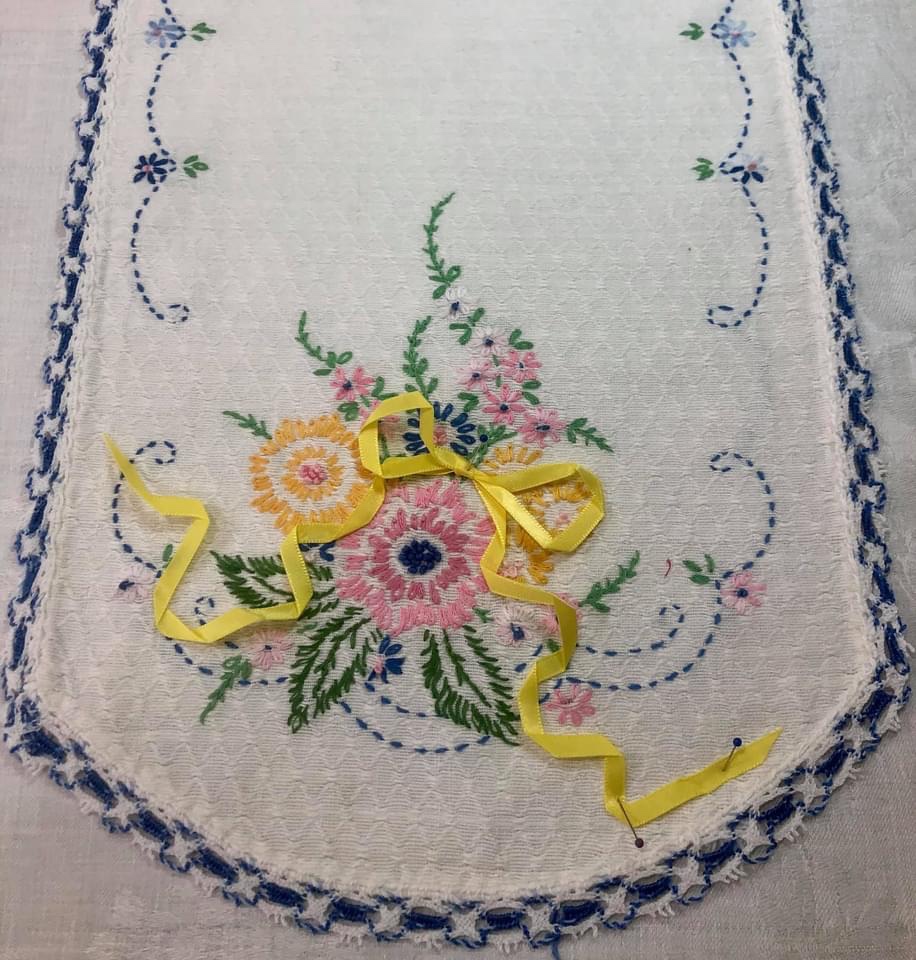
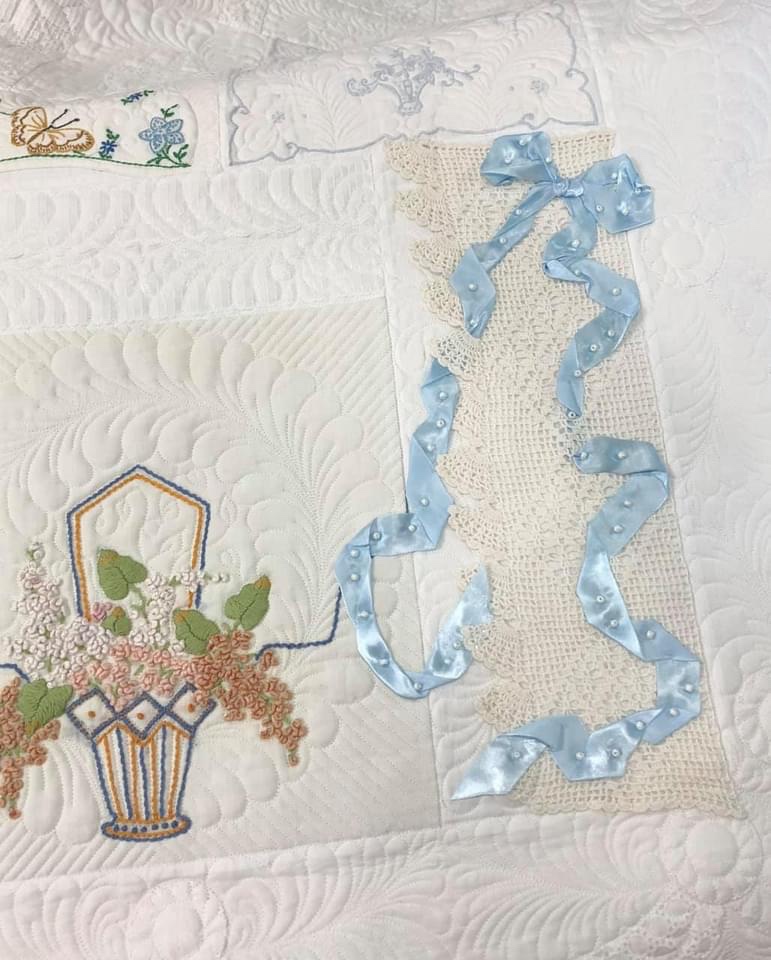
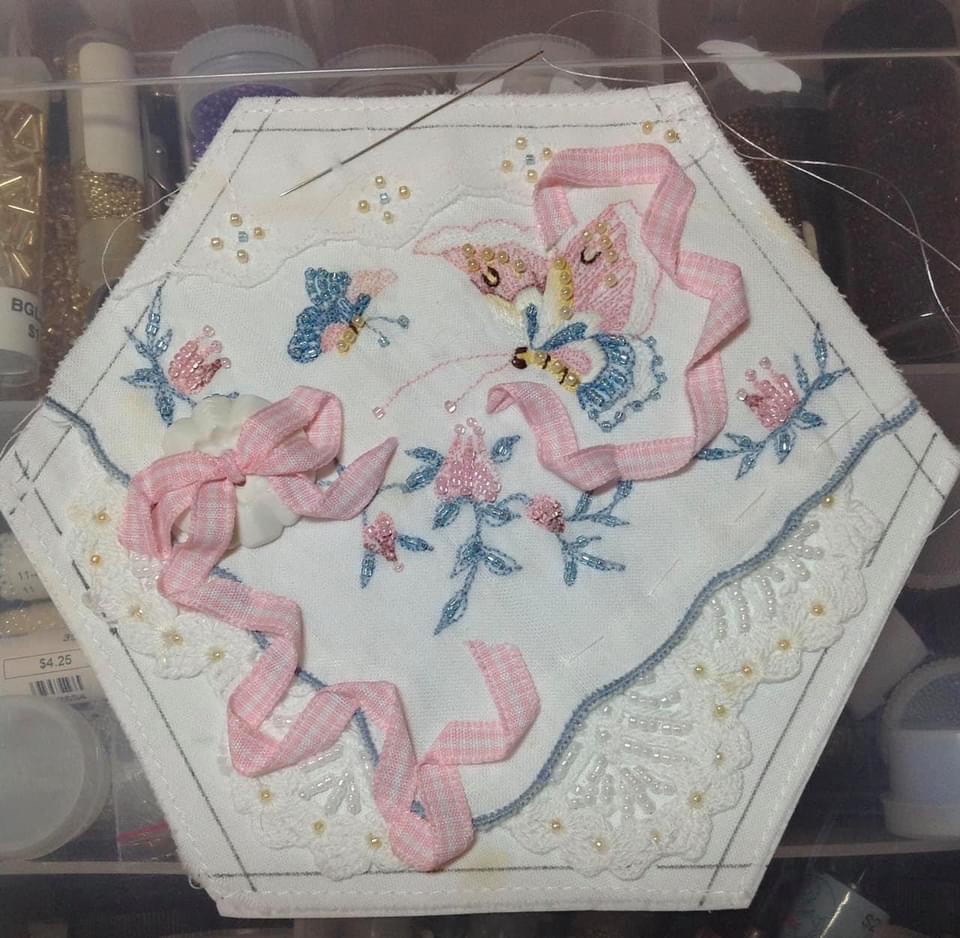
A few weeks ago a member asked about how I create and apply ribbon bows and streamers on my pink and white Vintage Lattice Stars quilt. This post is loaded with pictures and will take you through the step by step procedure that I use. I am positive there are numerous methods, find one that works well for you and your project.
Look for details in the yellow ribbon picture captions and then I have included pictures of my past work showing you finished ribbon work.
When should your ribbon(s) be attached to your quilt? This depends on your quilter, it depends on whether or not you want quilting to pass over on top of your ribbon work and it depends on what kind of ribbon you use. Remember: Anything that has the potential to break a needle MUST be added when your quilt is 100% finished.
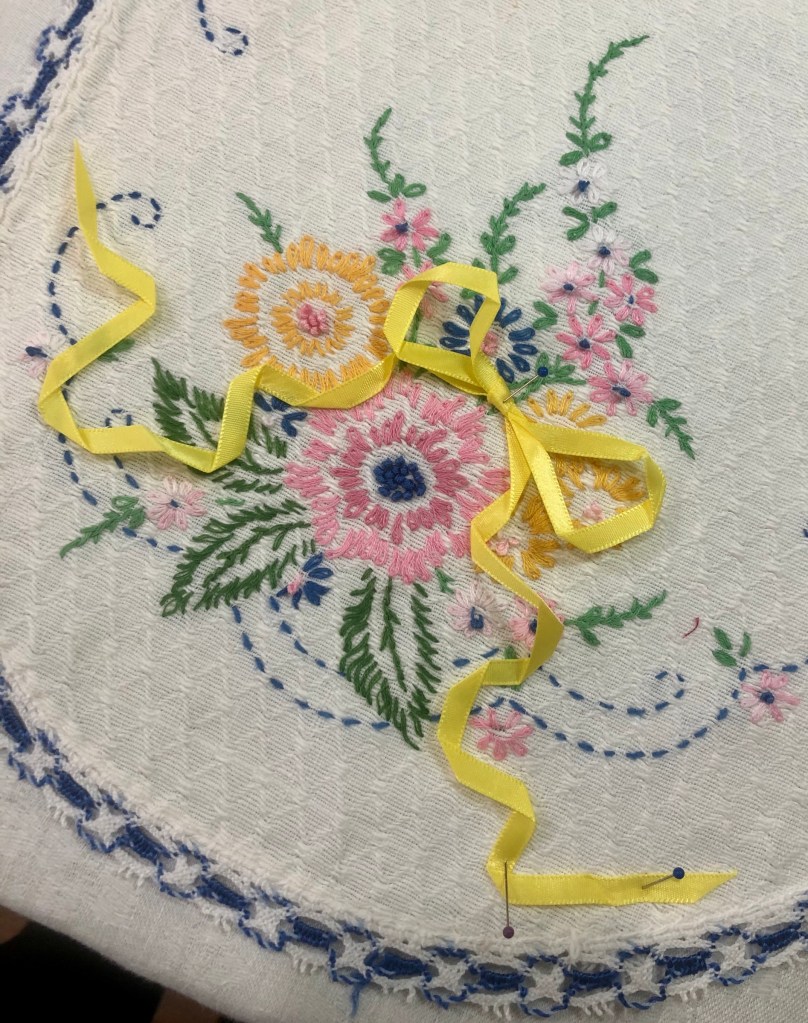
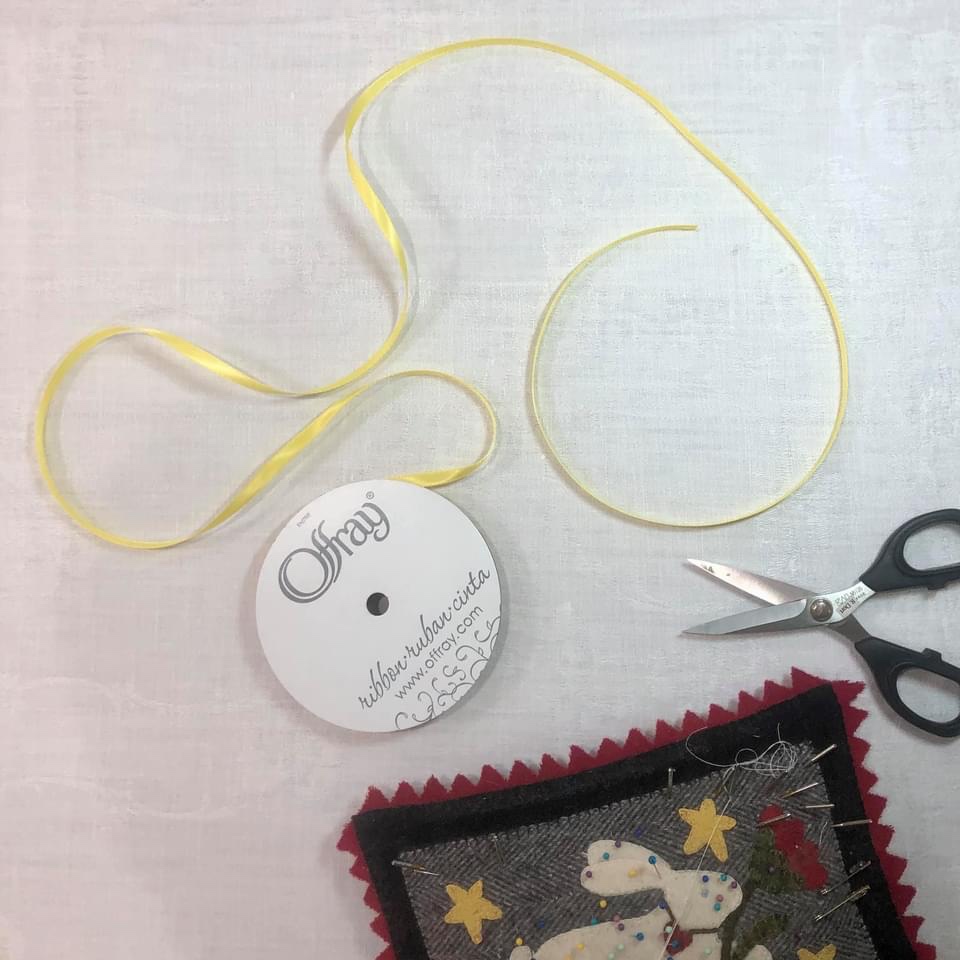
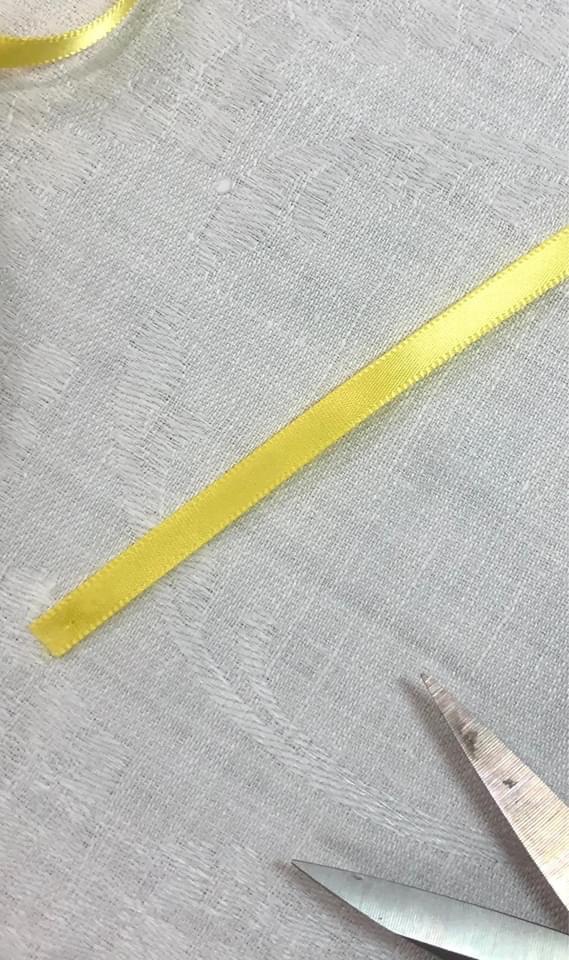
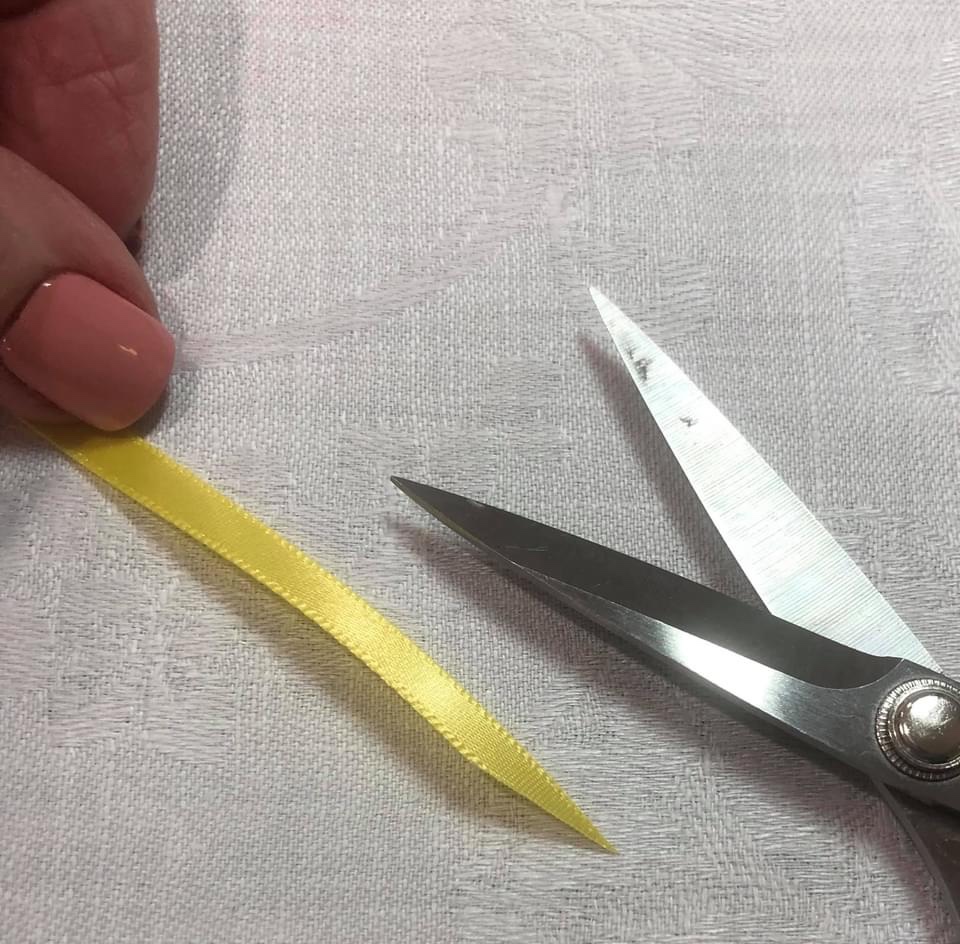
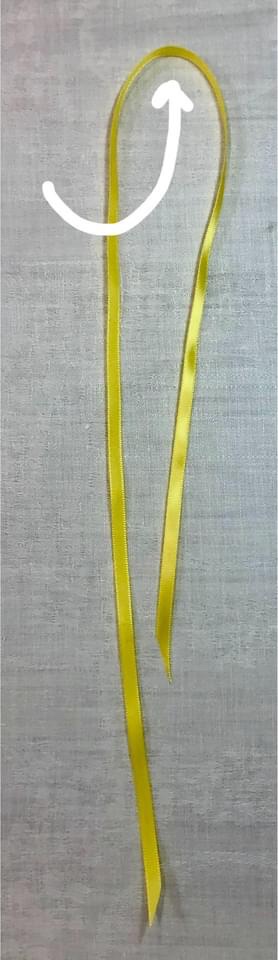
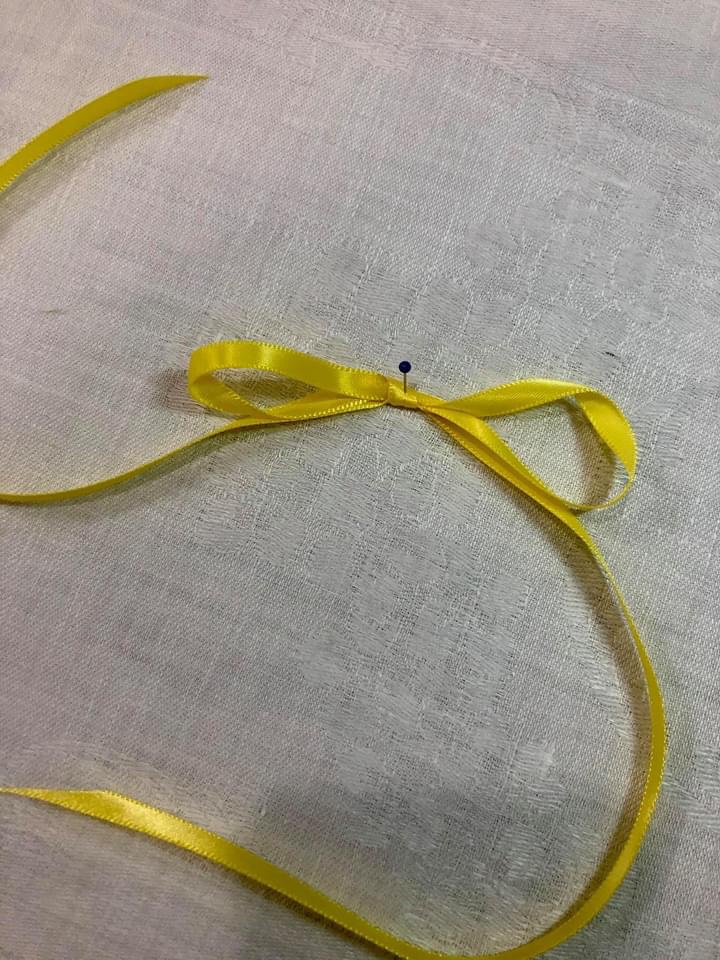
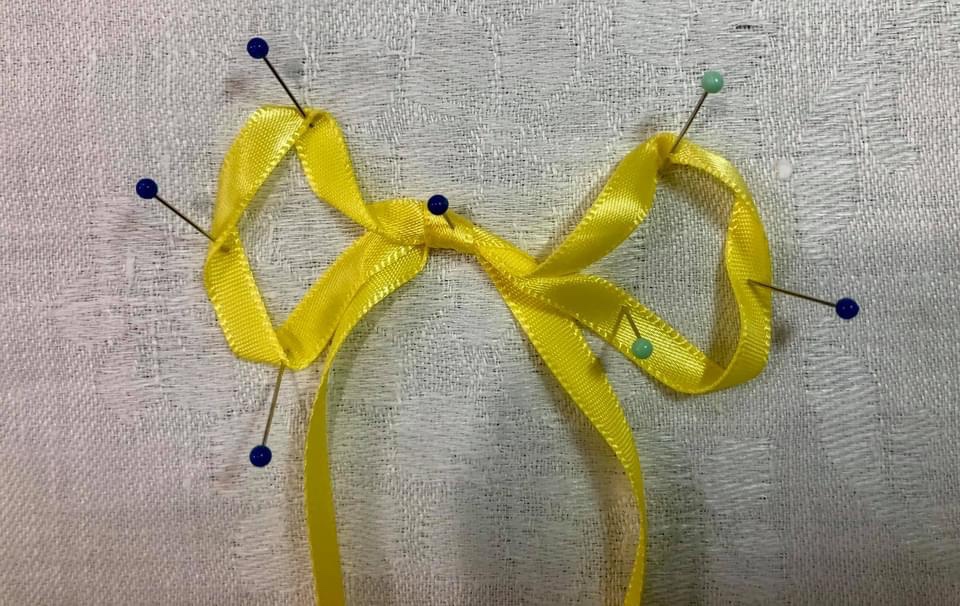
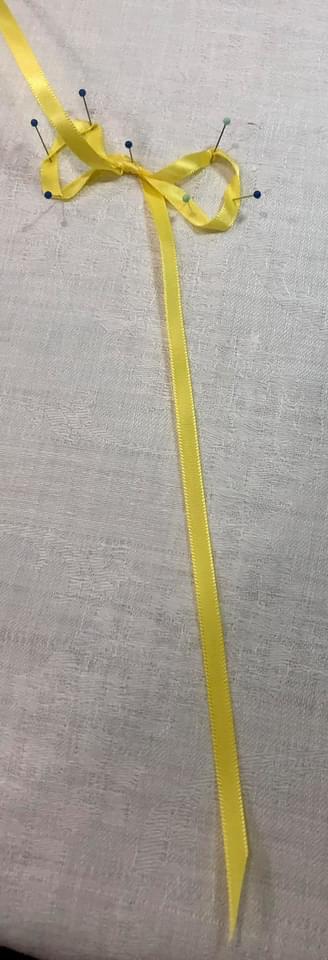
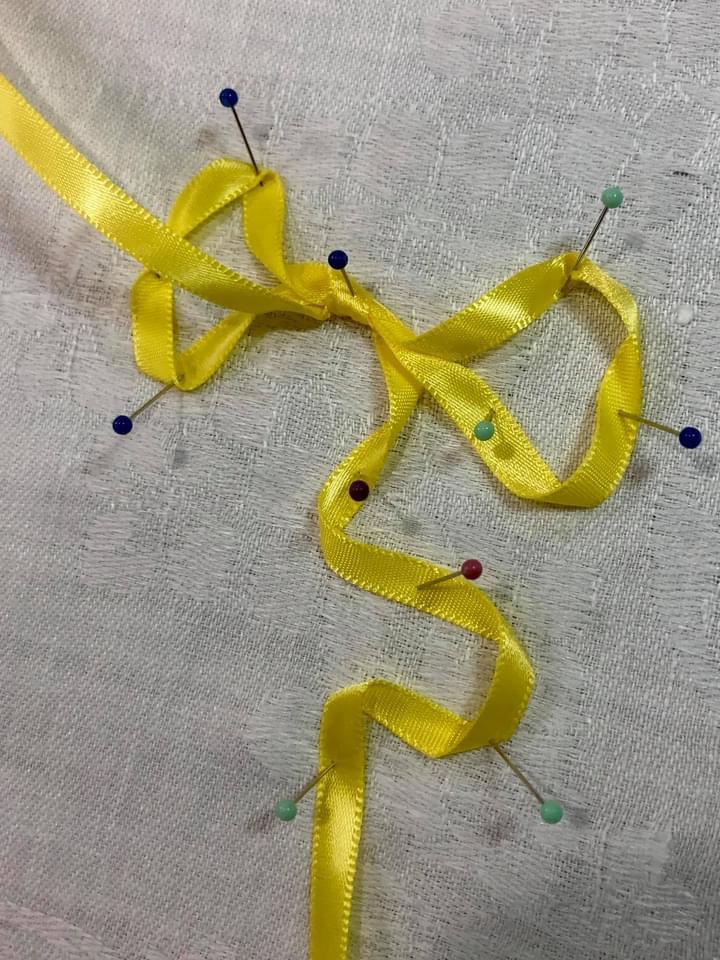
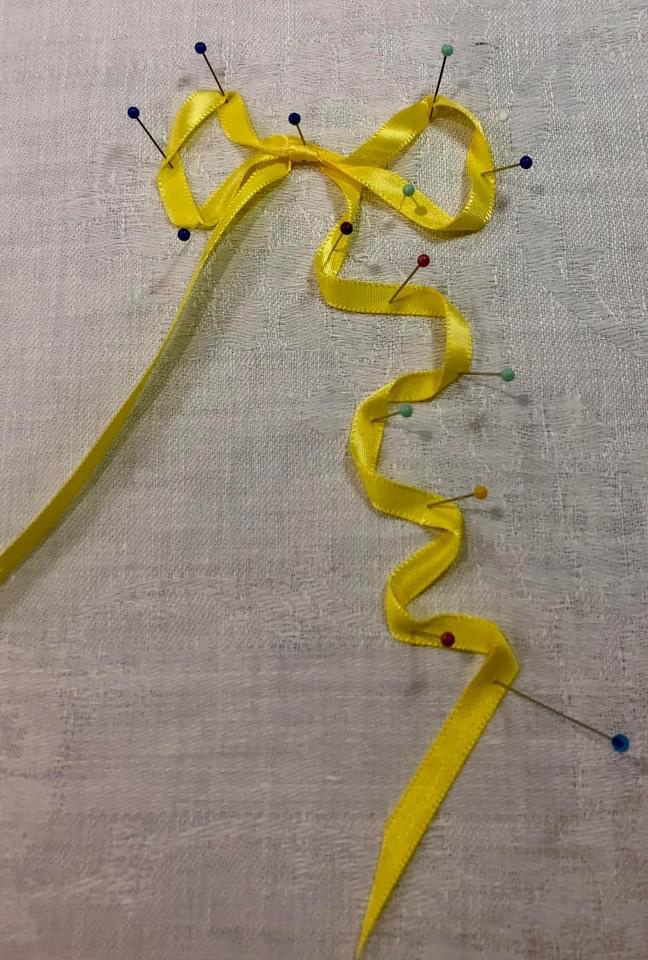
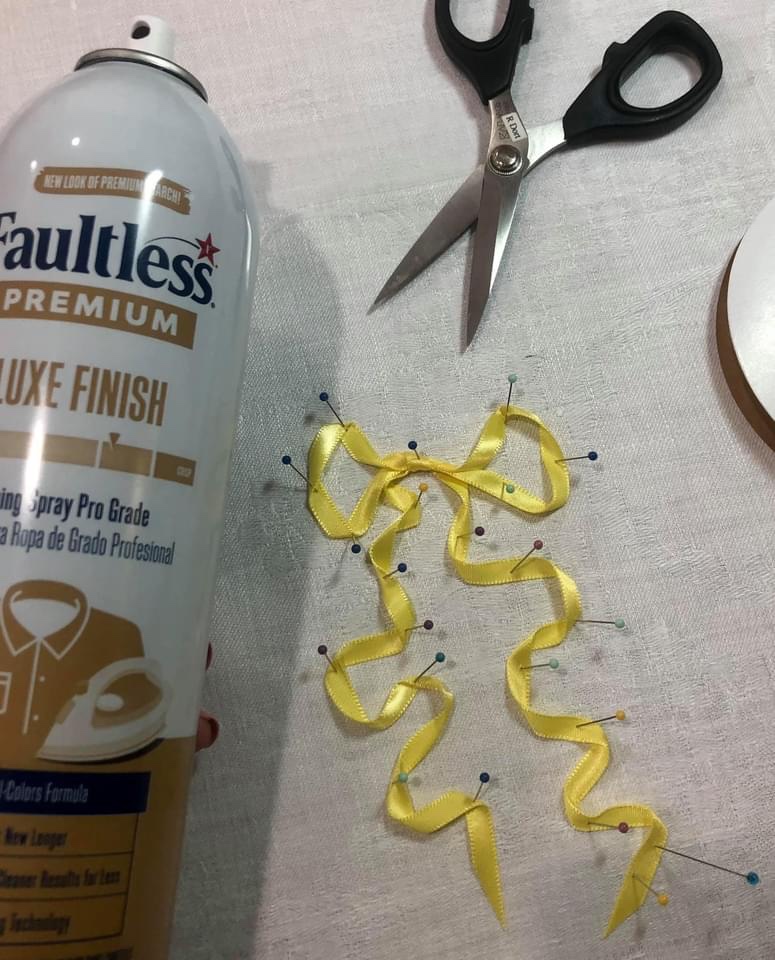
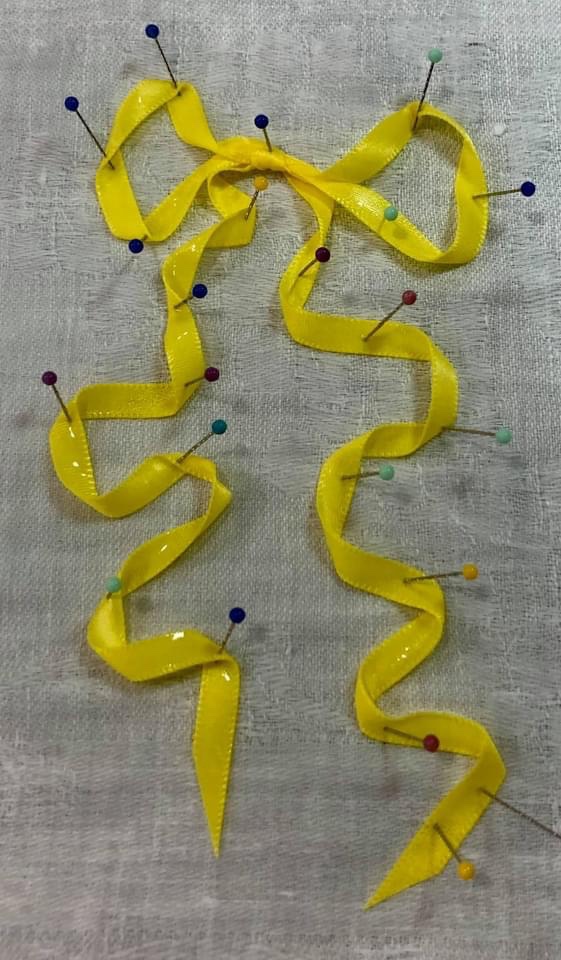
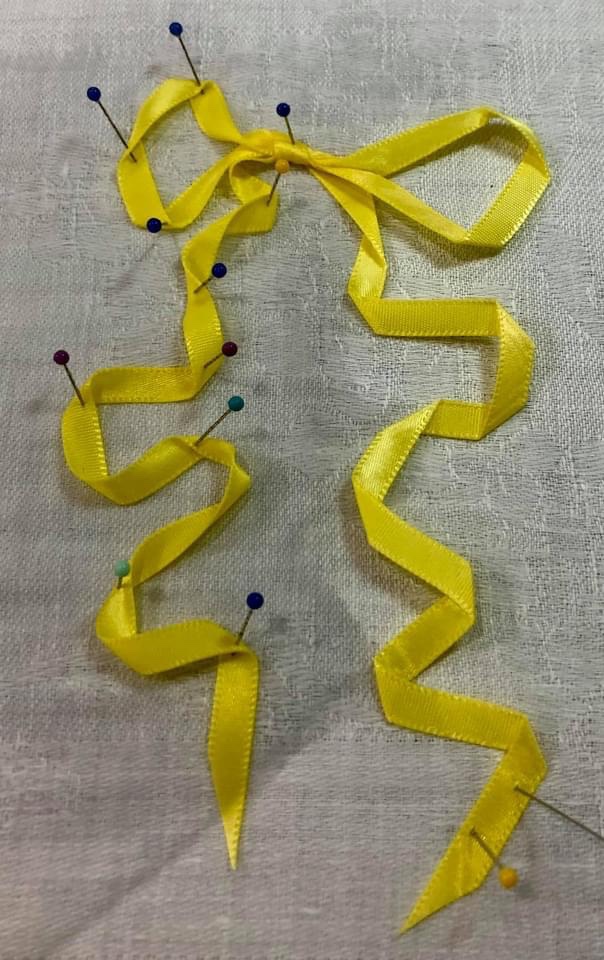
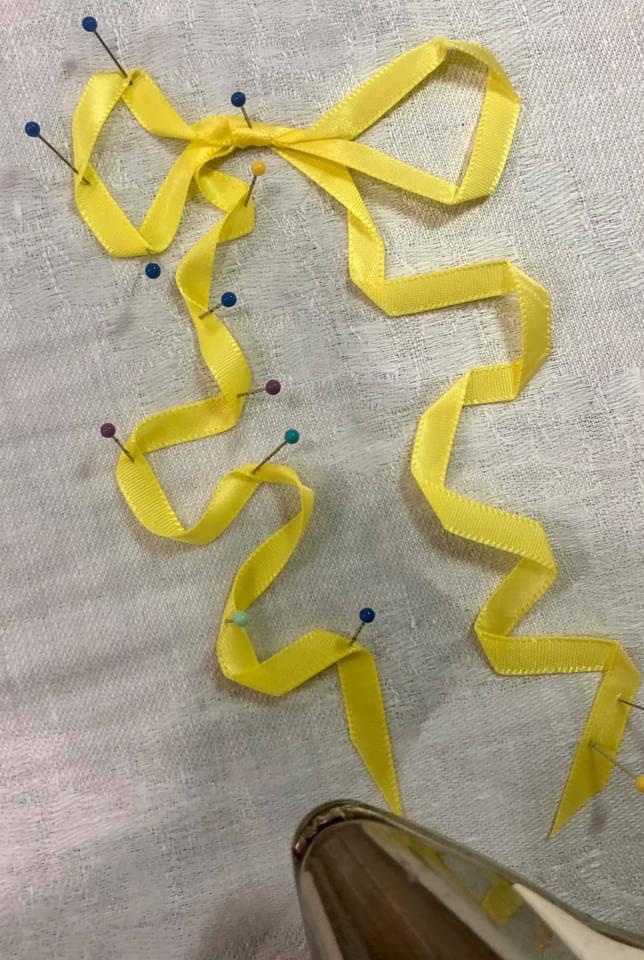
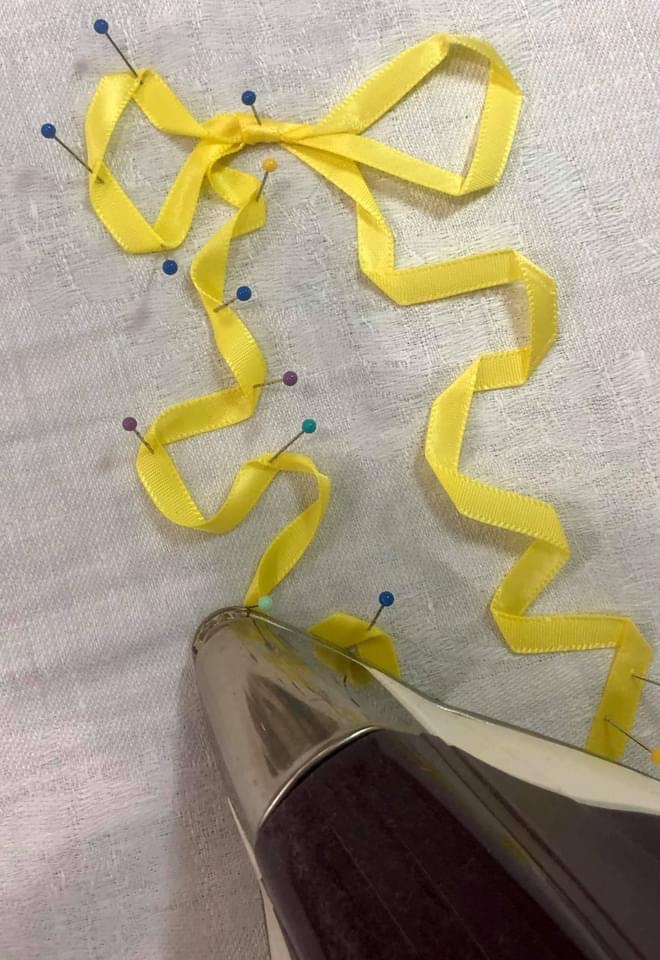
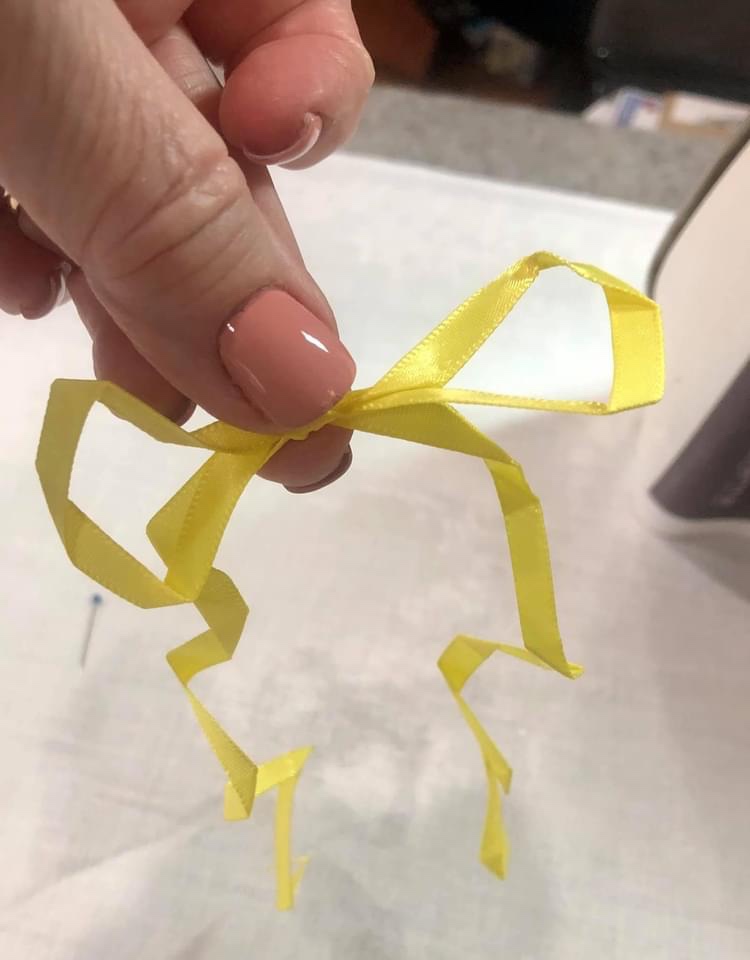
I am using new 1/4” Offray brand satin finished ribbon.Cut the ribbon ends to a sharp angle to prevent unraveling.For this example I am using a length of ribbon about 18” long. Lay it out on a flat surface with the left side about 4” longer than the right side. Squeeze a bit at the top, this will mark the center for creating the loops to make your bow.I am working on a padded surface, my wool pressing mat covered with a white damask napkin. Why? The napkin looks better for the photography, the pressing mat lets me pin with ease.Place a straight pin down through the center of the bow. Do a bit of ribbon manipulating to create some “character” for your bow loops. Pin as you go in order to retain the bends and folds.Once one side has been pined, start on the remaining loop and process in the same fashion as above.Ready to start on the right side streamer? Gently pull the left streamer up out of the way.Begin arranging the streamer by bending, twisting etc. to achieve a pleasing appearance. Work your way down the streamer, pinning as you go.Once you have finished the right streamer, move to the left streamer and repeat.Remember my good friend Spray Starch? Once you have your ribbon bow arranged and pinned to your liking, give it a healthy spray!Let it sit for a few minutes. This will allow for the spray to soak into the bends and folds of the ribbon fibers.Using my dry iron, I started at the bottom of the right side streamer and slowly pressed my way up to the bow.Working up the left streamer, I remove the straight pins as needed.Once I have pressed creases into my ribbon, I carefully left it from the pressing cloth.And gently place it onto the vintage linen. It will generally hold its new shape but it is easily further manipulated if necessary.Another example of where it could be places on the embroidered piece.If this were my final placement, I would very carefully use either Elmer’s Washable White School Glue and a dry iron to affix the ribbon to my vintage linen or I could pin the ribbon in place. Whatever method I used, my personal next step would be to machine stitch the ribbon permanently to the embroidery using a matching needle thread. Your choice might be to hand stitch the ribbon in place.
And finally:
Hope this little pictorial tutorial will help if you should decide ribbon bow and streamers are just the perfect thing to embellish your quilting.
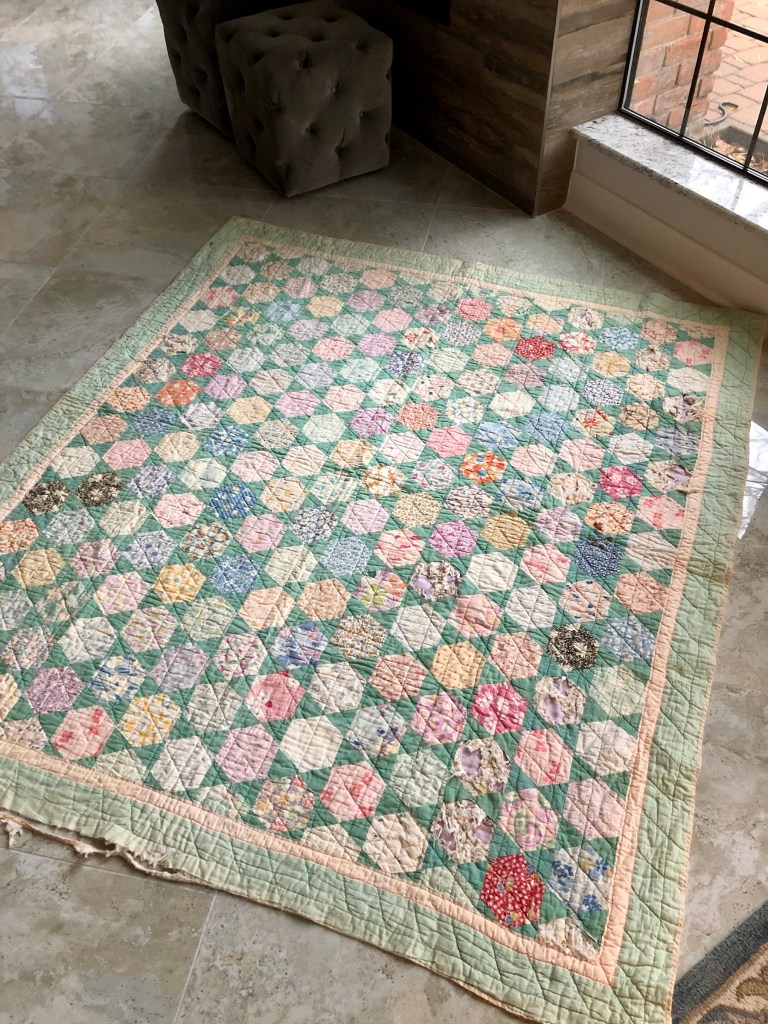
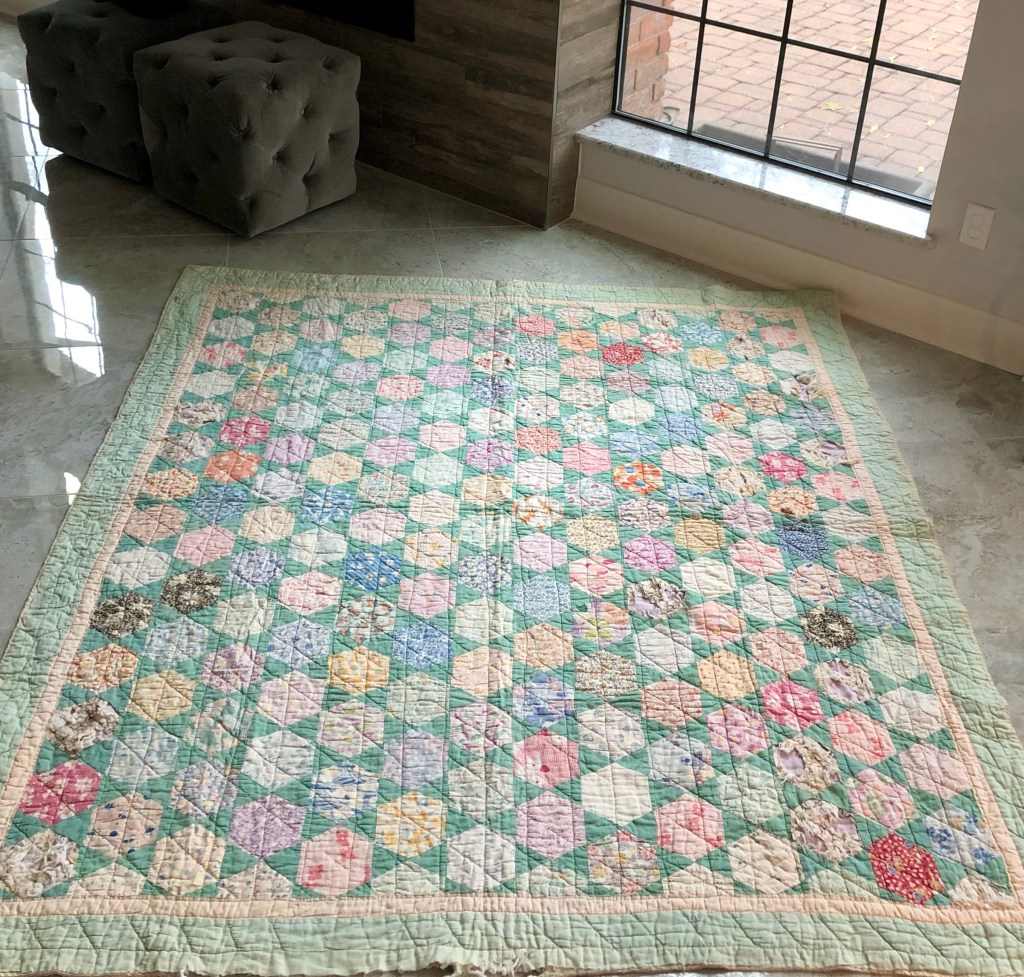
I forgot to measure, but I’m thinking this would have been on a Standard/Double bed.
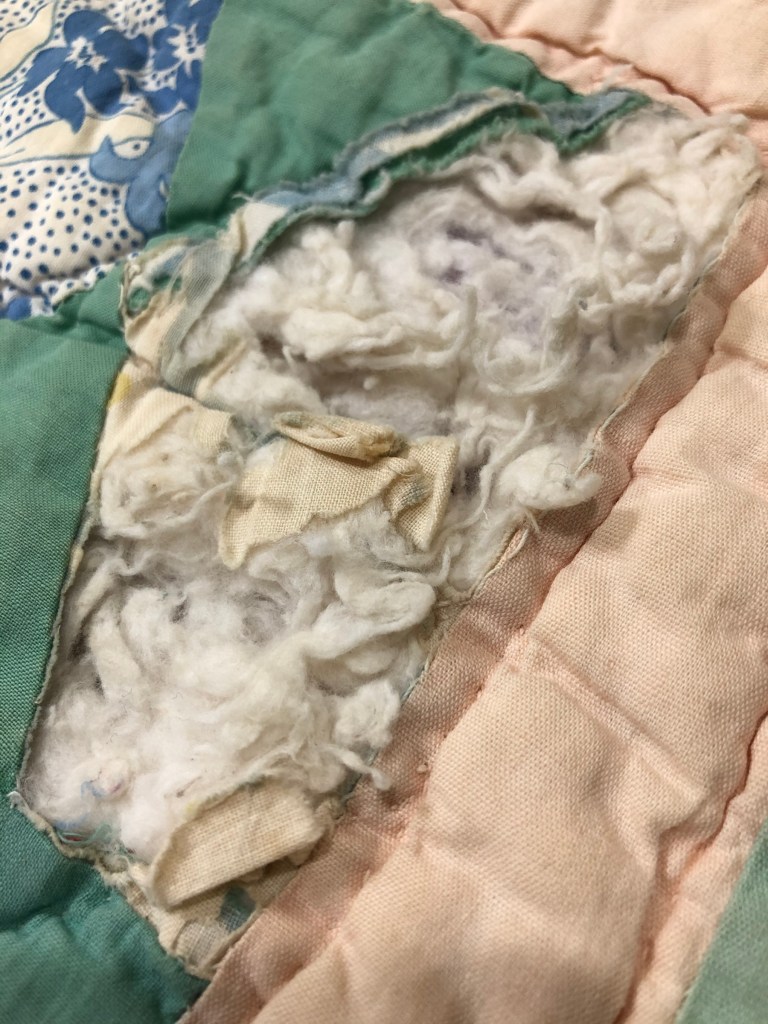
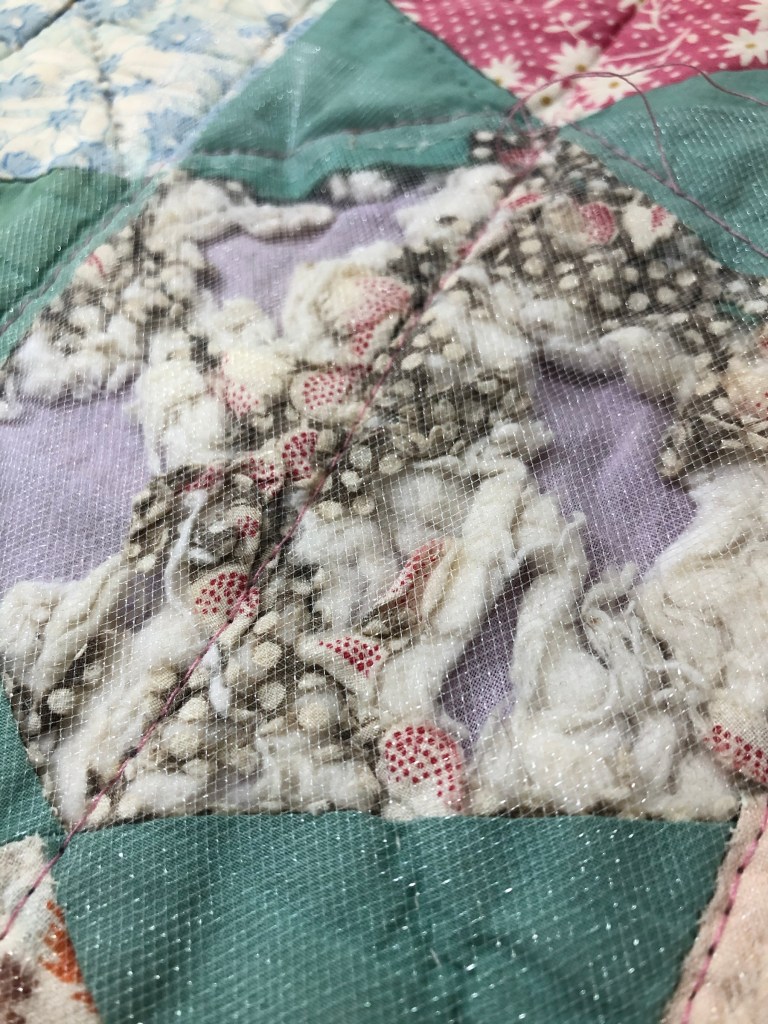
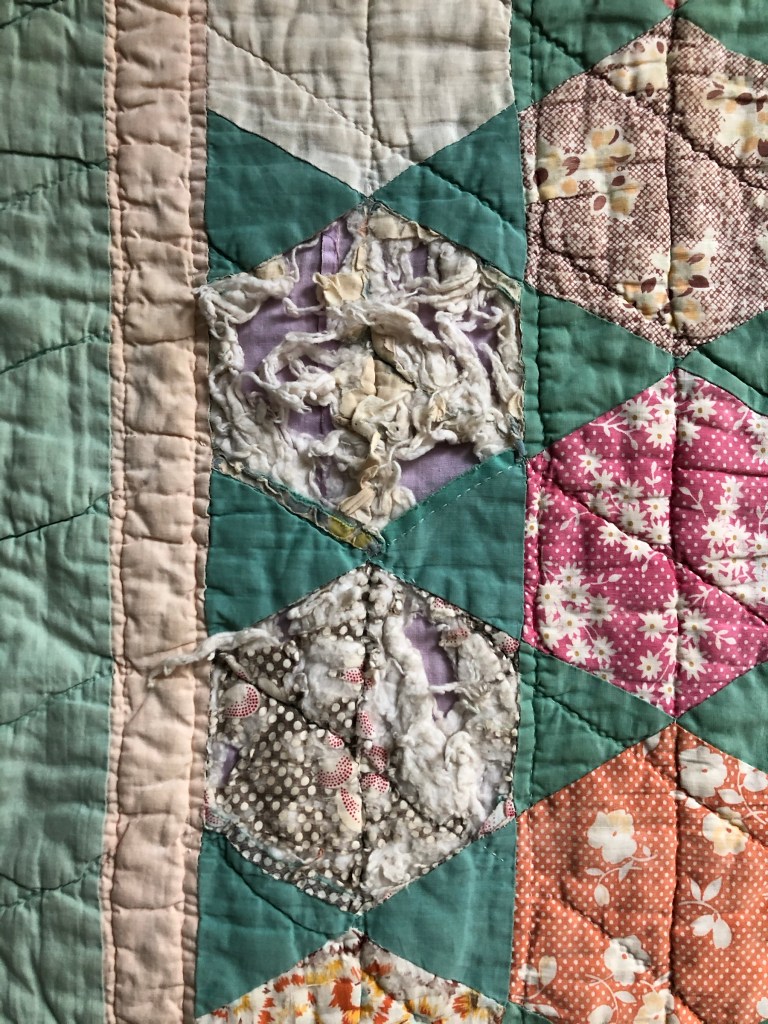
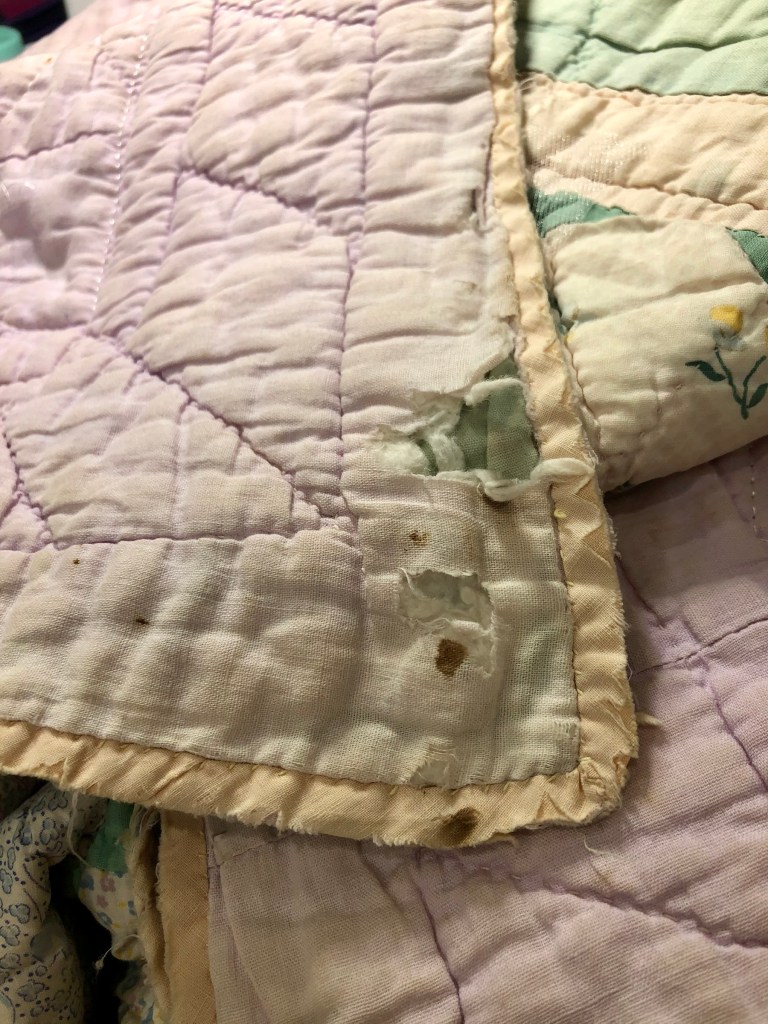
A recent find and you know me and hexagons, I could not pass on it. But let me tell you…this quilt was filthy! So filthy I could not bring myself to do more than cover the holes with soft white tulle. I had to stop and wash my hands frequently and while I’m not a crazy germophobe, I did wonder at times what kind of dust and grime I was inhaling as I attached the protective tulle. 😕
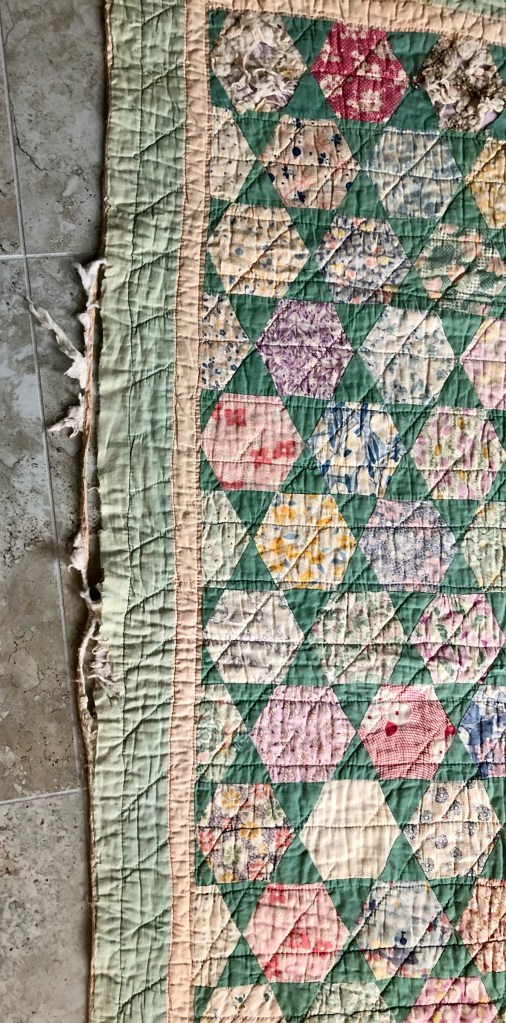
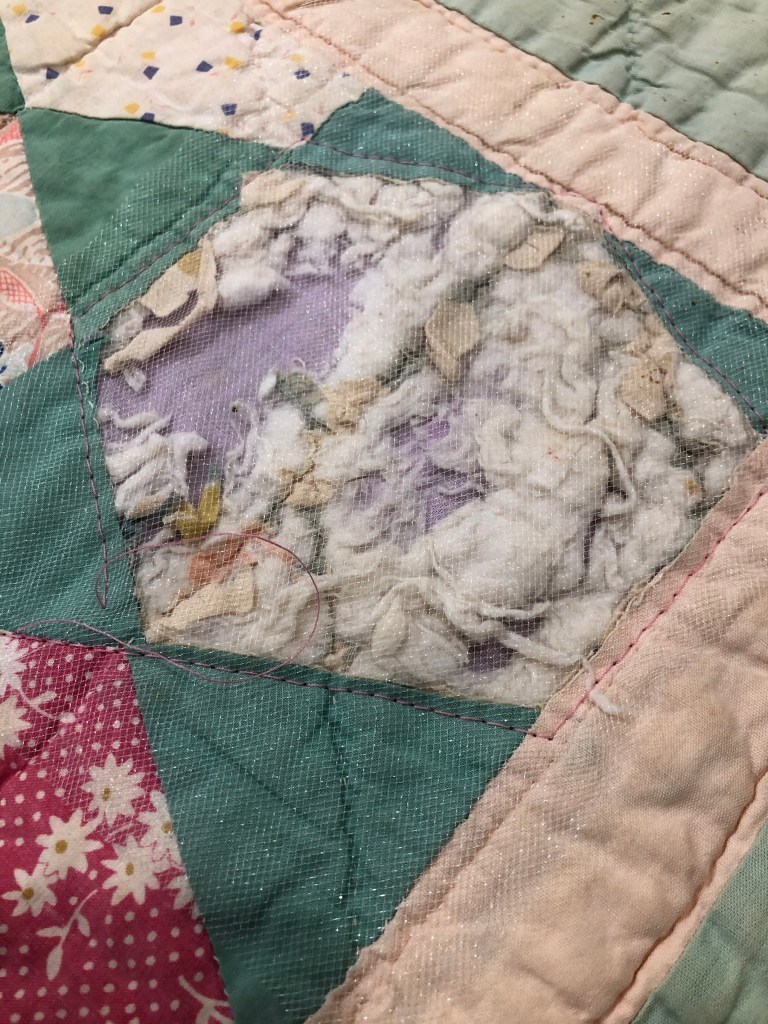
Only one edge was bad, the others have binding issues but that can be easily resolved later.
About 9 different full and several half hexagons had the fabric literally rot away. While I am not an expert on feed sacks I do believe the hexies are mostly if not all made from feed sack fabrics.
Using soft white tulle purchased at a craft store in the bridal area, I cut squares/rectangles a size that would cover the areas where the fabric was missing.
Can you see the pink thread? Choose a thread other than white, something you can readily see because after the soak/laundry step you will be removing the tulle. I used the longest stitch my sewing machine offered and most often I did a straight stitch through the battered hexagon area to further secure the damaged batting.
If you look closely you will see that this hexagon fabric has split and the tulle will provide some stabilization until I can make the necessary repairs.
I can tell from the bits of fabric left that the same fabrics consistently across the quilt top could not stand up to the wear of this utility quilt.
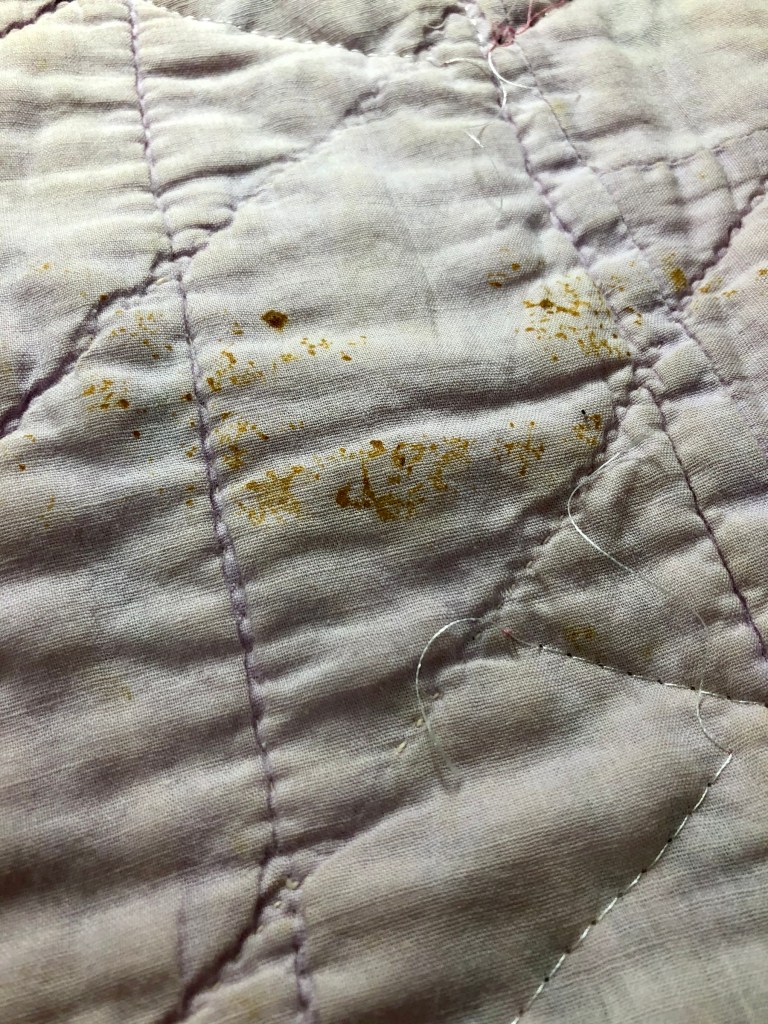
The back of the quilt also has some serious issues but nothing that can’t be fixed. I do think there are some stains that are permanent though. I will know after the piece has finished soaking.
At first I thought these were rust stains, but now I’m not too sure. They are all over the back fabric. Time will tell.
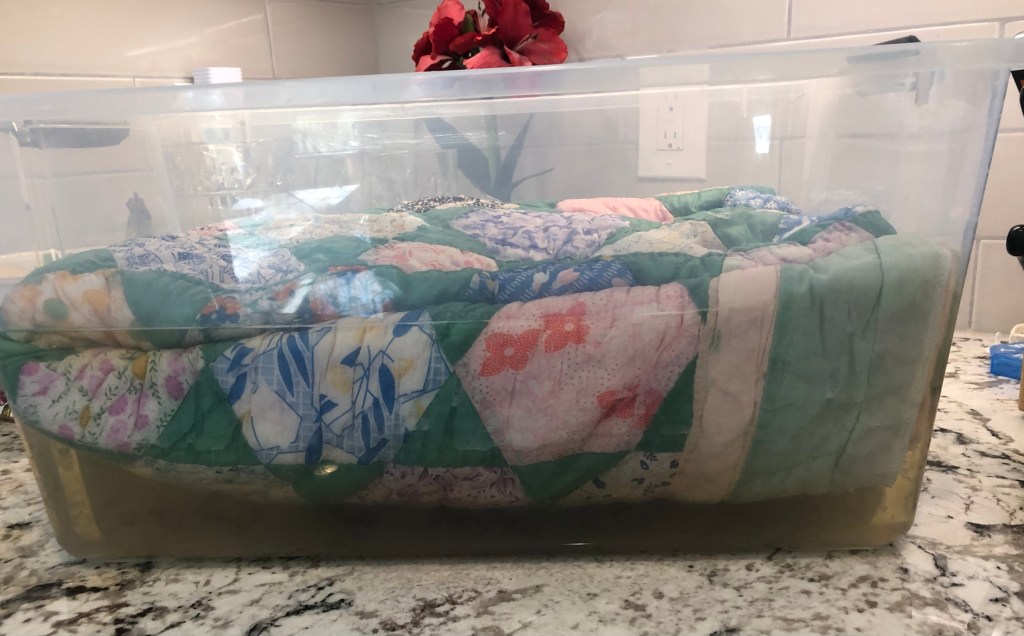
Look at the ugly brownish-yellow water at the bottom of my soaking tub. Oh my! I soak all my vintage quilts in Sodium Perborate, the same thing as Retro Clean. It does such a wonderful job of removing the dinge associated with old quilts. I use very hot tap water and always soak my old quilts for at least 48 hours. After soaking, I will drain am much water as possible and then it’s on to the front load washing machine and the dryer. It’s after the quilt is dry that I will begin removing the tulle and the repair process will begin.
Can’t wait to see this potential beauty when it’s clean and smelling great!
🗓 Class #2 begins on March 1, 2021 and oh my, I just looked and we have over 1600 members in our Facebook group! Wow!
It is a bit difficult to maintain a sense of order and organization while holding a class in a Facebook/Blog group. In any given month there can be a thousand posts and comments from the members. If you will adhere to the following rules, things will flow smoothly and your admin’s (Rhonda and Anita) will be so happy! 😃 Thank you in advance! ❤️
📌📌📌Reminder: The Facebook group directly associated with this Class is: 1914 Boehm House Vintage Linens Classes. Please remember to join this group.
Read everything your Admins (Rhonda and Anita) post/blog related to this new Class.
If you do not know how to use the Facebook tools/functions, learn before you post.
All specific patterns/charts/diagrams that are not copyrighted will be found in the Files section of this FB Group. You do not have permission to upload anything to Files. If you upload anything to Files you will be sad because you will find yourself blocked. ☹️
Do not ask questions until you have read all admin posts back to Jan. 31, 2021. Wondering how to find all admin. posts? Refer back to rule 2.
Negative posts and/or comments will be deleted.
Your posts must be related to one of 4 topics: The Boehm House, my retreat at the Boehm House of March 2020, Class #1 or Class #2. Anything else will be deleted and again, you will be sad. ☹️
If you go shopping and post pictures of all your found vintage treasures, please know I will most likely remove your post after 24 hours.
PS: how do you pronounce Boehm? Think Baim with a long “a”. Rhymes with Same. Does that help?
I was looking at the statistics for our Group, on a normal day we can have posts that generate several hundred comments. It is my goal to keep the group on topic and on target with the current class but to meet this goal I will need your help! 🙂
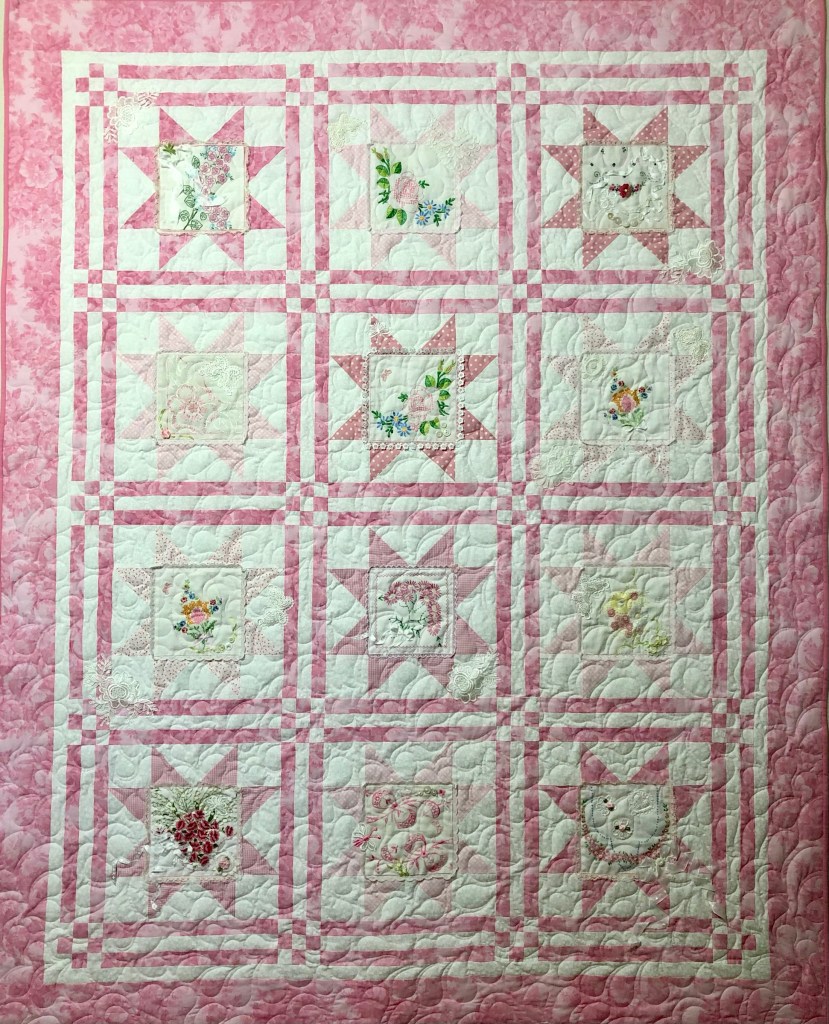
This is a picture of the quilt pattern you will need to purchase to participate in Class 2. It’s on sale so hurry over to: http://www.laughyourselfintostitches.com and look for: Lattice Stars. You have a choice of a “download immediately” or a “hard copy mailed” pattern.
Karen Walker’s pattern Lattice Stars is so very straightforward that most if not all of you will not need much direction from me until you reach the stage of embellishing, that is if you decide to embellish.
Karen gives direction on how to create the different parts of the Star Block, but if you have your own “tried and true” method do what works for you.
Once you have decided how large you want your quilt top to be and how many Star blocks you will need, begin your block construction.
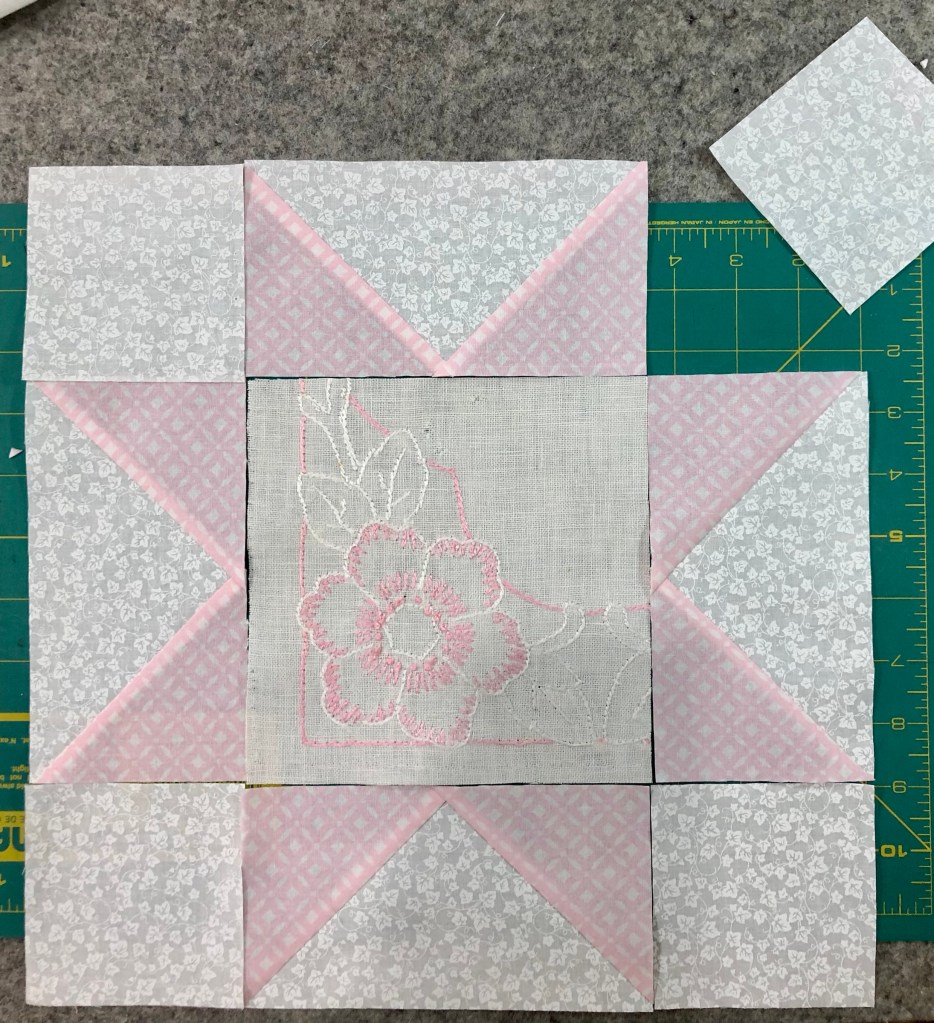
The Star block center…make it whatever you want it to be! The pattern calls for a 9-Patch, the sky is the limit on what the Star block center might be in your quilt! Make your Star blocks wherever your quilting heart leads you! It’s your quilt, there are no Quilting Police! I promise!
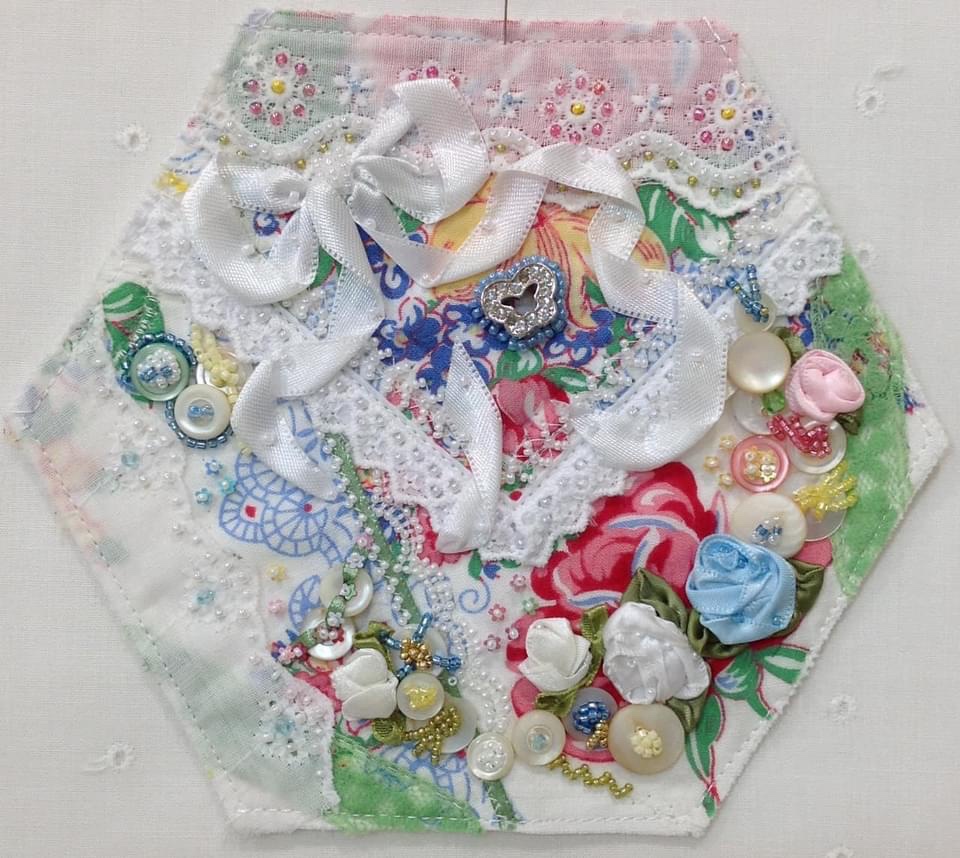
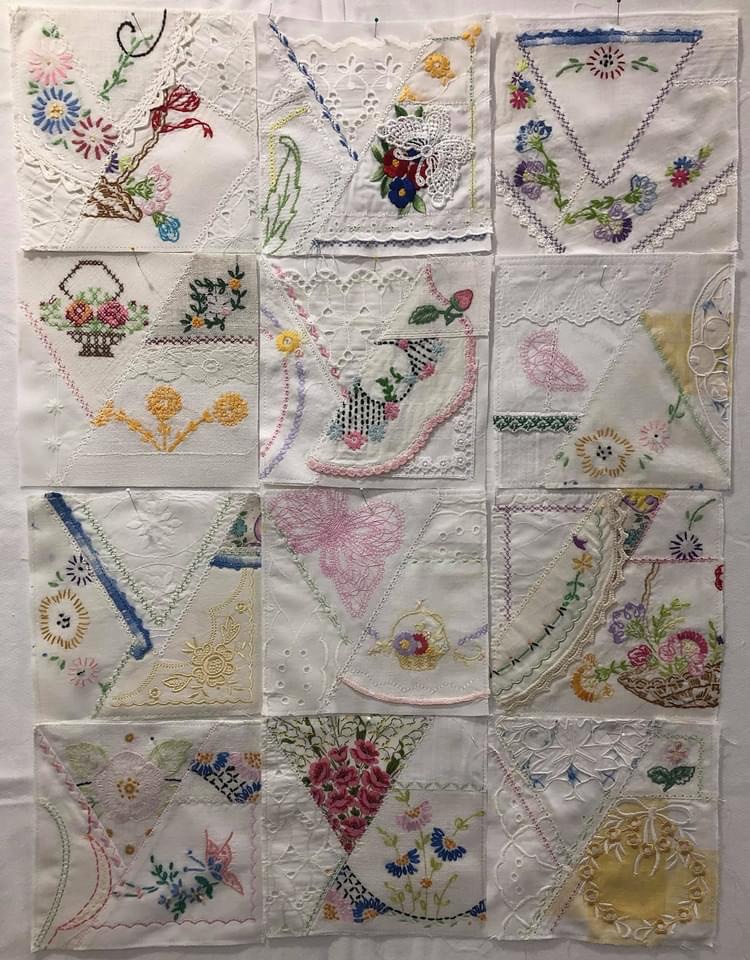
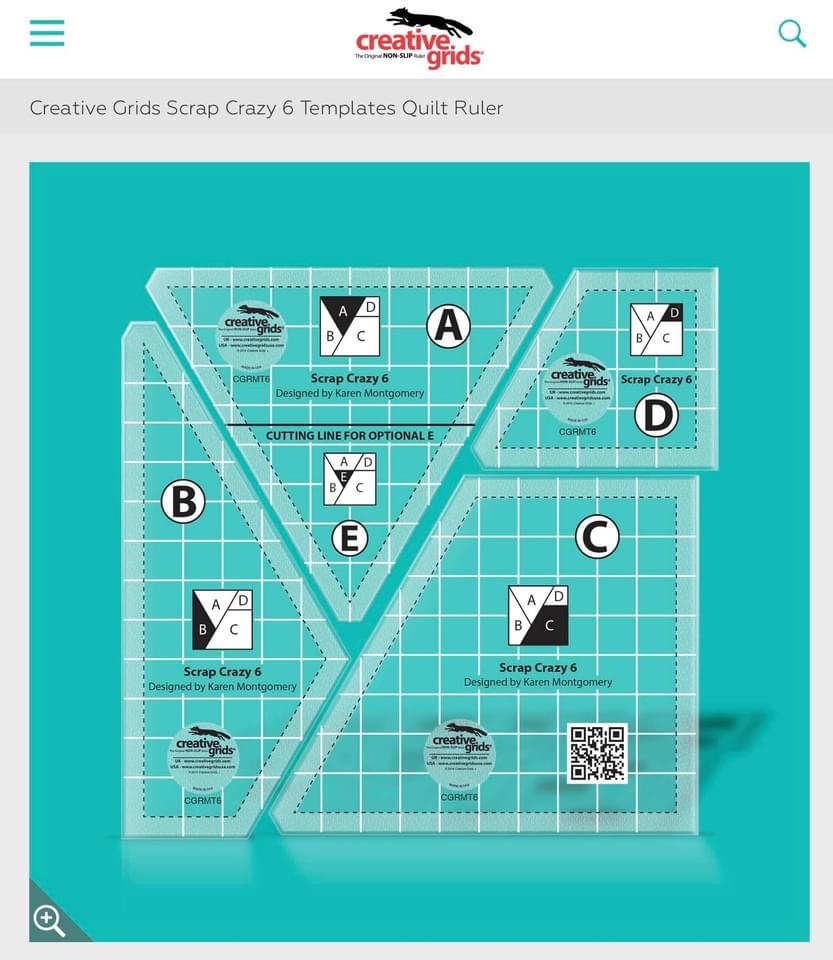
This picture below is from another project a few years ago but it gives you a visual for a Crazy Quilt star block center square.
12 Crazy Quilt Block squares that would make fantastic Star Block centers.The Creative Grid template set I used to create most of the 12 crazy quilt squares.
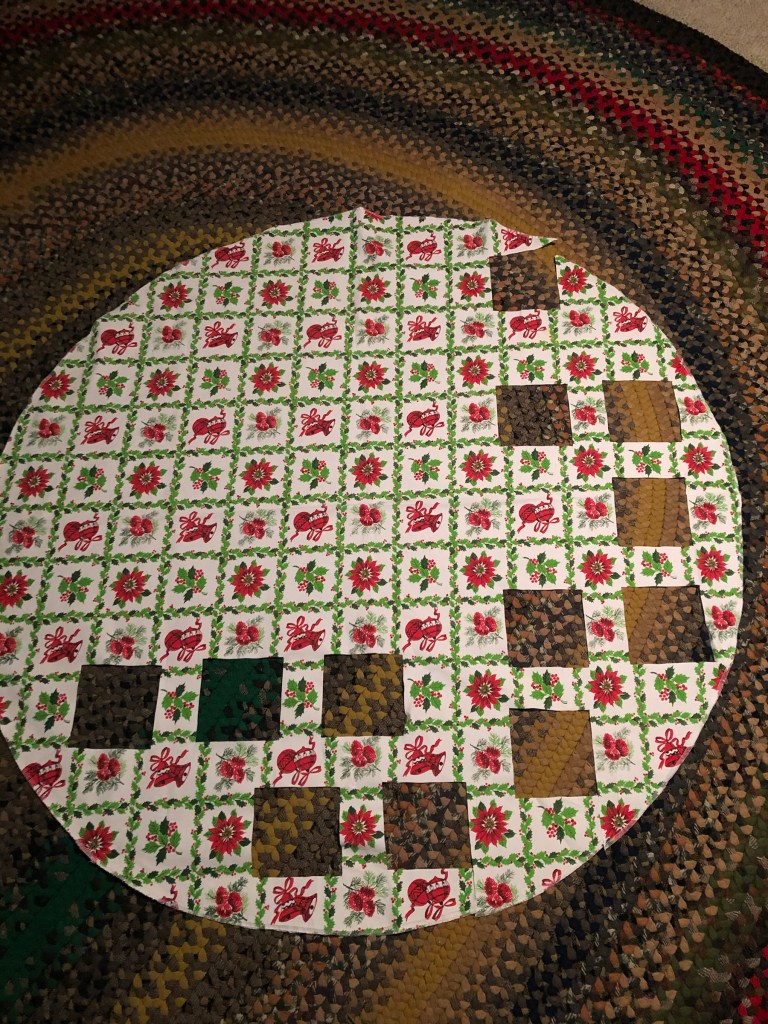
Another idea I’m developing: I went eBay shopping a few weeks ago looking for a vintage Christmas tablecloth. I purchased one, soaked and laundered it when it arrived. Because I discovered it had been printed on the fabric bias, spray starch came to my rescue as I pressed out the laundry wrinkles.
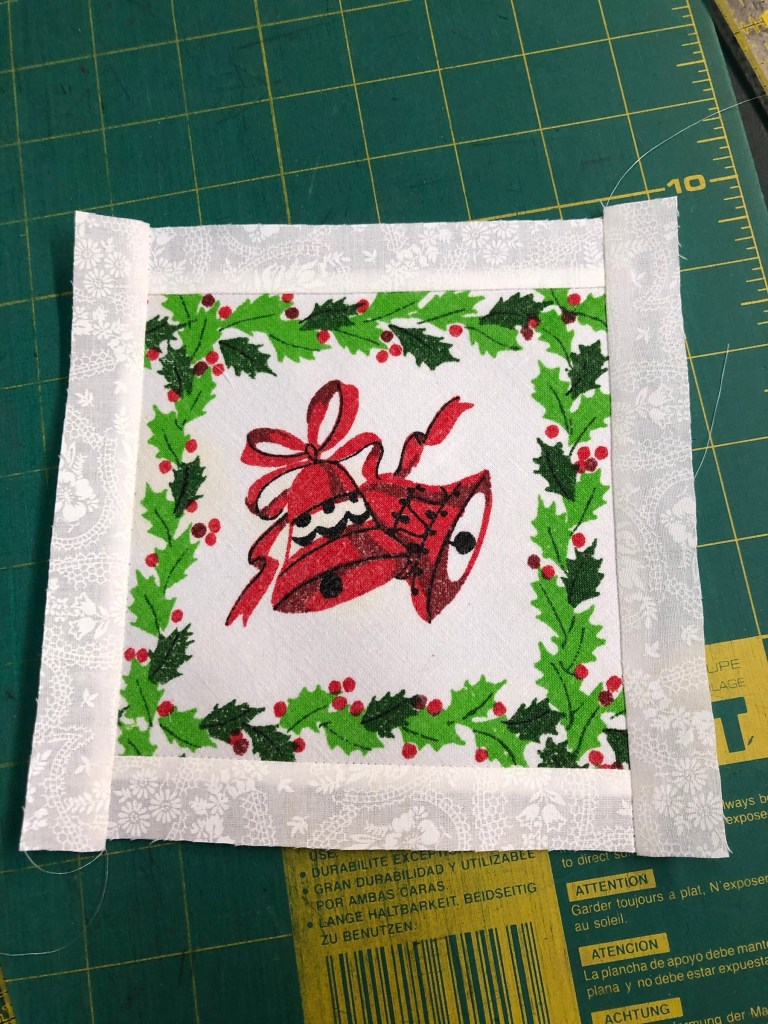
Here is what my vintage tablecloth looks now that I have Fussy Cut 12 Star Block centers. I was a difficult decision about how to cut the squares. By Fussy Cutting a single motif, I had to cut into and ruin 8 surrounding motifs. In order to potentially save the bells/poinsettias/holly sprigs/ornaments I decided to cut my square smaller than the star center and bring it to the correct size by adding a white fabric frame around the small square. This way I did not have to cut into or destroy too much of the printed cloth. Does this make sense?
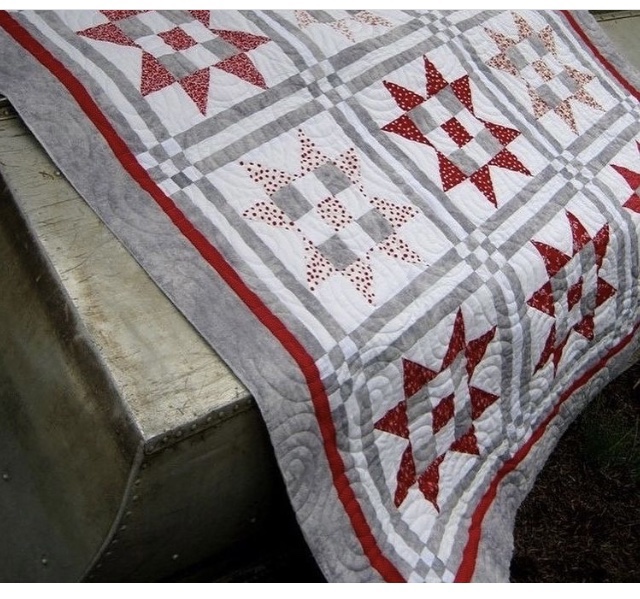
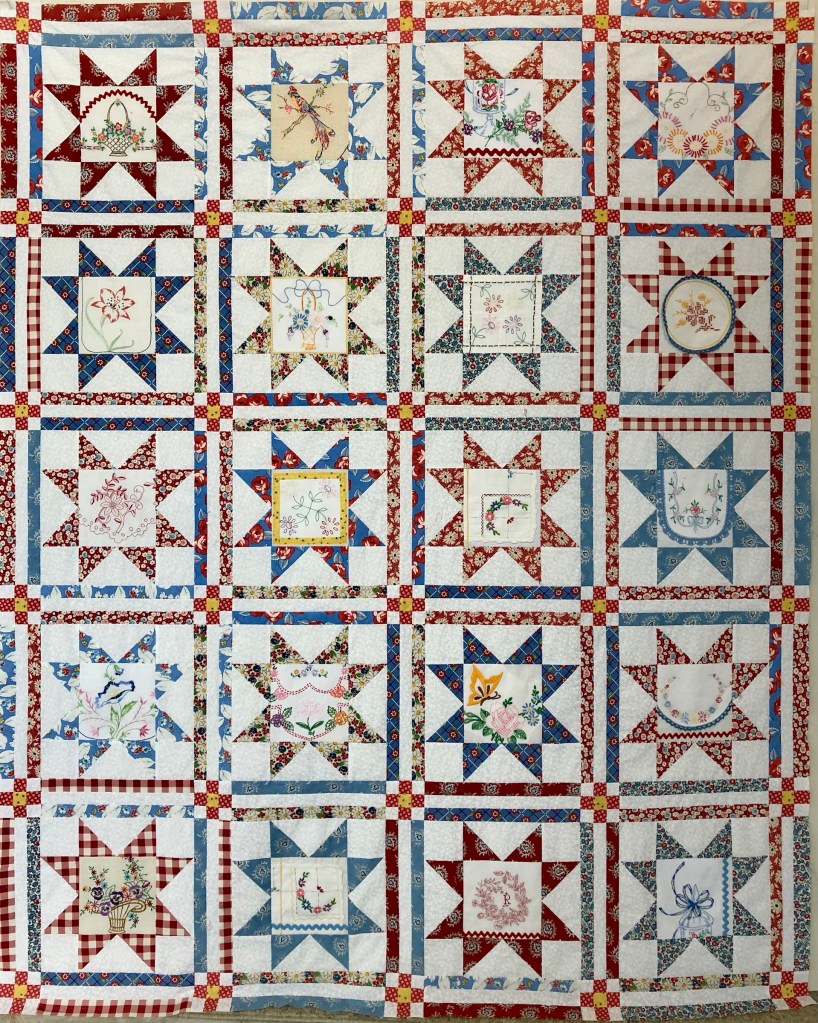
This red/blue/yellow/white Star quilt top makes me smile every time I see it! No, it is not finished, I am still deciding on borders. I’m in no hurry so it may stay unfinished for a month or two.
Have I told you today how much I love Star Block quilts? In a perfect world I would make one every other week!
Are you already working on your blocks for Class 2? Post pictures on our Facebook group page! Can’t wait to see them!