The Making of the Blue and White Mostly Vintage Linens Quilt, Part 2 of 4.

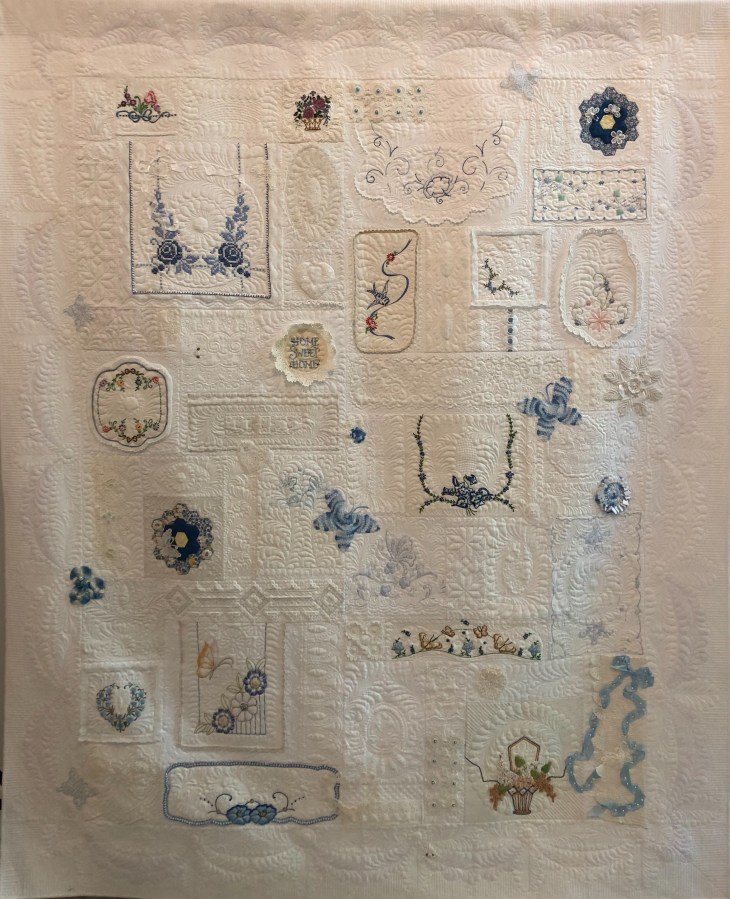
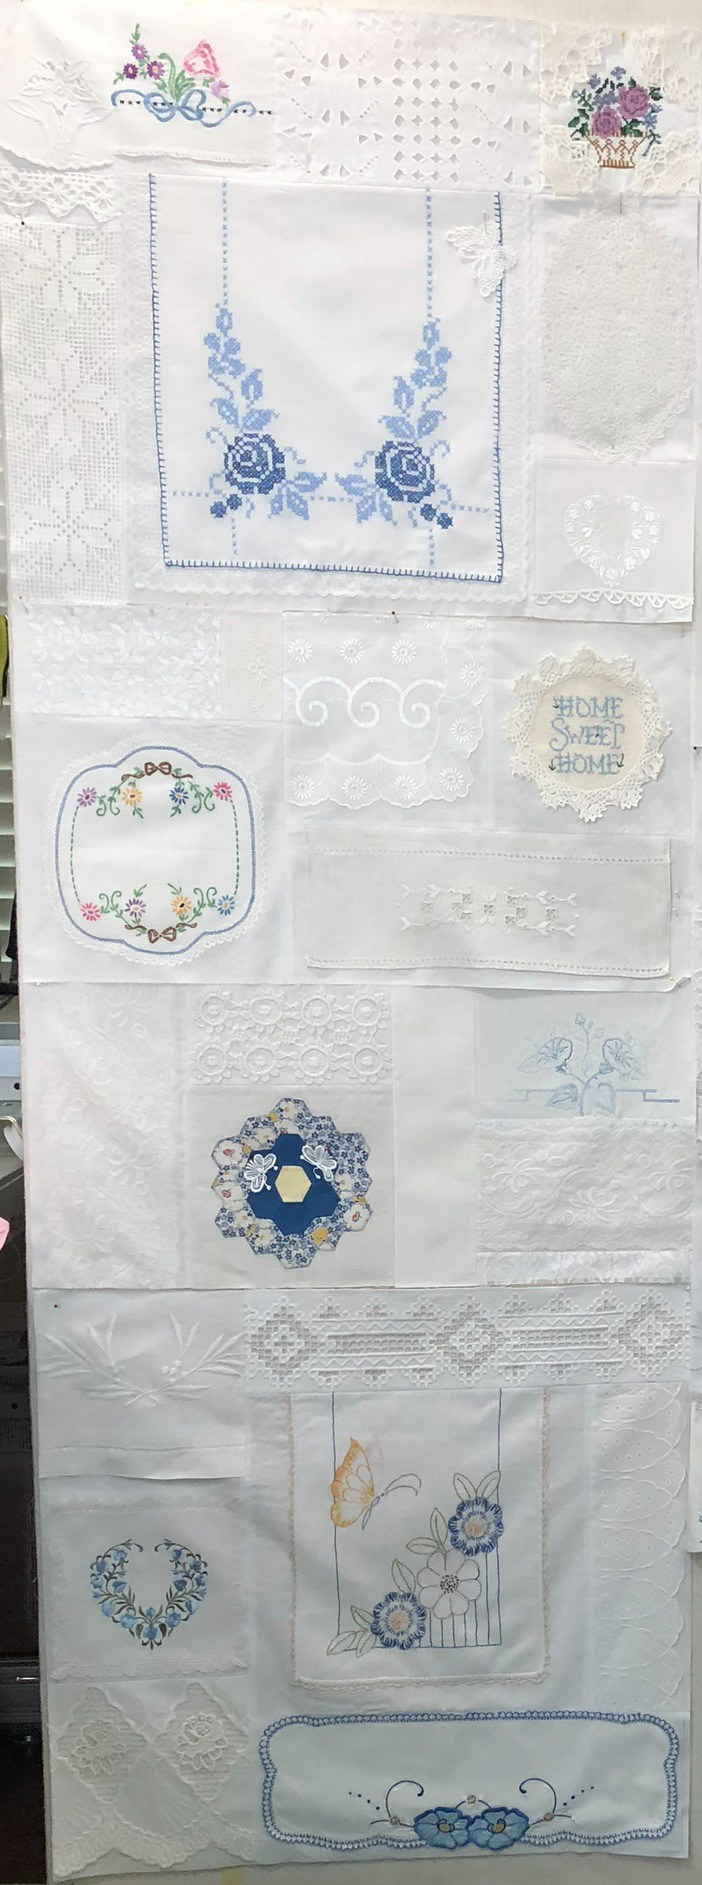
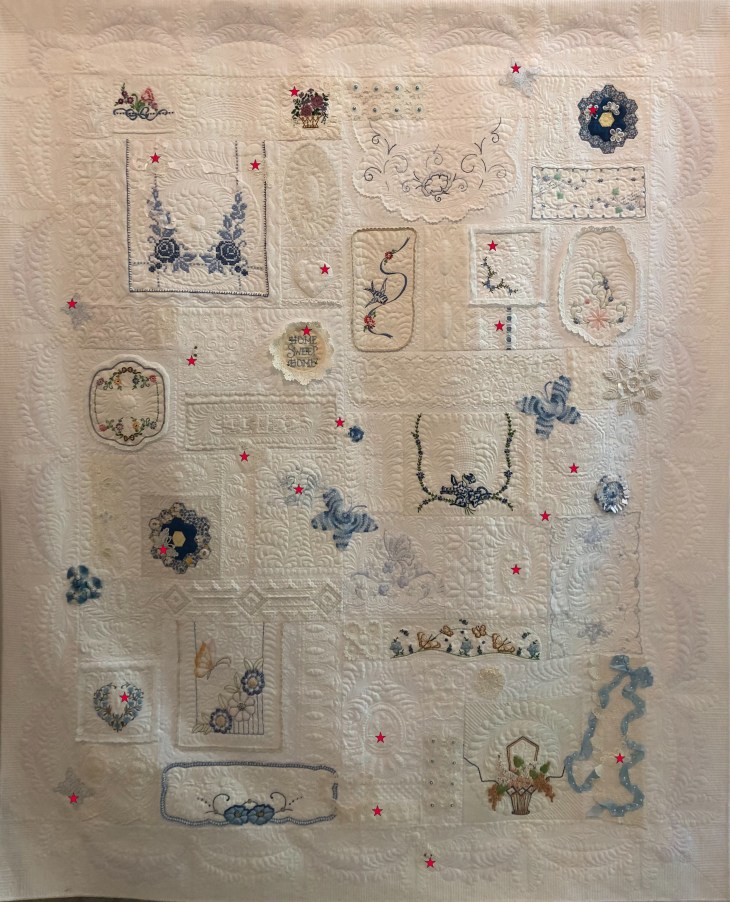
Part 2 of 4 is all about the right side of the quilt! Here’s the finished quilt with most of the new pieces marked with the red stars. In my last blog post we covered the left side of the quilt, top to bottom. Today we’re going to do the same with the other side. Are you ready?

red star new things(Edited)


IMG_0146(Edited)
Section 5

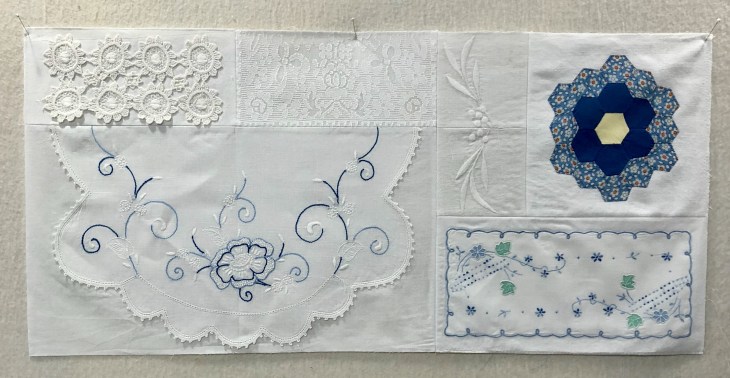
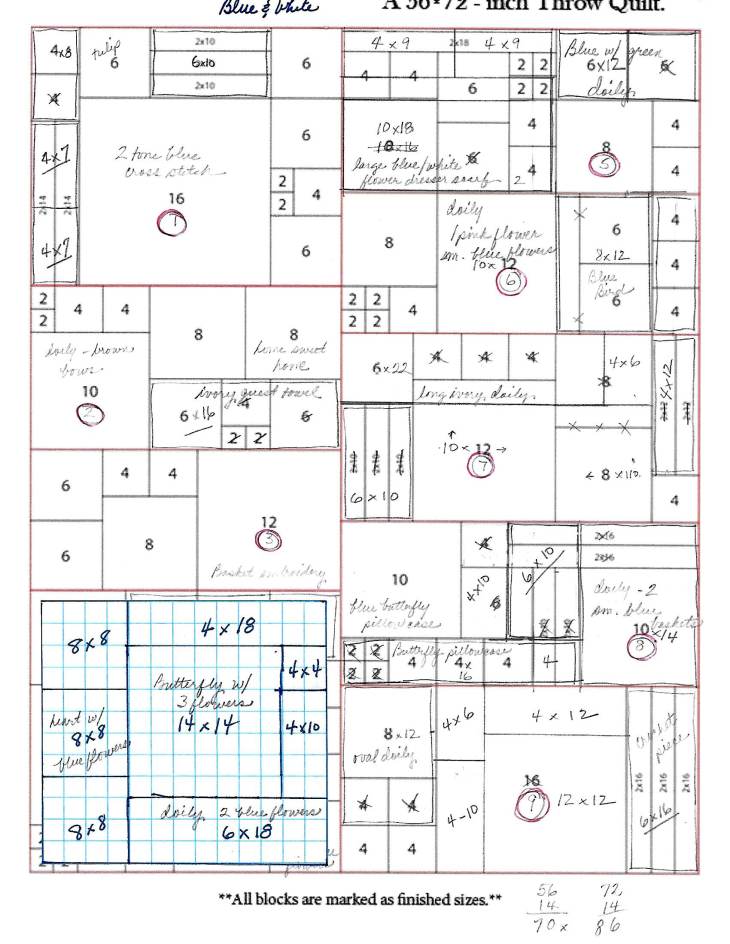
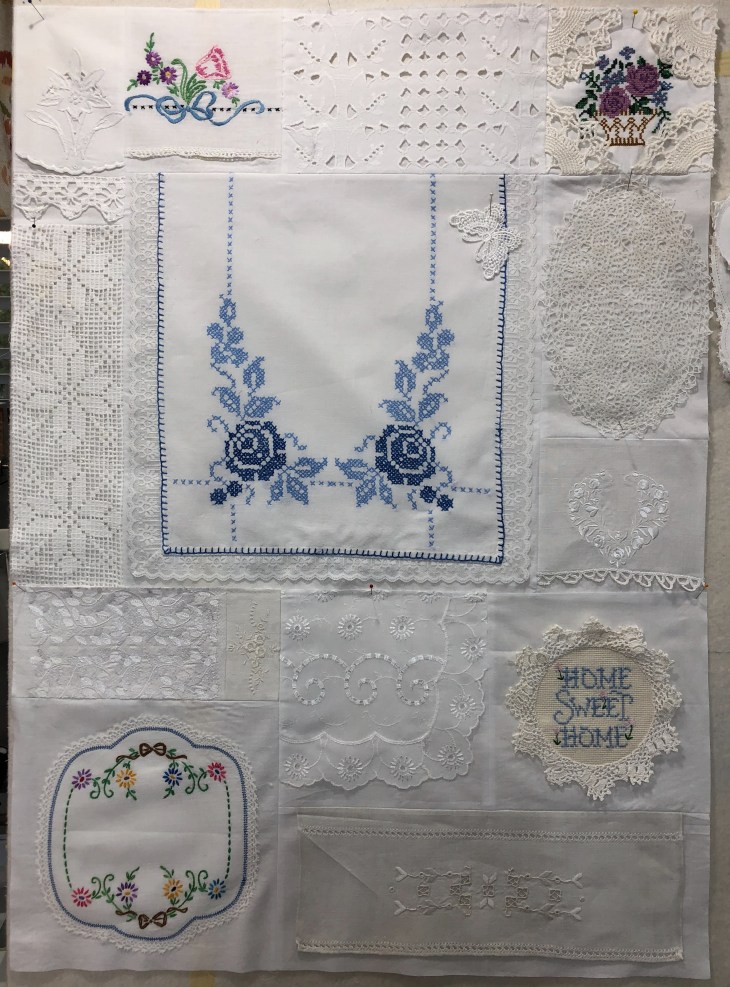
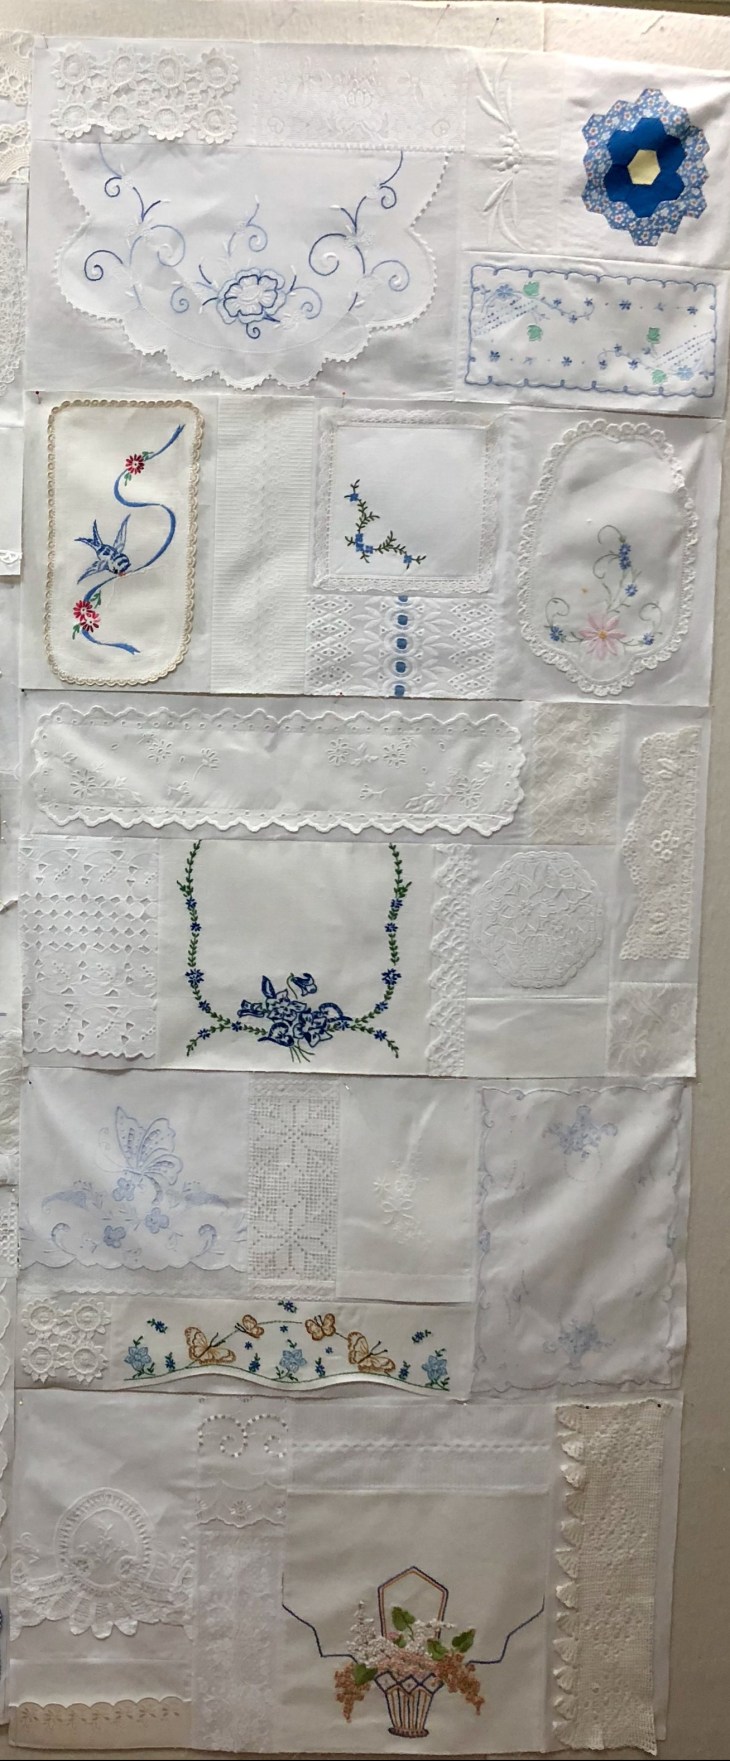
This is Section 5, the upper right side. This is also one of the few sections made up entirely of vintage pieces. Starting with the upper left side, we have a small (4×9″) portion of a table covering, a piece of pale ivory lace (4×9″) and half, (10×18″) of a beautiful blue and white dresser scarf below. See the piece to the left of the vintage Grandmother’s Flower Garden block? One of the blocks in Section 4 had a bit of embroidered areas left after I cut it to size. I merely joined those 2 left over pieces to create an entirely new block. It’s not obvious is it? Keep this in mind before you discard anything, sometimes bits can easily be joined to create something new! The rectangle piece beneath, I don’t know… I suppose it could be part of an antimacassars set? A small dresser doily? Whatever its original purpose, I think it works very well in my quilt.

IMG_0147
Section 6

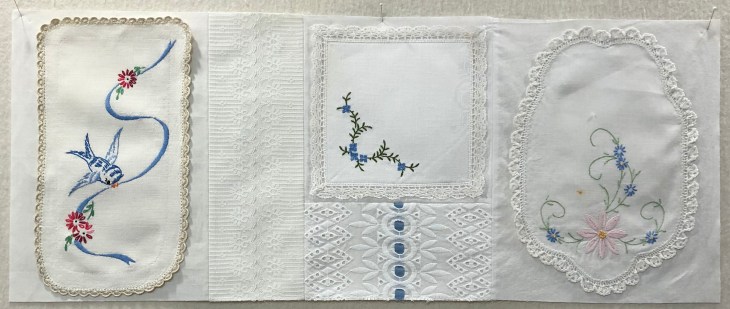
This is Section 6. The bluebird doily is vintage as is the rectangle block to its right where I took 2 pieces of white-ish old lace, laid them curved sides together and machine stitched them to the bleached muslin foundation. The next 2 pieces, top and bottom are new. The top piece is from my embroidery machine, I added the lace around the 4 sides. Beneath this piece is new straight off the bolt beautiful fabric from the now permanently closed Hancock Fabrics. I wove the blue ribbon in the cut-outs of the fabric. The rightmost piece is again, a beautiful vintage doily.

IMG_0148
Section 7

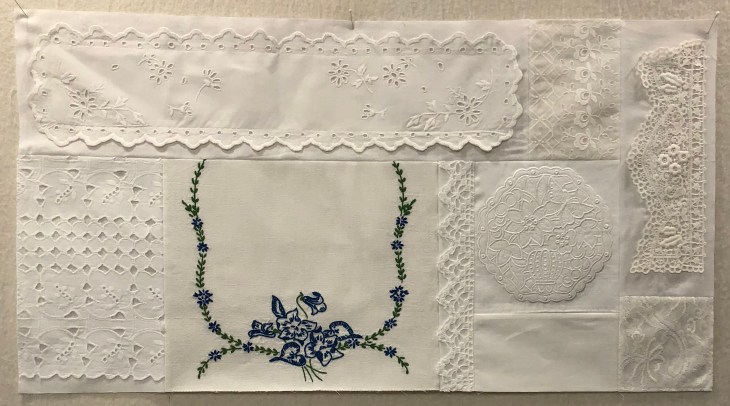
Welcome to Section 7. We only have 2 more sections to go after this one before the quilt top is completed. The top left long-long-long rectangle block measures 6×22! I really had to do some diagram adjusting to make this piece fit. On its right is a 4×6″ piece of vintage lace and finally a 4×12″ block of the most beautiful lace/trim/adornment ever! It is not symmetrical. You’ll see the top edge is not straight light the bottom edge. This is a piece I could have never ever cut so I’m glad I could use it in its entirely. (Note: this piece was moved over to the left side of the quilt during the quilting process.) Bottom row left has a 6×10″ piece of what may have been a curtain/window treatment and the doily in blue and green is an end of a dresser scarf. Next you’ll find a 2×10″ piece of hand crocheted trim and then a new hexagon shape from my embroidery machine. Beneath the hexagon is a plain bleached muslin rectangle and then a 4×4″ vintage lace panel piece.

IMG_0149(Edited)
Section 8

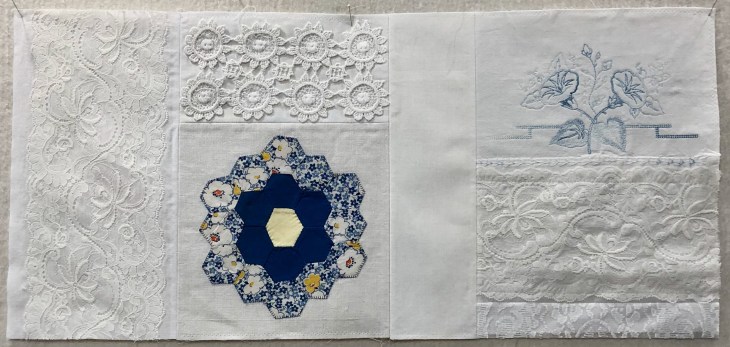
Hello Section 8! Are you confident yet in knowing you can take vintage pieces and easily mix them with new? Starting at the top left we have a vintage beautiful blue pillow case, part of the hand crocheted piece we used in a section on the left side of the quilt, a new white on white embroidery from my machine and then an equally beautiful piece of blue embroidery. Measuring 10×14″ this may have been a tray cloth? On the far left we’ve got another piece of that table covering and a darling childs pillow case that measures 4×16″ finishes this section.

IMG_0150(Edited)
Section 9

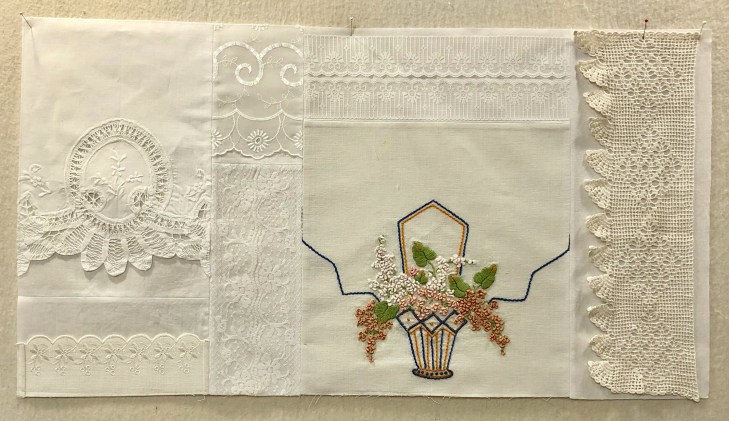
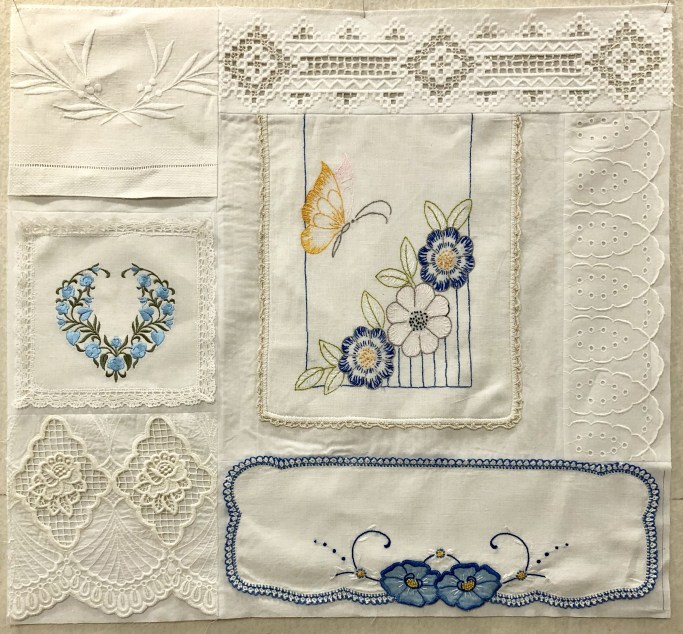
Are you still with me? This is the final part, Section 9! Beginning on the left, a 8×12″ new-ish Battenburg guest towel with a 4×8″ new machine embroidery ivory piece below. The next area has 2 different vintage laces, the top measuring 4×6″, the bottom at 4×10″. Moving to the right, the top 4×12″ rectangle is 2 pieces of vintage lace placed with scalloped edges touching and stitched in place on the foundation. The Basket… I auditioned this basket in almost every section as I created them. I finally realized that it was so “visually heavy” it had to go on the bottom edge. It balances nicely in this position. To its right is a 6×16″ beautiful piece of vintage crochet.

IMG_0138(Edited)
Right side of the quilt top

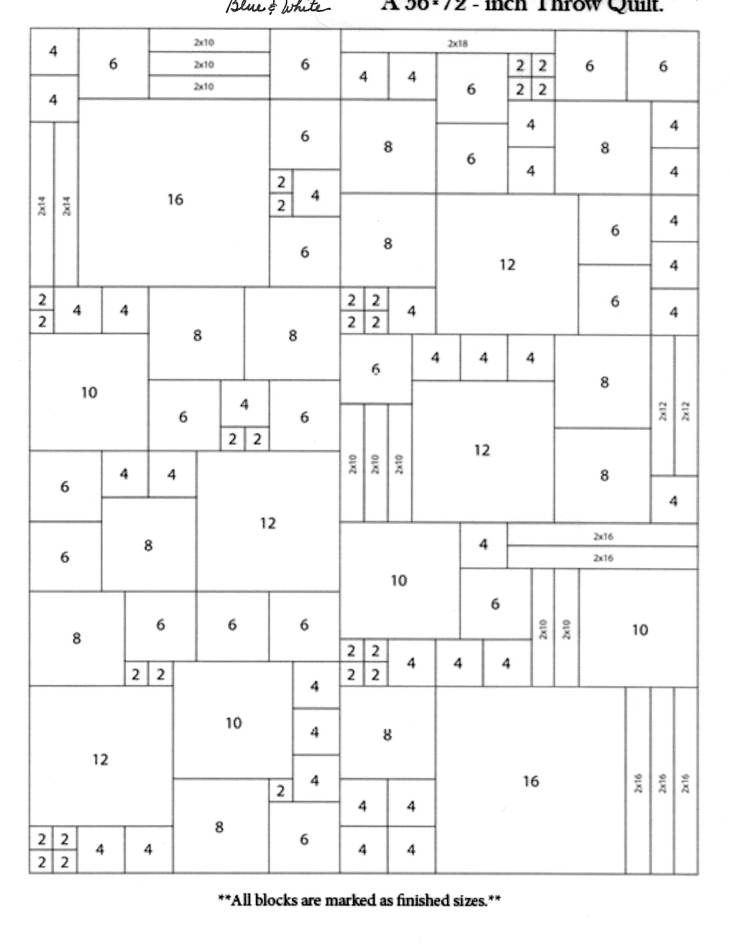
Whew! We’ve covered each of the 9 sections in great detail. Success (for me) came from the “Divide and Conquer” method. Had I set out to create this quilt without a diagram I would have been at a loss as to where to start. Don’t give yourself a monumental task, break it down into managable goals, or in my case, 9 managable goals. Again, many thanks to Andrea for creating a very usable/adaptable diagram that is well laid out and easy to use! You can keep scrolling down to my post of 7/1 to see Andrea’s diagram if you’ve forgotten what it looks like.

IMG_0140(Edited)

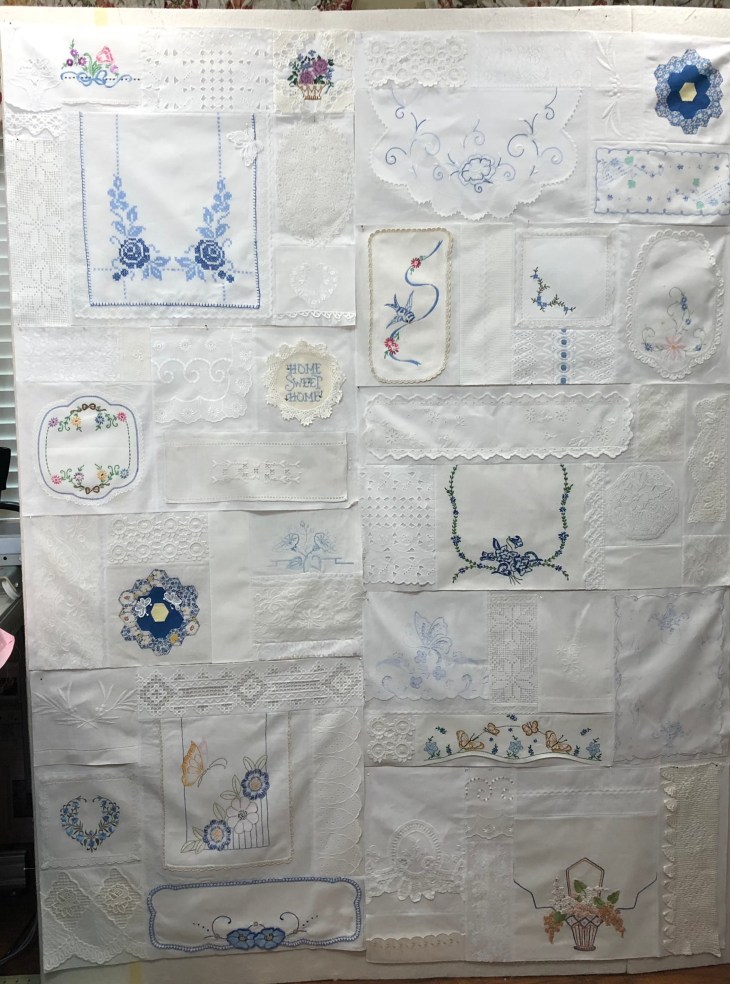
Here’s the quilt top with all the sections laid together on the design wall. We’ve come a long way since the previous post!

Are you planning to create a quilt using this 4 part tutorial? Yes? Well please send pictures so we can all see what you’re doing. With your permission I’ll post your pics and we can all be inspired! Do you have questions? Bring them on, if you’re wondering about something, chances are so are others.

Next post, part 3 of 4, will be all about adding the borders and quilting! There’s nothing I love more than the quilting part! I took 10,000 pictures so get ready!

Lisa, have you started your quilt???

Here’s my thought for the day: “Any day spent in the sewing room is a good day!” Today I spent the biggest part of the day in mine!

*** Huge house update! Sunday (July 15) the roofers finished with the Hurricane Harvey repairs! Can I tell you that’s 321 days ago!!! Now that the roof’s repaired, the contractor can come back and fix the dining room wall. Once the wall is spackled, sanded and painted I can begin putting the dining room together! Can I also tell you I ordered furniture last Wednesday for the family room. I’m told to expect it to arrive in about 8 weeks. This means that we will be past the 1 year Hurricane Harvey anniversary! Who would have ever thought it would take this long, but God is good and so are we!

img_0814.jpg

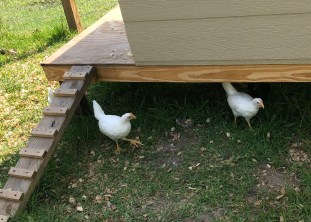
Oh, and I survived the Juvenile Delinquents, aka the chickens…

Happy quilting and blessings to all,

Rhonda

image


The Making of the Blue and White Mostly Vintage Linens Quilt, Part 1 of 4.

img_0667edited.jpg

I say “mostly” because this was an exercise in combining both new and old pieces into a single quilt. When I speak to groups one of the most common comments I hear is something like: But I don’t have all those beautiful old things and don’t know where to find them. Here’s proof you don’t need a huge stash of vintage linens to create a beautiful quilt.

In the picture below, with a red star, I’ve identified almost every new piece in this project:

red star new things(Edited)

If my counting skills are sharp, there are at least 25 new items in this quilt. But how did I start this project? If you’ve read any of my past blog posts you might have seen the tutorial on the making of the Pink and Green Vintage Linens quilt. I used a wonderful quilt block layout by Andrea of http://www.mouseinmypocket.com. She has generously given me (us) permission to use her layout. If you’re going to go forward with her design, it would be great to drop her a line or two of thanks!

Below is the layout from Andrea’s web site.

Scan 1

What are the numbers in each unit? They are the finished size of each block. So right away your “quilty antenna” should be going crazy. Did you catch that: Finished Size!!! That means each and every single time you reference one of the numbers, you MUST add 1/2″ to the numbers!!! For example: look at all the 4’s. You know that really means 4 1/2 x 4 1/2″ right? If you forget your seam allowances you’re in big trouble! What about the units that are not easy squares like all the 4’s? Look at the 2×10 units. They are actually 2 1/2 x 10 1/2″ blocks. Get yourself into the frame of mind that you double, maybe even triple check before you cut! Think: SEAM ALLOWANCES!

Here’s my adaptation:

Scan 2

So what’s happened with my adaptation? I’ve marked off the diagram into sections, 1-9 (see the numbers circled in red),  I’ve labeled where I’m thinking many of my linens, etc. will be used,  I’ve changed up the block layout within each segment to meet my needs and I’ve totally revamped segment #4.

While you’re at it, using pencil, write your ideas for what pieces to use where. Then, take a piece of paper, write the Section number and block size down and straight pin it to the piece you’re going to use. This way you won’t get confused and try and use the same piece two or three times… like that would EVER happen to anyone…

It’s all about divide and conquer! And why did I totally revamp section #4? A number of reasons: I had a large piece I wanted to use and I wanted to avoid all the Set-In seams. What’s a Set-In seam? Here’s a pretty good link: How to sew a set-in seam

But, let’s start with section #1 and the design wall.

IMG_0141
Section #1

From the top left: guest (hand) towel, pillowcase, old dresser scarf,  new machine embroidered cross stitch design framed (Doily also new, cut into 4 quarters) ivory hand crocheted doily, hand crocheted white piece, blue cross stitch dresser scarf, vintage ivory oval doily and finally, new machine embroidered heart with old trim sewn along the bottom edge. See the top right edge of the large blue cross stitch? See where the edge is torn. I don’t care because later a new white butterfly will cover this problem area. Don’t fret the problem areas. Think of them as opportunities for adornments/distractors/etc.

If you’re comfortable with your block placement, sew them together and pat yourself on the back!

What about Section #2?

IMG_0121 (Edited)
Sections 1 & 2

With these close up pictures, I’m seeing a few new things I did not get marked with a red star. Starting at the top left of Section #2, the white embroidered piece is straight from my embroidery machine, as is the little ivory piece to its right. The middle piece is from a table runner and Home Sweet Home; well, straight from the Goodwill. When I bought it for $2.50 it was hot glued into a wooden round embroidery hoop. Once released from captivity, I trimmed away all the glue, used a circle template to cut it to perfect shape and added a bit of beautiful ivory hand crocheted trim around the edge. The bottom right piece is a guest hand towel.

This is a good time for a break to talk about the Vintage Linens Quilt Police: they exist only in your imagination. Don’t be hampered by thinking there are Vintage Linen rules. Do I have a few personal rules? Yes. I won’t cut up a fabulously beautiful “perfect in every way” piece, I generally abhor fusibles with vintage pieces and… I can’t think of anything else. For you: the pieces are yours. You can do with them as you please. You don’t need permission from anyone else because the pieces are not theirs. Ok, enough said.

IMG_0143(Edited)
Section #3

From left to right: new off white lace, rectangle section of a small damaged tablecloth, a vintage Grandmother’s Flower Garden quilt block, a filler block of bleached muslin, new Morning Glory machine embroidery using variegated blue/white embroidery thread (I embroidered this onto a vintage pillowcase that already had a small line of variegated blue/white handwork), another piece a vintage panel lace and finally, a small filler lace at the bottom. For the Flower Garden quilt block, I  machine appliqued it to a square of bleached muslin fabric before I began to set the section blocks together.

Are you with me so far? See how breaking down the quilt top into 9 Sections makes the task seem so much more manageable? If you concentrate on each section at a time you don’t feel so overwhelmed at creating an entire quilt top from bits and pieces. If you scroll way back to the top you can also see from the diagrams that sections 1-4 are sewn together to form the left side of the quilt and sections 5-9 make up the right side. Easy-peasy!


IMG_0145(Edited)
Section #4

We’re now at the bottom section of the left side! Section 4 begins with the bottom edge of an ivory guest hand towel, a vintage Aida (I think…) piece of trim, a new blue and green machine embroidered heart with new white lace trim added, a vintage dresser scarf, the edge of an all white dresser scarf, a piece of beautiful light ivory trim and finally, a blue flowered small dresser scarf/doily.


8CA3781E-82EC-4EBB-B145-75F940EE6385

Say this with gusto: “Taaa-Daaaa!” The left side of the Blue and White Vintage Linens Quilt is complete!

Now that you’ve read thus far, do you have some ideas for your project? You can see that not every block has to be “The Star of the Show”. You need a mix for the eye to travel around your quilt. You need some blocks that pop and others what recede and “read” as plain. In other words, your eye need somewhere to rest as it travels the quilt top. What you do need to keep in mind is visual balance and that’s where your smart phone or digital camera comes in handy. It’s easy to snap a picture and look at it to see if your arrangement is visually heavy and/or light in certain areas. If you really want to get picky, revise your photo to black and white for ready reference to balance.

Do you have an embroidery machine, does your sewing machine have an embroidery module? Does a really good friend have either one? Can you see how the sky’s the limit when you take into consideration the adding of new pieces with vintage pieces to create a beautiful quilt? I hope I’ve opened your eyes to the countless ways to take what you have in your stash and add to it! Now here’s the upright and mature part, just make sure you don’t try to pass off your mix of old and new as totally vintage, because honestly, not too many people would be able to tell the difference!

Part 2 of 4 will come in a few days. I’m taking care of the daughter and son-in-law homestead once again, this time it’s only the chickens and watering the garden. The 5 chickens are juvenile delinquents. They don’t like me, they don’t mind and are in general, a nuisance, but right now they are my grandchickens and I will try and love them. 🙂

IMG_0581(Edited)

***House update: the construction repairs are complete! Praise God From Whom All Blessings Flow! It has been 10 months and 3 days since Hurricane Harvey and the flood waters came to visit. It seem like yesterday, it seems like years! Here’s another jaw dropper: when ordering from LazyBoy, it takes 2-3 months for chairs to arrive. Seriously, what do they do, harvest the polyester and weave the cloth!

So what do you do if you really what to watch television and don’t want to sit on the floor? You ask your awesome son-in-law or order 2 reclining lawn chairs!

IMG_0756

They are amazingly comfortable, and will probably be even more so when I venture out to the store to buy a couple of chaise lounge pads!

Oh my goodness, I almost forgot!!! I have a new BFFWALVL! That stands for Best Friends Forever Who Also Loves Vintage Linens! This is Lisa and she works at Quilter’s Crossing in Tomball, TX. A wonderful fabulous quilt shop!!!!! Stop in and tell her you saw her here in this blog post! And then spend several hundred dollars while you’re there!!!  🙂

img_0714.jpg

Until next time, blessings to each of you and of course: Happy Quilting!

Rhonda

IMG_4386 (Edited)