

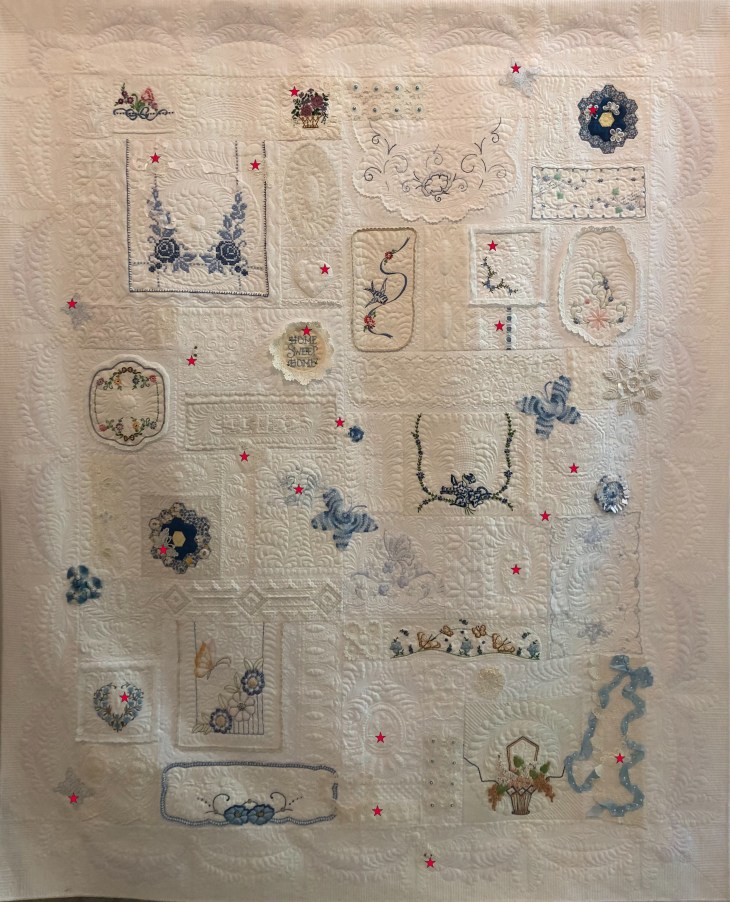
Part 2 of 4 is all about the right side of the quilt! Here’s the finished quilt with most of the new pieces marked with the red stars. In my last blog post we covered the left side of the quilt, top to bottom. Today we’re going to do the same with the other side. Are you ready?
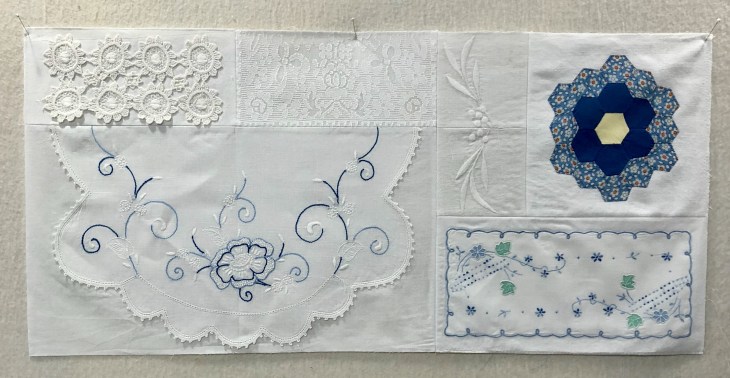
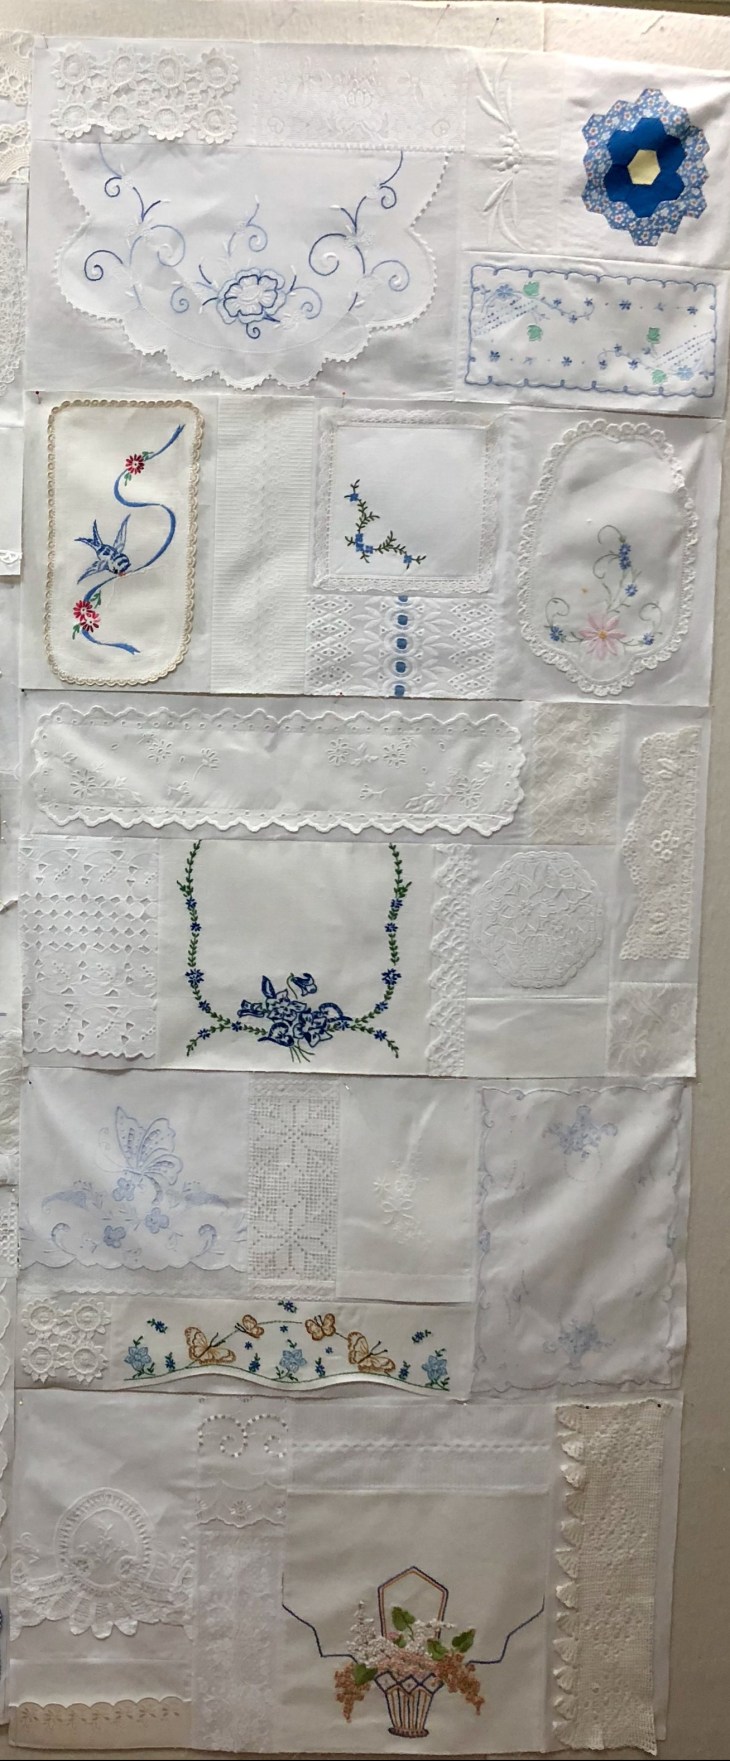
This is Section 5, the upper right side. This is also one of the few sections made up entirely of vintage pieces. Starting with the upper left side, we have a small (4×9″) portion of a table covering, a piece of pale ivory lace (4×9″) and half, (10×18″) of a beautiful blue and white dresser scarf below. See the piece to the left of the vintage Grandmother’s Flower Garden block? One of the blocks in Section 4 had a bit of embroidered areas left after I cut it to size. I merely joined those 2 left over pieces to create an entirely new block. It’s not obvious is it? Keep this in mind before you discard anything, sometimes bits can easily be joined to create something new! The rectangle piece beneath, I don’t know… I suppose it could be part of an antimacassars set? A small dresser doily? Whatever its original purpose, I think it works very well in my quilt.
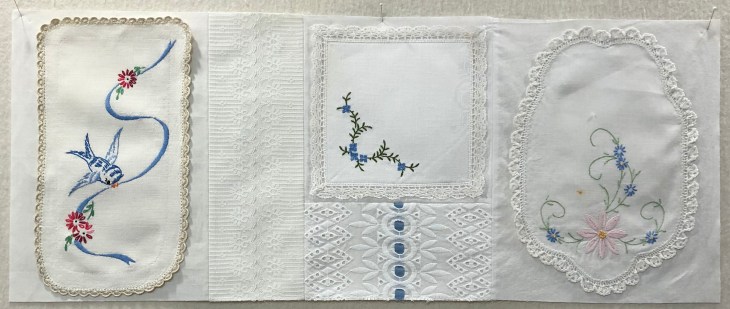
This is Section 6. The bluebird doily is vintage as is the rectangle block to its right where I took 2 pieces of white-ish old lace, laid them curved sides together and machine stitched them to the bleached muslin foundation. The next 2 pieces, top and bottom are new. The top piece is from my embroidery machine, I added the lace around the 4 sides. Beneath this piece is new straight off the bolt beautiful fabric from the now permanently closed Hancock Fabrics. I wove the blue ribbon in the cut-outs of the fabric. The rightmost piece is again, a beautiful vintage doily.
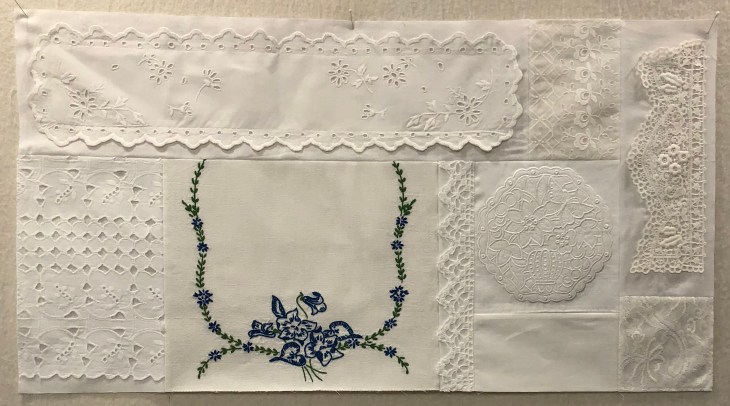
Welcome to Section 7. We only have 2 more sections to go after this one before the quilt top is completed. The top left long-long-long rectangle block measures 6×22! I really had to do some diagram adjusting to make this piece fit. On its right is a 4×6″ piece of vintage lace and finally a 4×12″ block of the most beautiful lace/trim/adornment ever! It is not symmetrical. You’ll see the top edge is not straight light the bottom edge. This is a piece I could have never ever cut so I’m glad I could use it in its entirely. (Note: this piece was moved over to the left side of the quilt during the quilting process.) Bottom row left has a 6×10″ piece of what may have been a curtain/window treatment and the doily in blue and green is an end of a dresser scarf. Next you’ll find a 2×10″ piece of hand crocheted trim and then a new hexagon shape from my embroidery machine. Beneath the hexagon is a plain bleached muslin rectangle and then a 4×4″ vintage lace panel piece.

Hello Section 8! Are you confident yet in knowing you can take vintage pieces and easily mix them with new? Starting at the top left we have a vintage beautiful blue pillow case, part of the hand crocheted piece we used in a section on the left side of the quilt, a new white on white embroidery from my machine and then an equally beautiful piece of blue embroidery. Measuring 10×14″ this may have been a tray cloth? On the far left we’ve got another piece of that table covering and a darling childs pillow case that measures 4×16″ finishes this section.
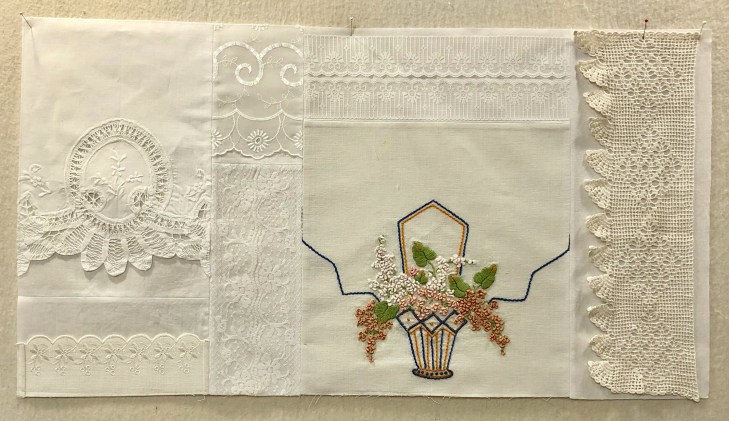
Are you still with me? This is the final part, Section 9! Beginning on the left, a 8×12″ new-ish Battenburg guest towel with a 4×8″ new machine embroidery ivory piece below. The next area has 2 different vintage laces, the top measuring 4×6″, the bottom at 4×10″. Moving to the right, the top 4×12″ rectangle is 2 pieces of vintage lace placed with scalloped edges touching and stitched in place on the foundation. The Basket… I auditioned this basket in almost every section as I created them. I finally realized that it was so “visually heavy” it had to go on the bottom edge. It balances nicely in this position. To its right is a 6×16″ beautiful piece of vintage crochet.
Whew! We’ve covered each of the 9 sections in great detail. Success (for me) came from the “Divide and Conquer” method. Had I set out to create this quilt without a diagram I would have been at a loss as to where to start. Don’t give yourself a monumental task, break it down into managable goals, or in my case, 9 managable goals. Again, many thanks to Andrea for creating a very usable/adaptable diagram that is well laid out and easy to use! You can keep scrolling down to my post of 7/1 to see Andrea’s diagram if you’ve forgotten what it looks like.
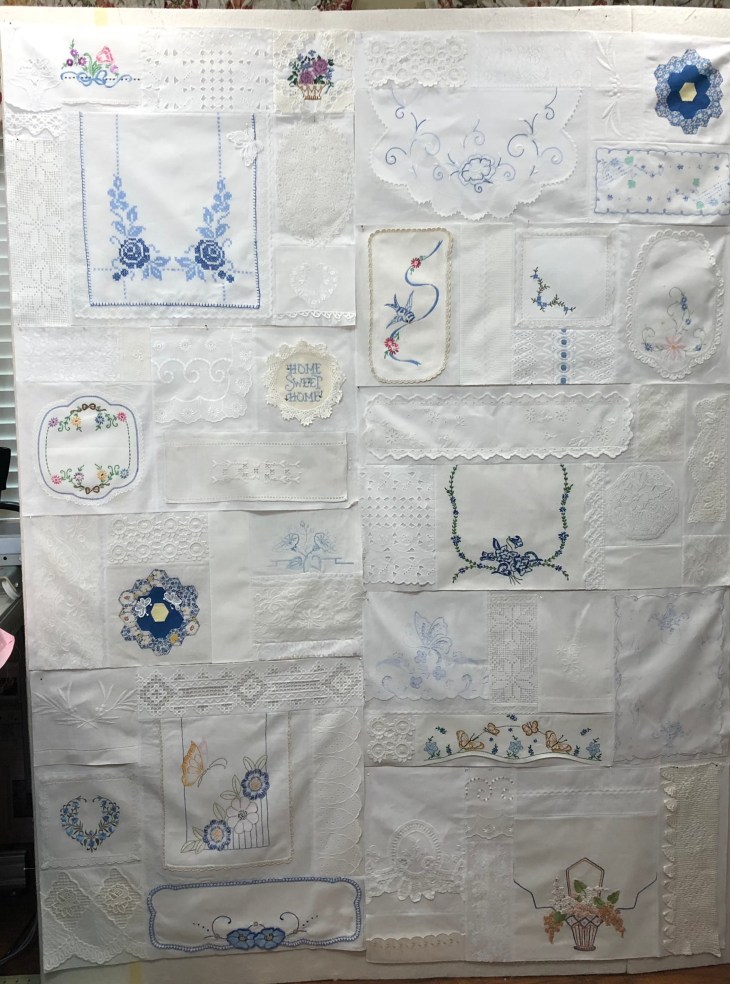
Here’s the quilt top with all the sections laid together on the design wall. We’ve come a long way since the previous post!
Are you planning to create a quilt using this 4 part tutorial? Yes? Well please send pictures so we can all see what you’re doing. With your permission I’ll post your pics and we can all be inspired! Do you have questions? Bring them on, if you’re wondering about something, chances are so are others.
Next post, part 3 of 4, will be all about adding the borders and quilting! There’s nothing I love more than the quilting part! I took 10,000 pictures so get ready!
Lisa, have you started your quilt???
Here’s my thought for the day: “Any day spent in the sewing room is a good day!” Today I spent the biggest part of the day in mine!
*** Huge house update! Sunday (July 15) the roofers finished with the Hurricane Harvey repairs! Can I tell you that’s 321 days ago!!! Now that the roof’s repaired, the contractor can come back and fix the dining room wall. Once the wall is spackled, sanded and painted I can begin putting the dining room together! Can I also tell you I ordered furniture last Wednesday for the family room. I’m told to expect it to arrive in about 8 weeks. This means that we will be past the 1 year Hurricane Harvey anniversary! Who would have ever thought it would take this long, but God is good and so are we!

Oh, and I survived the Juvenile Delinquents, aka the chickens…
Happy quilting and blessings to all,
Rhonda

Rhonda, Just to say, this is one of the most beautiful pieces of fabric art/quilts that I have ever seen. Thank you so much for sharing. Jane Alexander
Sent from my Galaxy Tab A
LikeLiked by 1 person
Hi Jane, thank you so much! It has been such a joy to create.
LikeLike
As always, it’s just pure joy to read your posts about vintage linens. You are so creative when it comes to designing and layout. Thanks, Rhonda. Glad to know things are nearly finished in the house. Nature can be so devastating but glad to know you are going strong in the aftermath.
LikeLiked by 1 person
Thank you! It’s been a trial but things are getting wrapped up! And thank you for your kind words about my blog, I love posting!
LikeLike
I really like this quilt. I love the peaceful feeling of the blue and white together. Every time you share your new quilts I learn lots more. My eyes have been opened to looking for scraps and ideas from other things. I was looking at what doilies (embroidered and crocheted) I have and I didn’t have enough and a good variety. This quilt inspired me to go to e-bay and place a bid on something I have been watching. I WON it by $1 and got the bid in with 3 seconds to spare. So as soon as I receive them I am going to lay them out against either this pattern or the last one. You are one generous and talented lady to teach and share. I love hearing about your house, especially since it is almost ready. I can’t imagine being in that kind of limbo for a year. It is looking beautiful. How did your yard do with all the water and other yucky stuff? Thank you from the bottom of my heart. I had 9 children and the last 15 years I raised them as a single Mom. All my creative juices just slowly went away. I am helping to raise my 7 year old Grand daughter right now but you have gotten me dreaming and wanting to create again. Thank you so very much.
LikeLiked by 1 person
Thank you for your kind words! Send pictures once you begin your project!
LikeLike
And I should have mentioned, the yard is coming back. There were so many contaminates and chemicals in the flood waters that many things died. Maybe this fall we will get some things planted again.
LikeLike
Good morning! This is my first email from you as I just started following your blog – “found” you while searching through Pinterest for ideas to use my large stash of vintage linens, and this quilt stopped my search! Thank you for the detailed instructions! I can’t wait to get started! So happy for your progress on restoring your home to normalcy!
LikeLiked by 1 person
Thank you Sara! Just know I’m here for you if you have questions! Send pictures of your progress!
LikeLike
Indeed God is great. You have had a great attitude throughout your Harvey Journey. I believe keeping yourself busy with these beautiful vintage pieces has distracted you just enough to keep you sane. I love your work and I love your house
LikeLiked by 1 person
Thank you sweet friend!!!
LikeLike