

Are you remembering to write 2017 yet? Are you still stunned to realize Christmas is behind us and Valentine’s Day is a month and 2 days away?
I had such great plans for the Christmas holidays…had being the key word. Christmas morning found me sick in bed with the flu. Not just the 2 or 3 day flu but the kind that sticks around for 14 days. Oh the plans I had… But enough about that, I did load a quilt on the longarm. I worked on it every day, just a little bit each day, for very short periods of time. When I looked back over my journal to add up the quilting hours I laughed at the bits of time here and there that all added up to a finished quilt!
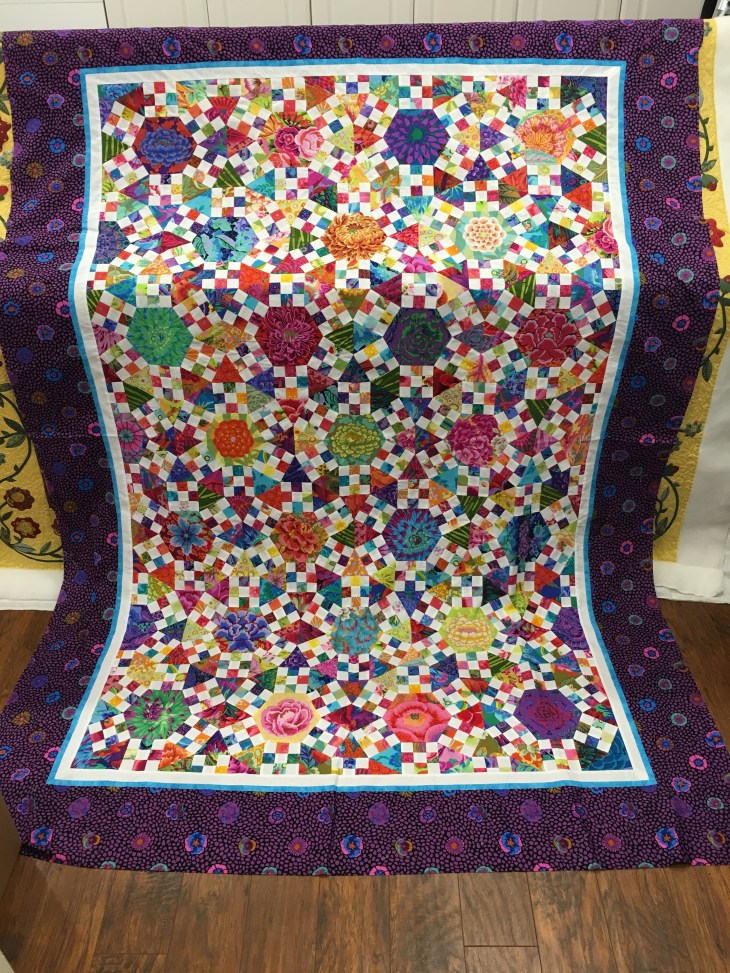
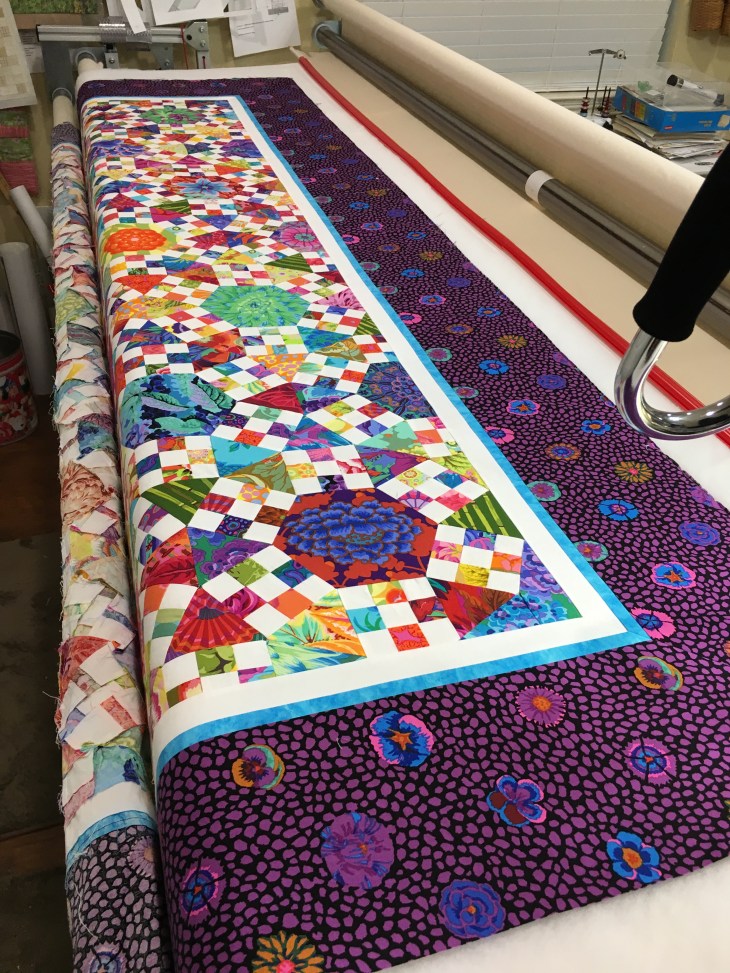
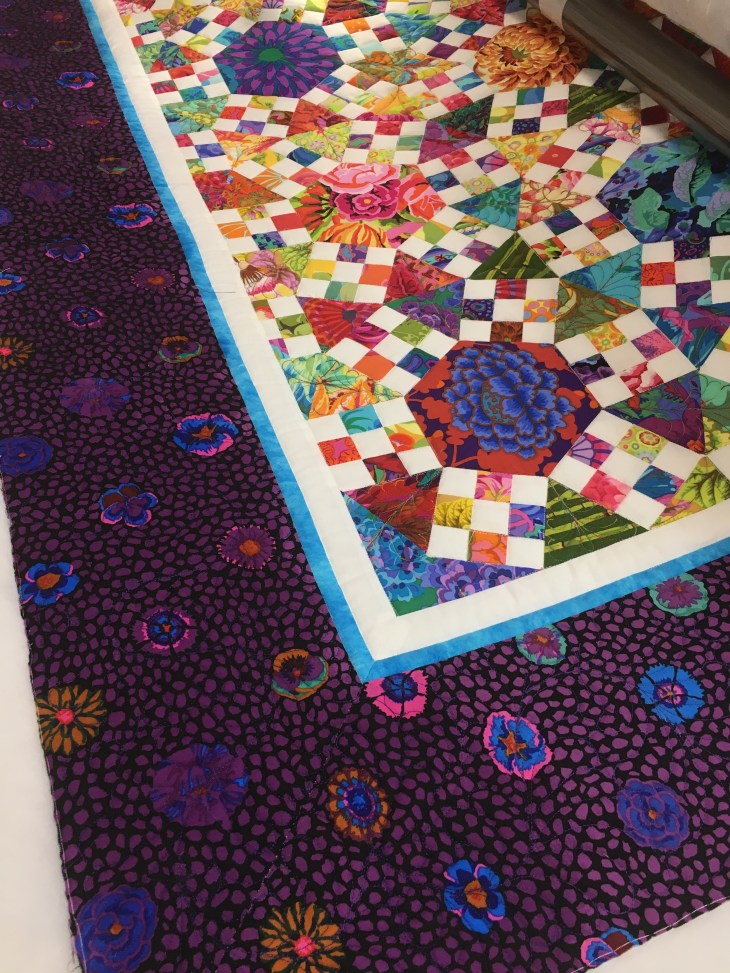
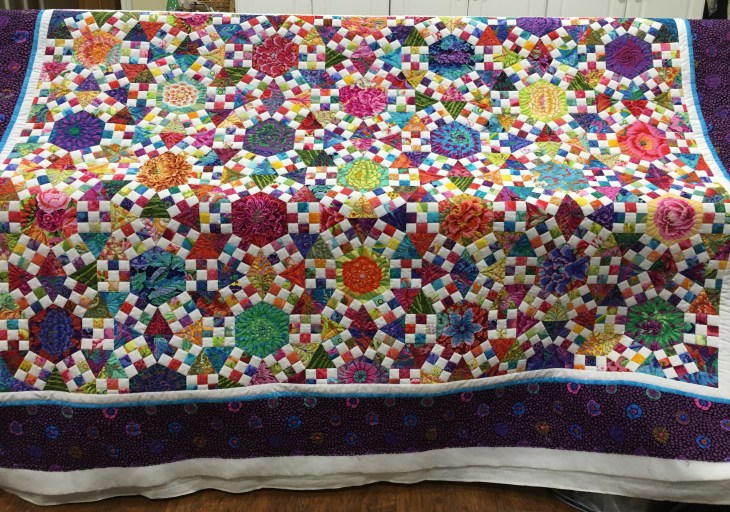
This is a Jack’s Chain pattern. If you google and/or search on Pinterest you’ll find many variations of the Jack’s Chain, each one so interesting! It looks complicated doesn’t it? And did you notice that if you squint at the picture, the larger white interlocking circles become more evident? A Jack’s Chain quilt pattern is nothing more than lots and lots of Nine Patches, lots of Equilateral Triangles and a few Hexagons. That’s it! Below is a picture of the quilt top laying across the back of my longarm. It measures approx. 62×90″. I didn’t make this quilt top, that honor belongs to my guild Bee, the Cut-Ups. This quilt will be our donation to the Guild (Quilt Guild of Greater Houston) for the Live Auction part of our 2017 Quilt Show-Joy of Quilting. Planning to be in or around the Houston area the first weekend of May? You could own this quilt! Our show is Friday and Saturday, May 5-6th at The Stafford Center in Southwest Houston. For more information go to: Quilt Guild of Greater Houston
I used Hobbs Batting, a white single Poly-Down and backed it with double wide 100% bleached muslin. I like to use a solid back fabric, that way the quilting can shine as well as the top.
I literally had no idea how to quilt this one. I left the top spread out for several days as I contemplated different ideas. I called one of the piecers and picked her brain as to how she’d like to see it quilted. So glad I had that conversation with her, she’s the one that pointed out the larger interlocking white circles, my eyes hadn’t even picked those out. I was too narrowly focused on the hexagons and the nine patches surrounding them.
I’m a huge advocate of “Stitch in the Ditch”… every ditch. This quilt has a lot of ditches. Yes, it was tedious but remember, I’m quilting in very short snippets of time when I was feeling like getting off the couch. Tedious but so well worth it!
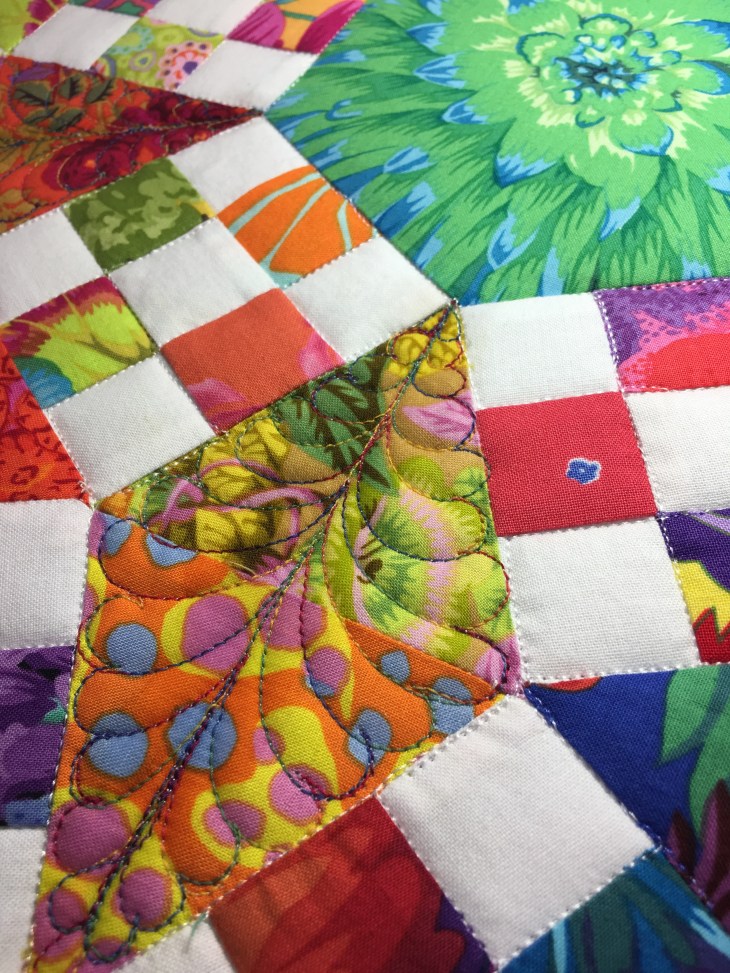
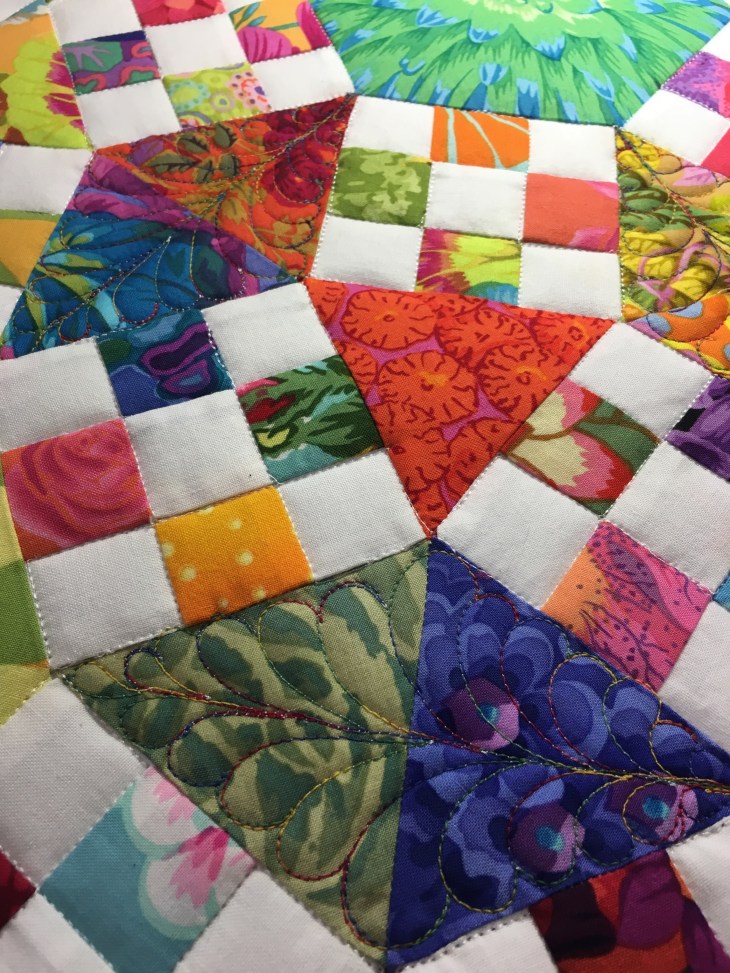
After the ditch work was complete I needed to decide how to handle three areas. 1. the large hexagons 2. the diamonds formed by two triangles and 3. the individual triangles. If you look closely I purposely chose not to stitch in the ditch where two equalateral triangles joined. I wanted them to read as a single unit from the back.
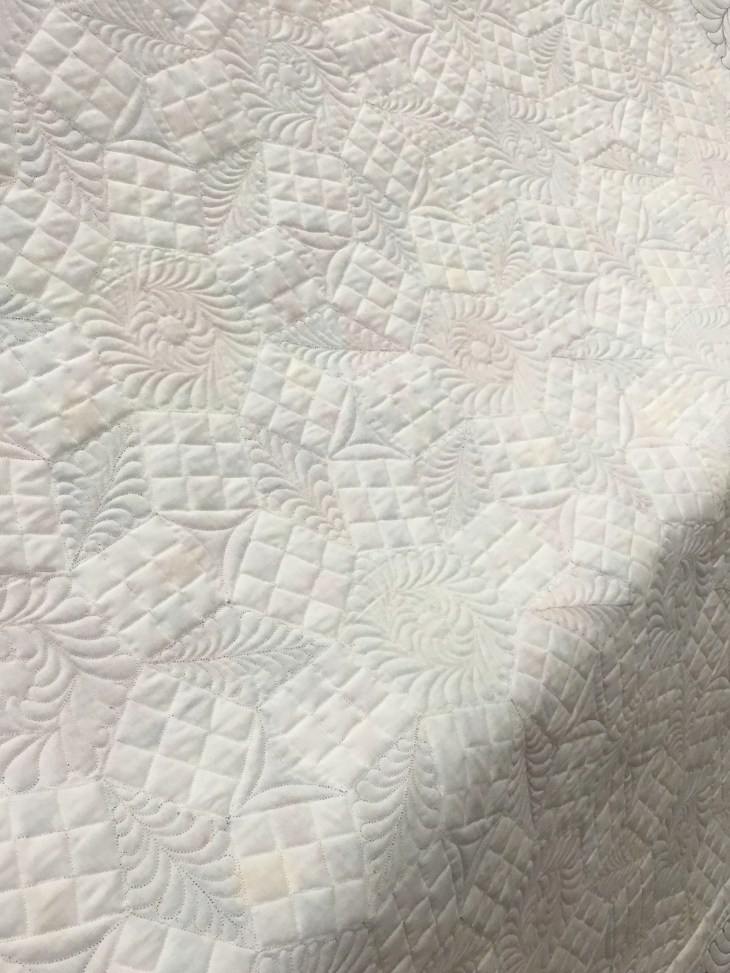
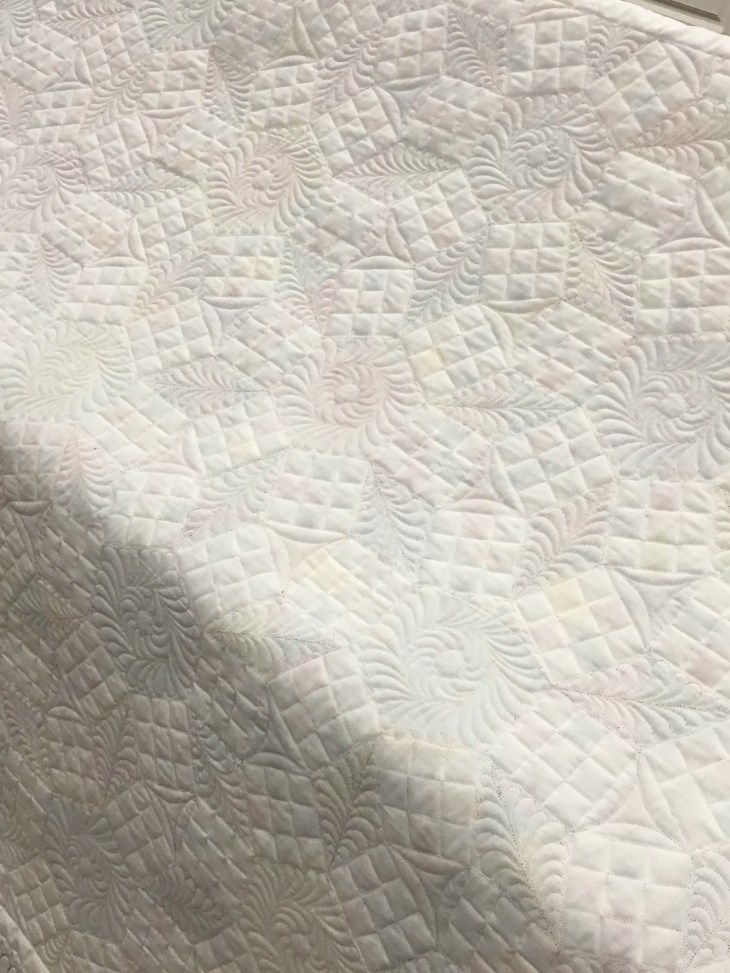
I look for both hard and soft areas of a quilt top to help me know how to quilt. The hard areas, the hexagons, triangles, diamonds and squares are set together in such a way that they create a soft area: the interlocking circles. So based on this observation I knew both hard and soft quilting designs were needed for continuity. The “hard” quilting was easy, it was all the ditch work, it was the “soft” that required some thinking. Just so you’ll know, I love love love quilting feathers. Free form feathers! They’re fast, they’re easy for me and they can fill up a space in no time flat. But could I stitch feathers in a Jack’s Chain???
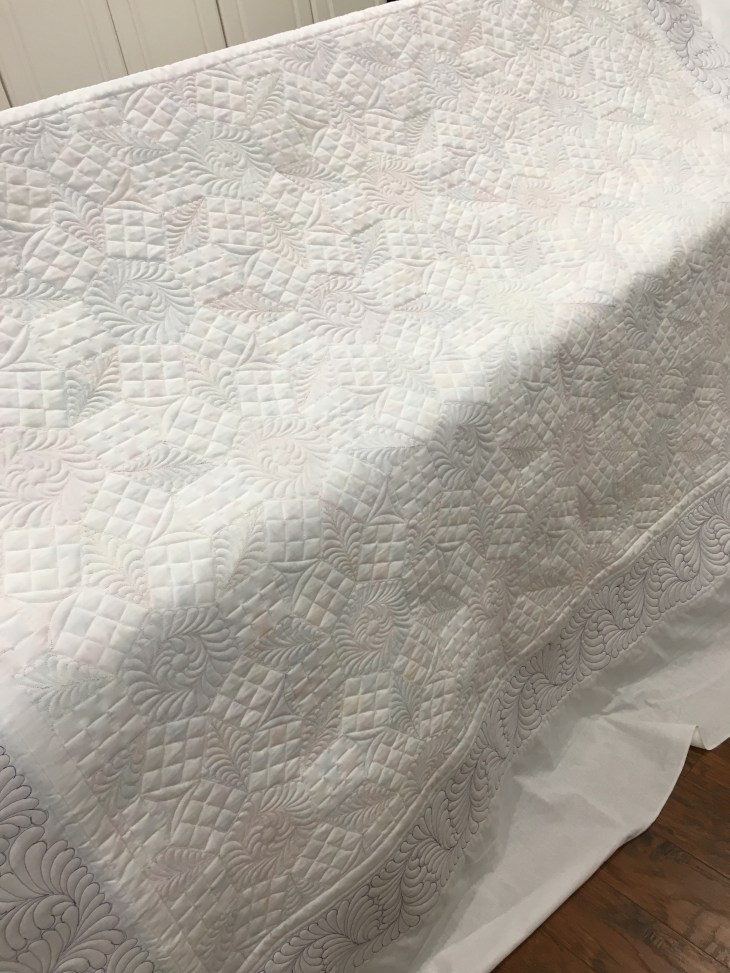
Almost forgot: my goal right from the start was to quilt the living daylights out of this top. To quilt it in such a way that the quilting would be an afterthought when looking at the top and make an impact when looking at the back.
I did all the ditch work with white #10000 Glide by Fil-tec, needle and bobbin. I’m not a huge fan of variegated thread but happened to have the PERFECT variegated for the diamonds: Superior Threads So Fine color #704 was a fantastic match. I drew a straight line top to bottom on each of the diamond shapes and free-form stitched the feathers. Like I said, perfect thread! What’s my favorite marking pen? When I’m not using white school chalk I use an EZ International blue marking pen, the kind that disappears by using either water, Sew Clean or white vinegar.
The pic below shows the borders quilted with the undulating feathers. Can’t see them can you! I used a Glide thread again, this time a fantastic purple #42607 Raven. It blends in perfectly with the intense outer border fabric. Later I’ll show you a picture from the back. I used the purple in both the needle and bobbin.
At this point I left the project alone for three or four days because I had no idea what to quilt in the hexagons. No idea! Eventually I decided to blue pen mark a smaller hexagon inside the hexagon piece there by creating the “vein” for a feathered hexagon wreath. This quilting, while very obvious from the back. it hardly shows at all on the top. I used a YLI Smoke monopoly in the needle and the white Glide in the bobbin on the darker hexagons and switched to Superior Threads clear monopoly in the needle for the lighter hexies. And finally, the single equilateral triangles; all they needed was a soft curve stitched point to point to point, again with the variegated thread. This soft quilted curve, when viewed from the back creates the illusion of circular motion around the 9 Patches that surround the hexagons.
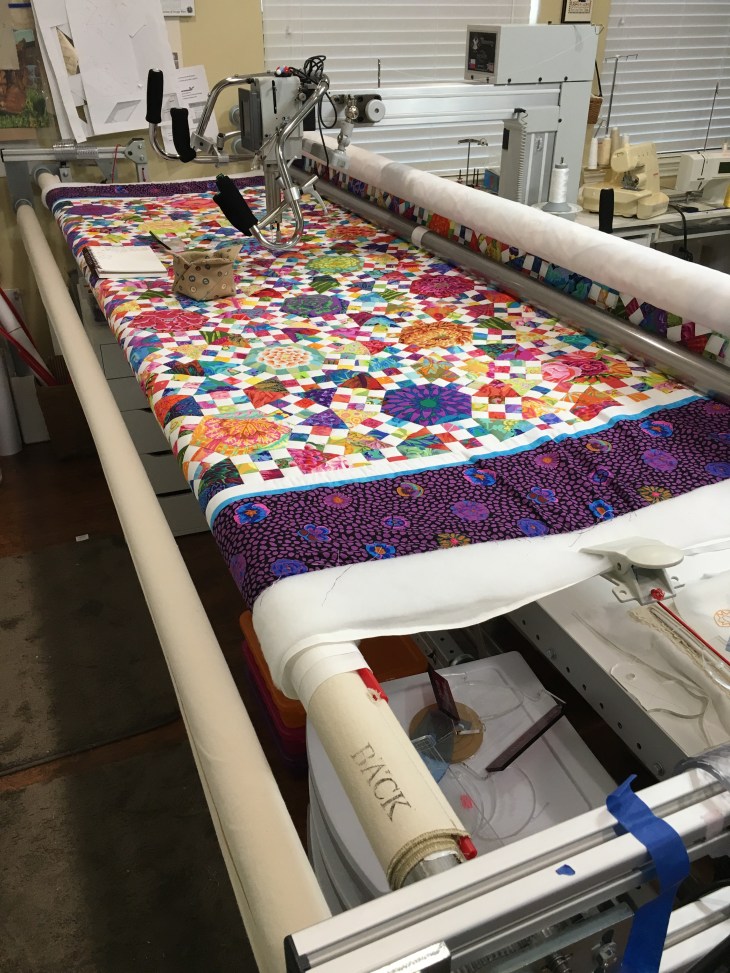
So here’s the finished (quilted that is) project below! By looking at the picture can you tell that I put 23 longarming hours into the quilt? Scroll down and look at the back-that’s where every minute of quilting gets to shine! I’ll hand this back to my fellow Bee members to trim, bind, sleeve and label and come May 5-6th, it could be yours!
Above is the only good picture I have of the purple undulating free form feathers.
I like the way the intense quilt top colors shadow through to the back, it gives the back such a wonderful soft glow.
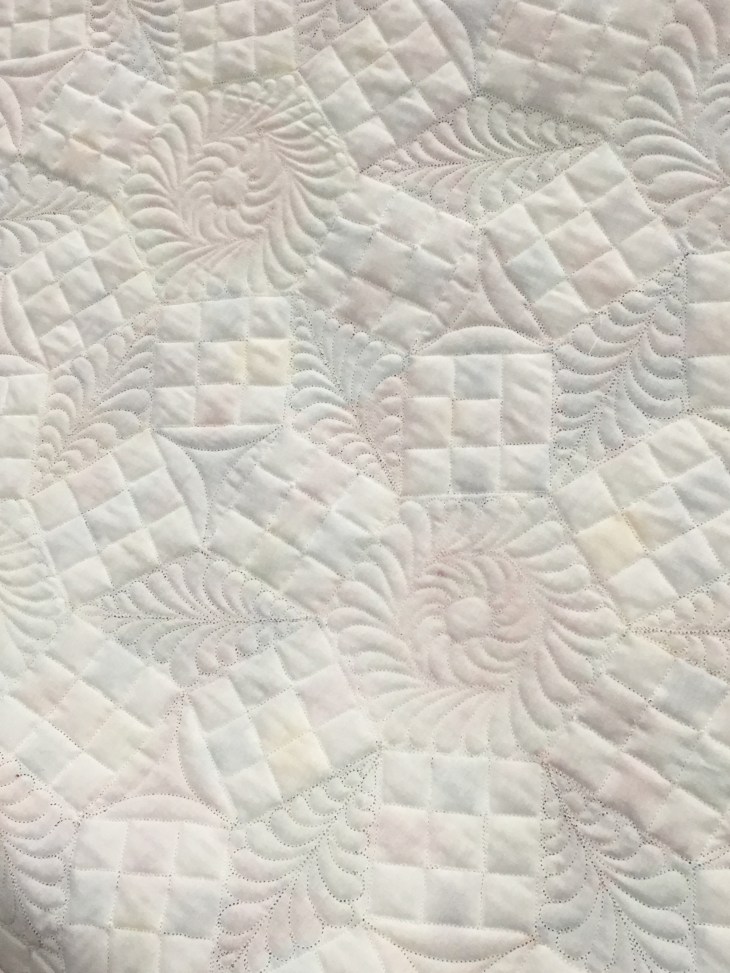

I have to say this is the first time I’ve ever attempted to have the quilting blend into the top in such a manner than you have to actually look to see the stitching. Best of all is I believe I achieved my goal with this heavy yet unobtrusive quilting.
Thanks for spending time with me in this long post!
Happy Stitching,
Rhonda
***added Jan. 13: Look what I found this morning on Etsy: an opportunity to purchase the pattern! All you need to do is change the fabrics: Jack’s Chain quilt pattern for sale here!

What an absolutely stunning quilt! The piecing and quilting are both amazing. You are very talented!
LikeLiked by 1 person
Thank you for your kind words!
LikeLike
Quilt is so beautiful. It all came together perfectly. Lovely pattern, exquisite quilting. The backing is as beautiful as the front(both in their own way). Quilting is so beautiful.
LikeLiked by 1 person
Thank you!!!!
LikeLike
Enjoyed your writing and details about how you quilted this beautiful piece! Thanks for the inspiration.
LikeLike
Thank you!!
LikeLike
Exquisite quilt and beautiful quilting job. Love it.
LikeLiked by 1 person
Thank you! It was such a fun project!
LikeLike
Absolutely wonderful!!!!
LikeLiked by 1 person
Thank you!
LikeLike
I love this and the detail is so impressive great work thanks for sharing
LikeLike
Your quilting as enhanced the quilt beautifully! The ladies of your guild must be over the moon with their quilt.
Thanks for putting the link to the pattern.
This version of the pattern is called “Ring Cycles” and was designed by a Lessa Siegele who appreared in The Quilt Show last year!
LikeLiked by 1 person
Thank you so much for your kind words! I am hopeful this will prove to be a hit with our auction attendees! Happy New Year!
LikeLike
good grief at all the work, and well done you. I have started my first quilt and am on the top, had not thought it through to this stage just yet. Thanks for sharing the instructions, the process, the time it took and the photos of the back. Wow at how well it comes out, amazingly beautiful on both sides.
LikeLiked by 1 person
Very, very impressive!
LikeLiked by 1 person