The quilting and the binding is finished. This has been such a wonderful journey, so many in the class have created such beautiful quilts! I’ve had a great time, hope you have too!
I used a single layer of Hobbs heirloom poly down batting, Wonderfil Specialty Threads Deco Bob thread, #104 in the needle and bobbin. I use a size 16 longarm needle. The backing fabric is bleached muslin and I quilt on an Innova longarm.
Did you know that if you turn most of the overhead lights off and just leave the machine light on, you get some wonderful shadows that highlight the quilting designs?
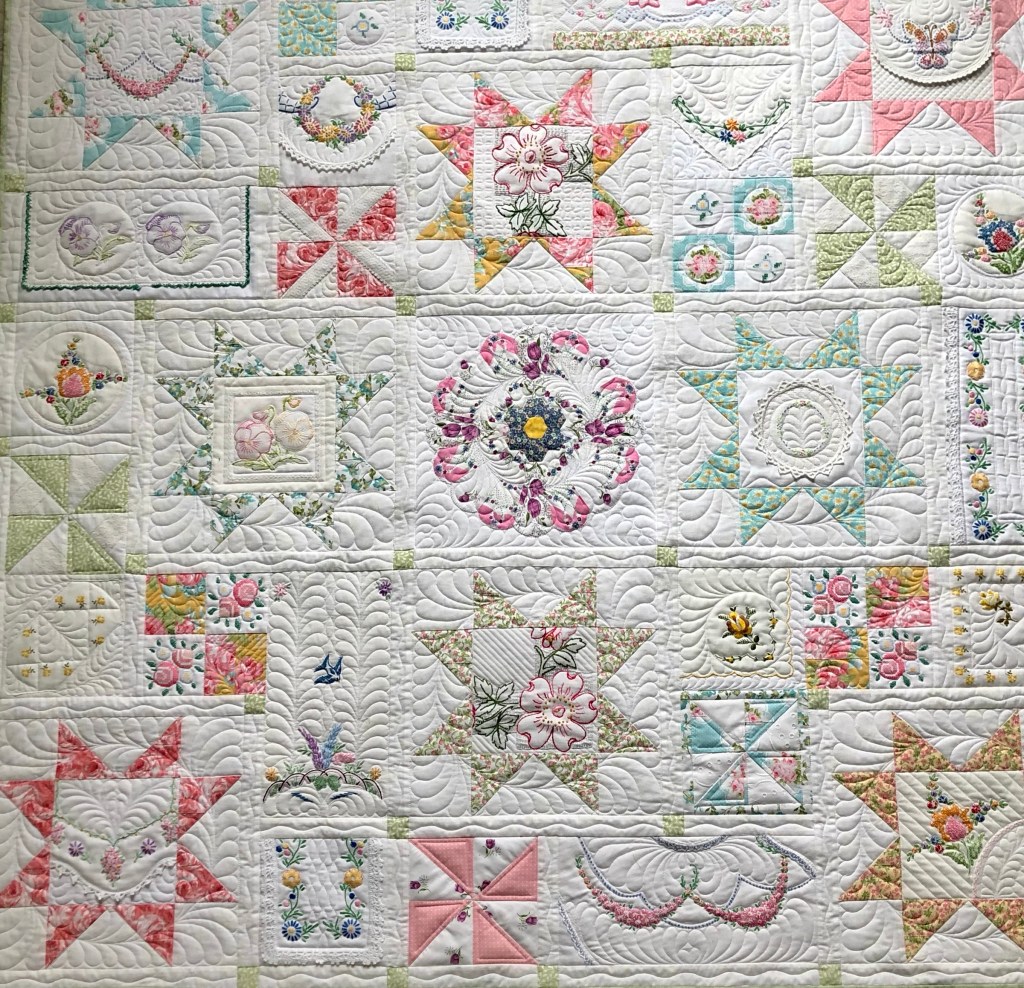
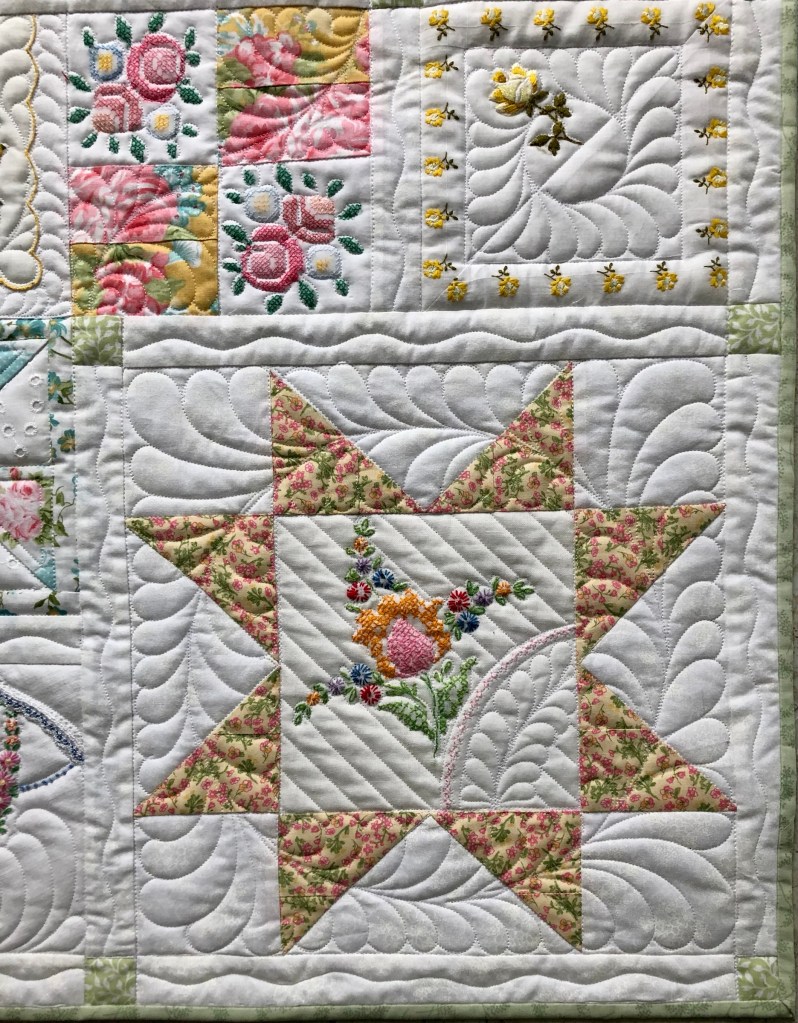
The embroidered vintage pieces were easy to quilt, the stars worked well with a large feather wreath design.
I plan to use this piece as a Throw. Here it is keeping me warm on one of our few cold Houston, TX winter evenings.
If you’ve followed me for very long then you’ll know I adore quilting feathers. This quilt is no exception. 🙂
I love the idea of getting vintage linens in the limelight, they are beautiful and I believe that by using these worn, torn and stained pieces it is a wonderful way to honor the hands that made them.
Thanks for following me, for participating in my class and for all your kind words and support! Are you ready for Class 2? It begins March 1st! Stay tuned for information soon!
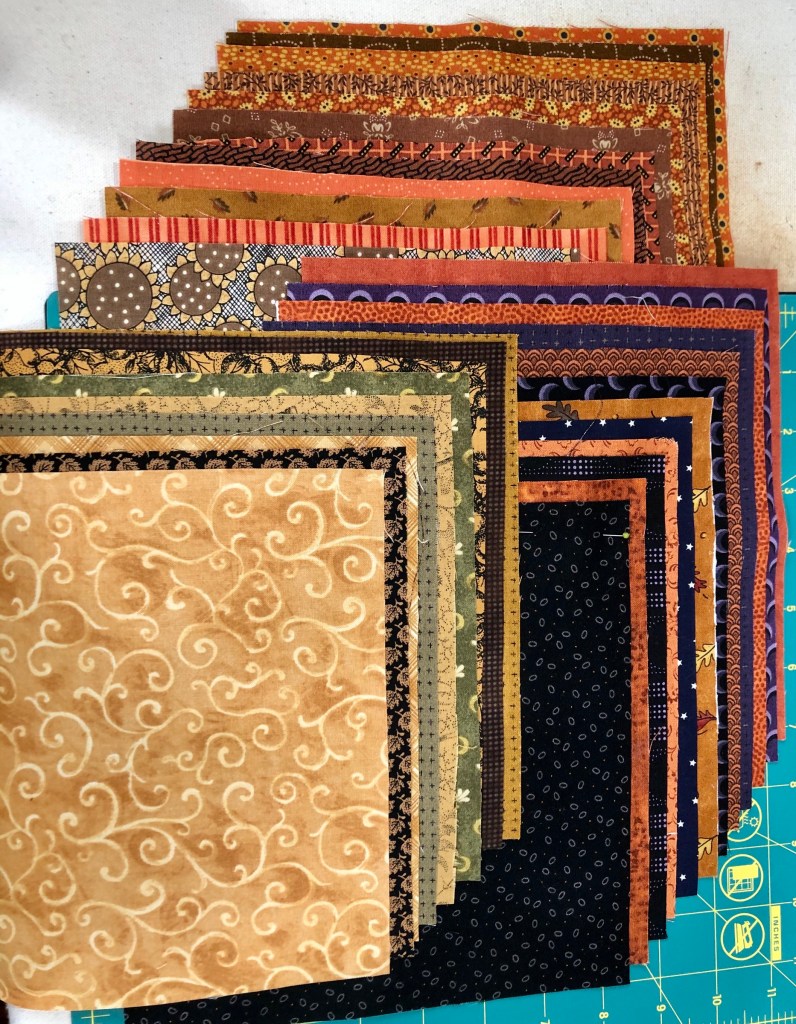
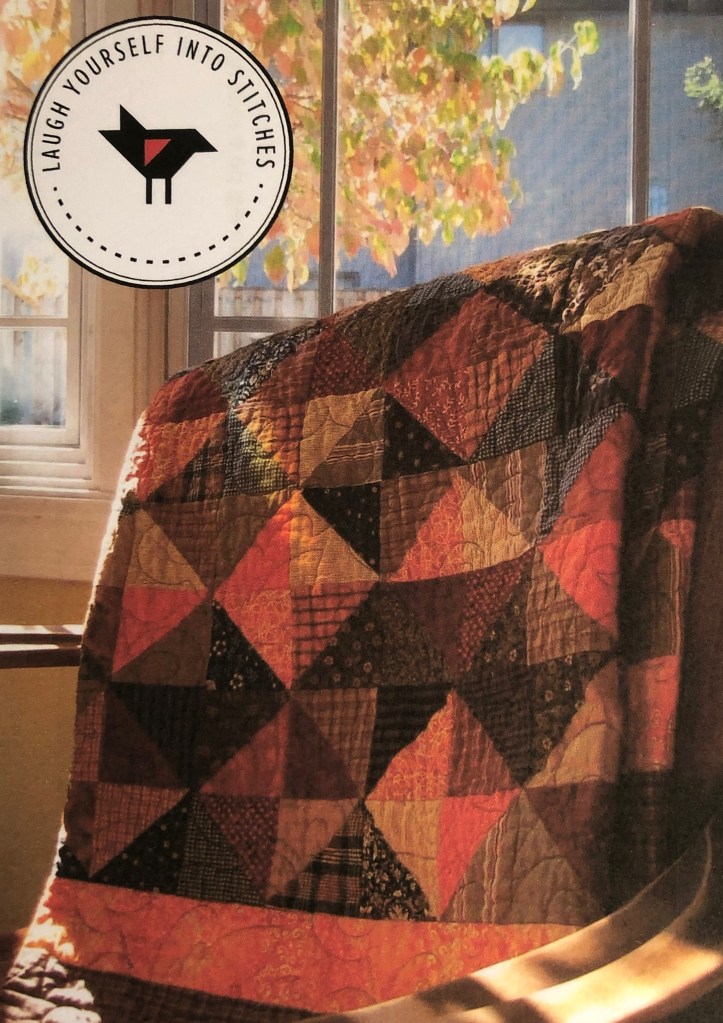
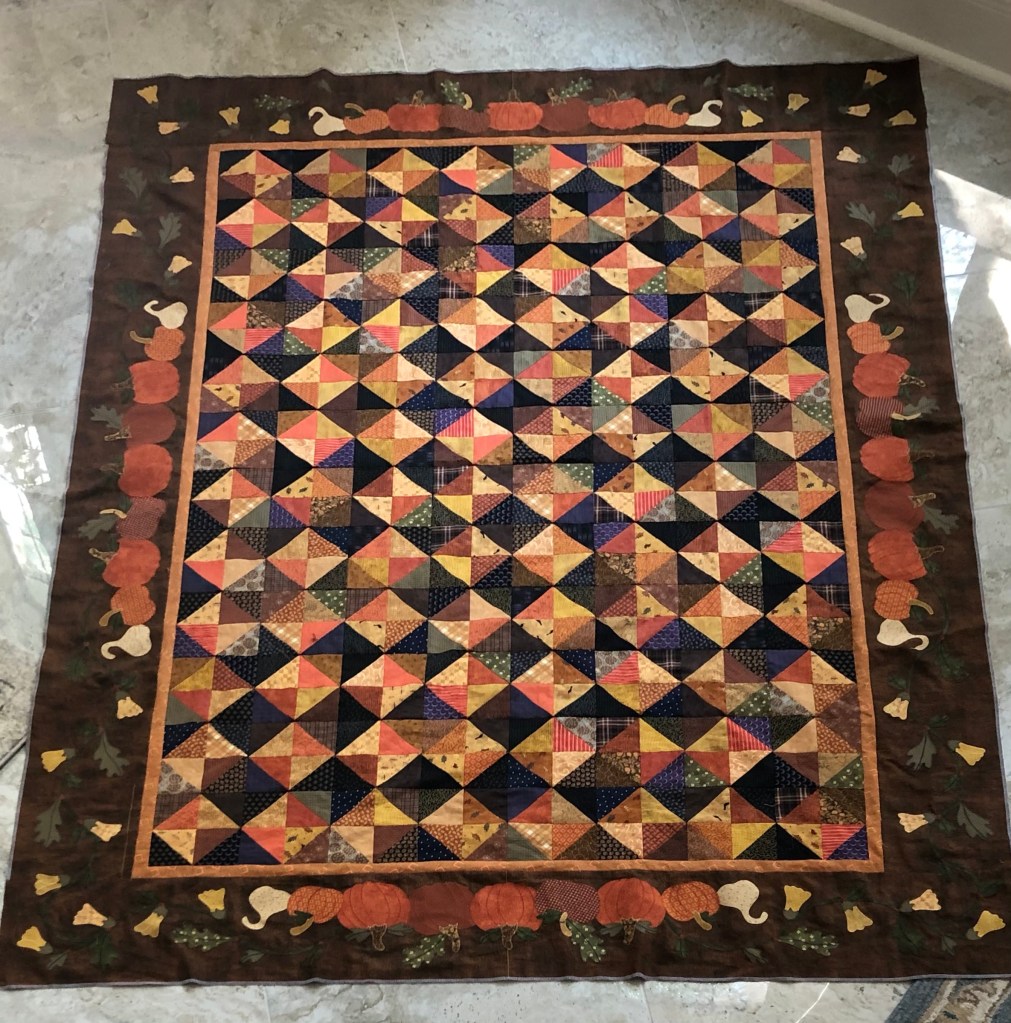
Time to sneak in a blog post that’s not about the ongoing Vintage Linen Classes. What’s not to love about a warm color Fall quilt when it is cold outside!
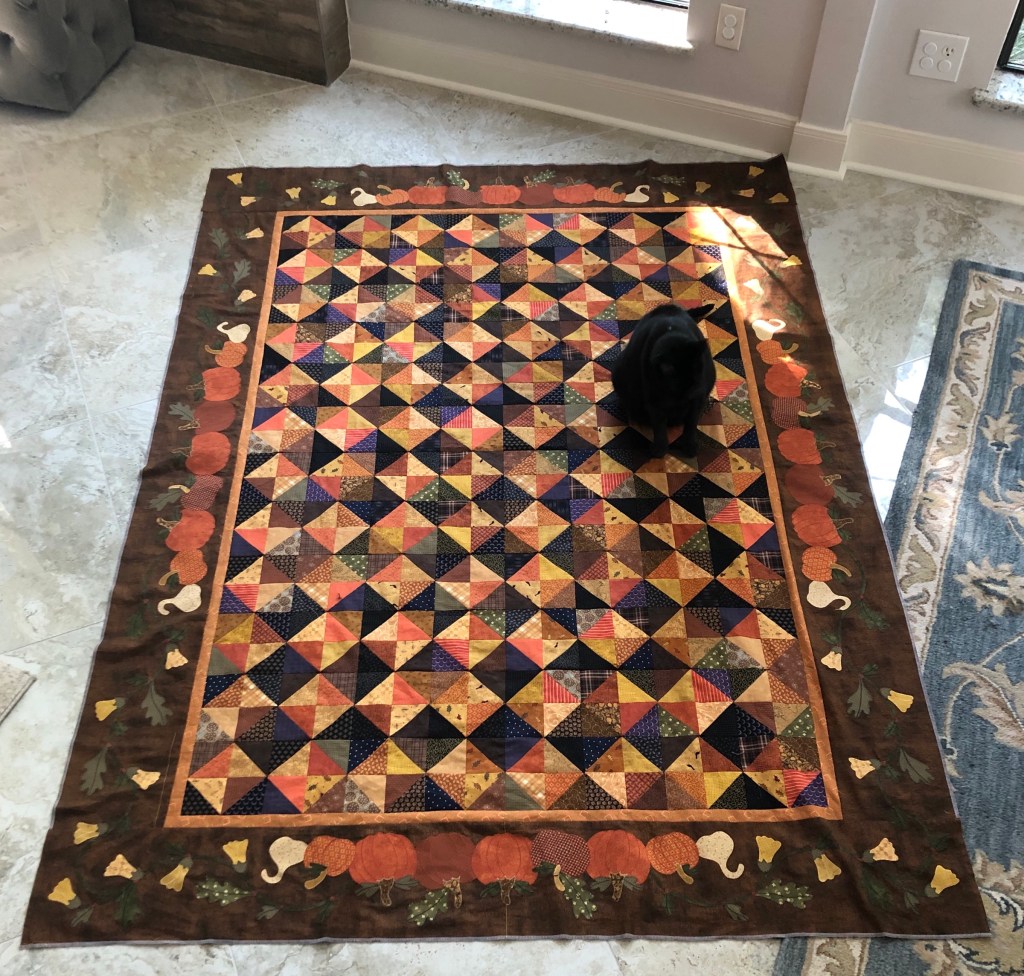
From a pattern by Karen Walker, owner/designer of Laugh Yourself into Stitches, this is my adaptation and I’m loving it no matter what time of year it might be!
Designed to be 52×64 I added to my quilt and made it 72×90.
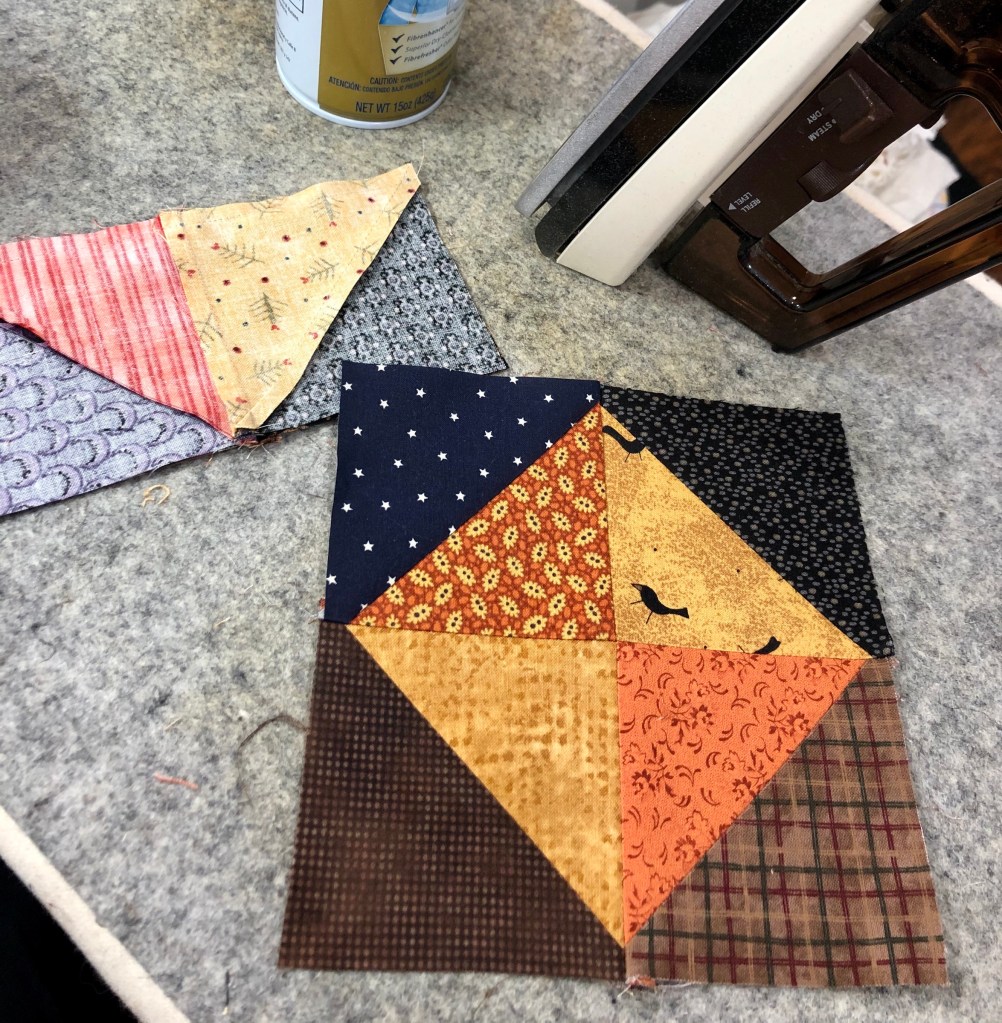
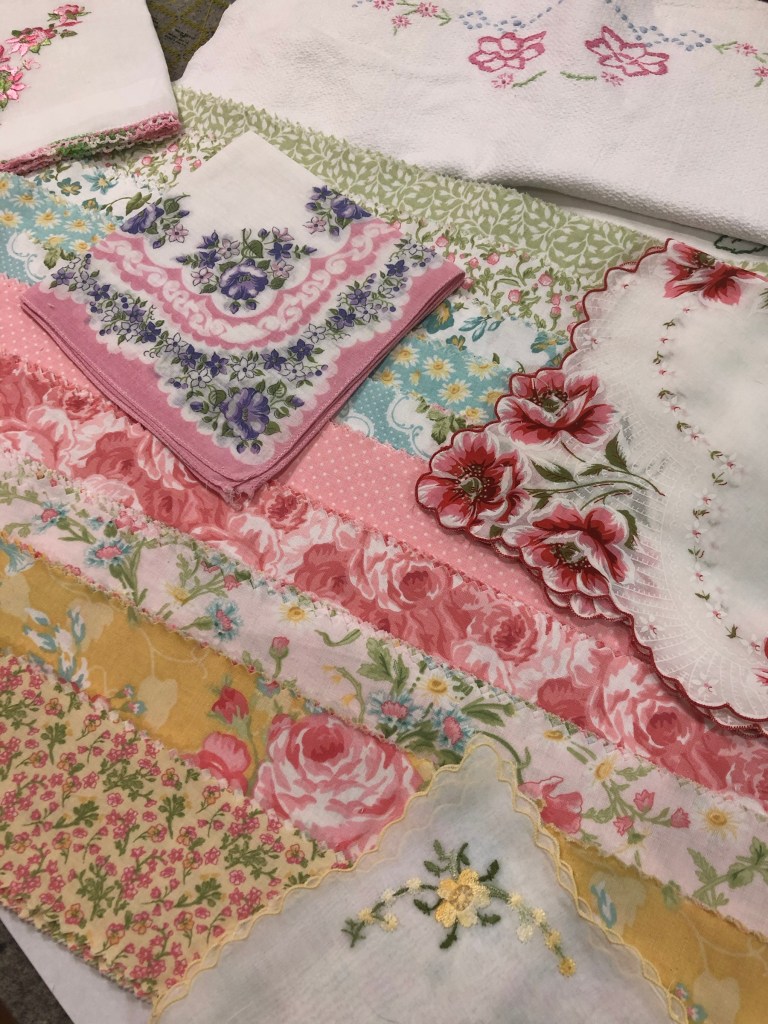
After digging through my fabric stash these are the “light/dark” combinations I arranged. Goldens with darks, oranges with darks, you get the picture.
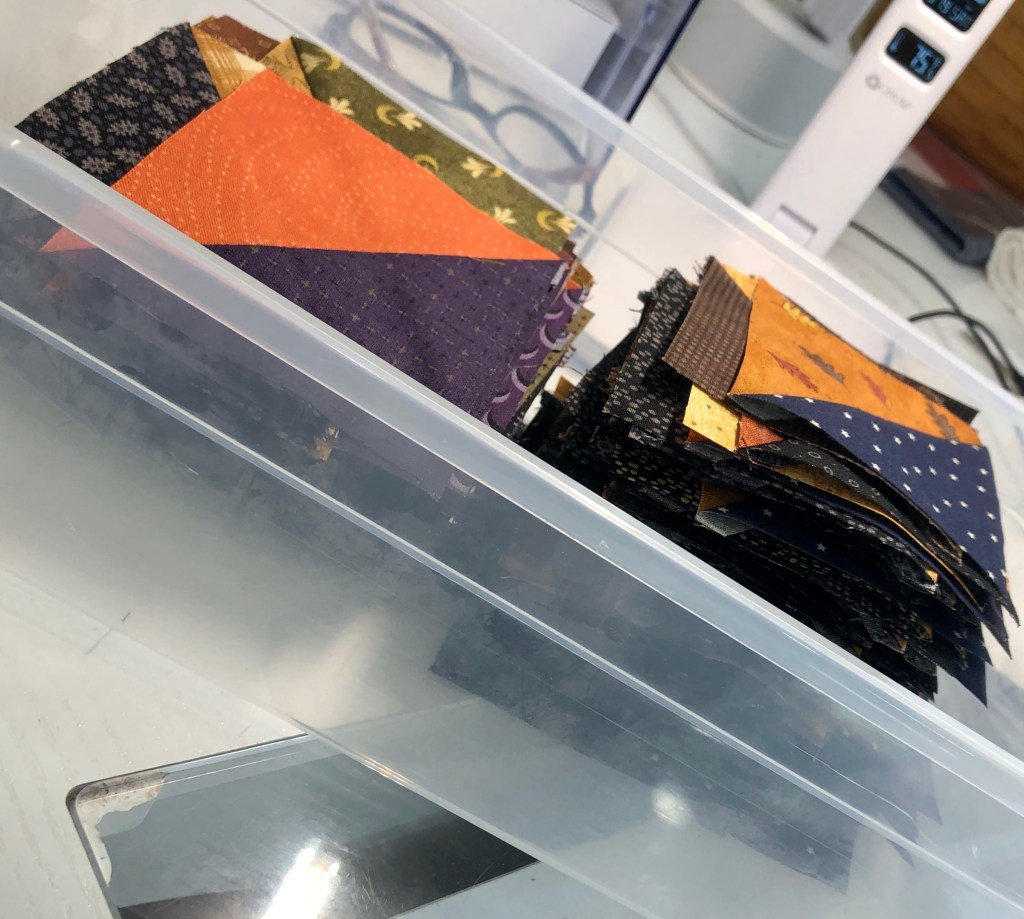
Have you ever used the Magic Eight method of creating half square triangles? Simply genius and fast! If you’re not familiar, do a quick internet search.
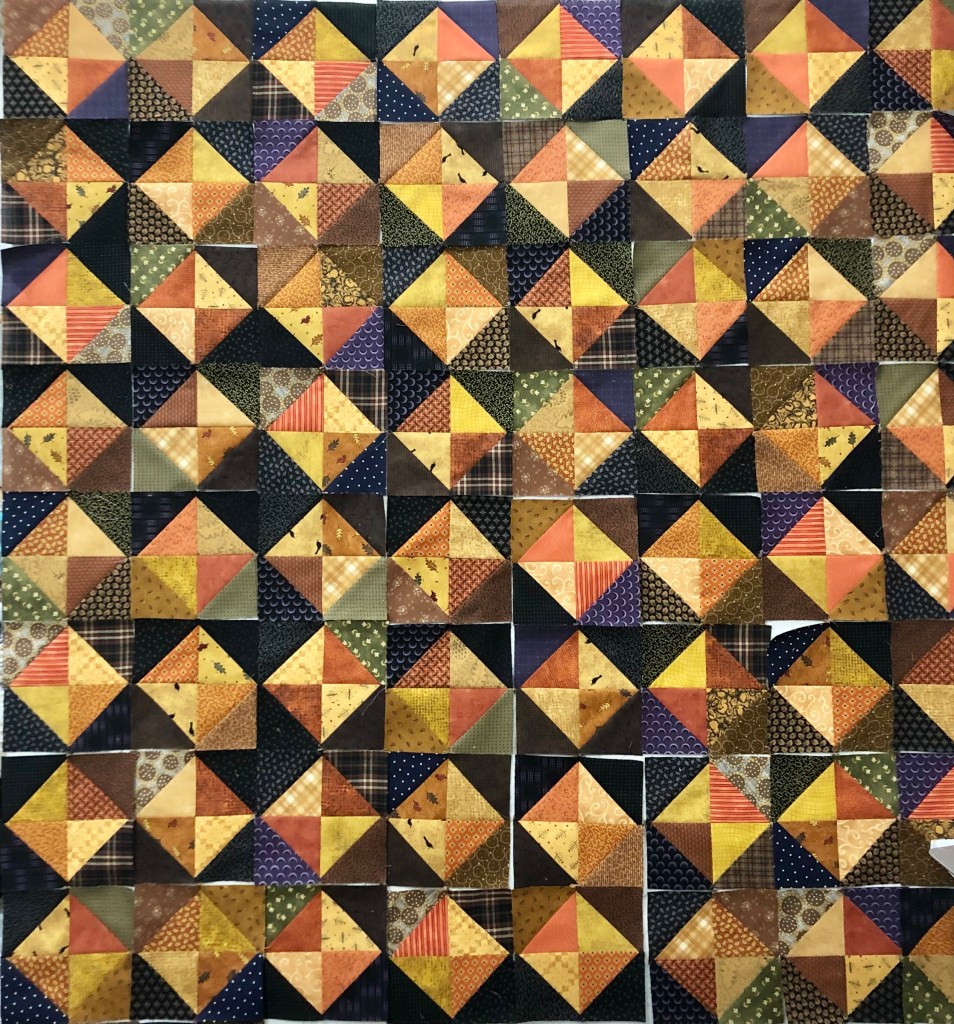
There is a method for half square triangle (HST) placement. Position 4 small blocks with the light fabric to the inside and sew them together.
Here’s where I really went rogue. The pattern calls for 2 borders. I stayed with that idea but changed the inner border to be 1 1/2” wide and the outside border 7”.
My next step was to dig through all my old Fall applique quilt patterns looking for pumpkins and gourd motifs.
I also located my template plastic, quickly made templates for all the motifs I thought I might use on the outer border. Pumpkins, a gooseneck gourd, pumpkin stems, leaves and a squash blossom. this was a huge time saver! It’s easier to quickly draw around the outside of a plastic template than it is to trace from a pattern laid out beneath the Heat n Bond Lite. If you study the border you’ll note I ended up using only a few of the leaf motifs.
My “go to” fusible for quilting is Heat n Bond Lite.
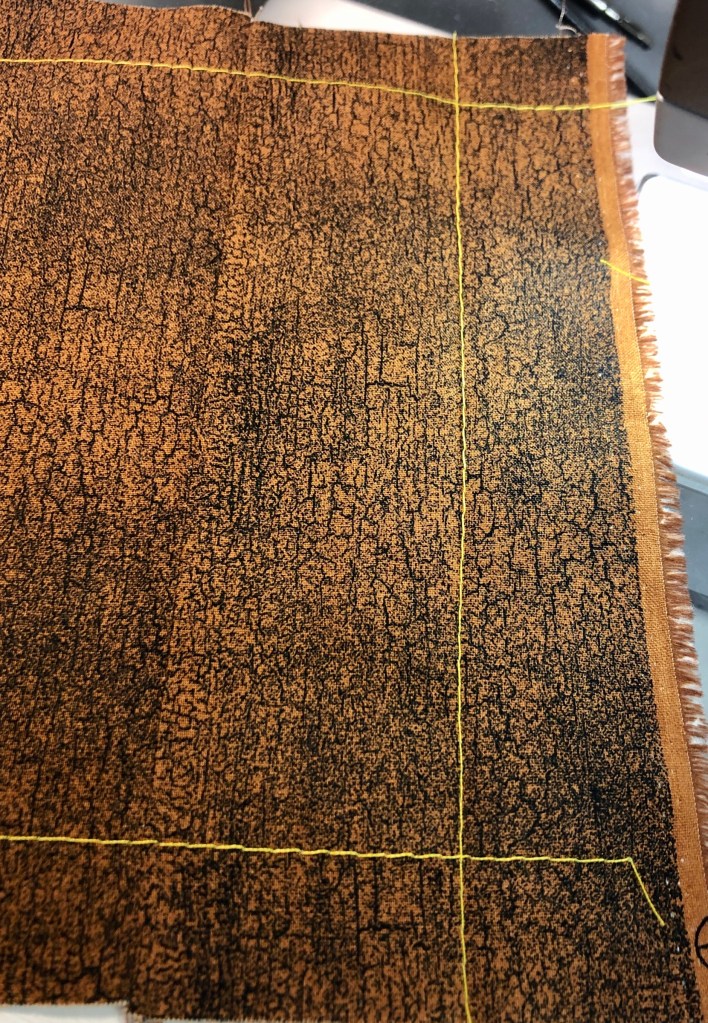
If you’ve done much machine applique you will know it usually draws the fabric in a bit. I cut my outer border 1 1/2” larger than necessary to accommodate but I also knew that I needed a “visual” reminder of the desired finished border size. I chalked my guidelines but knowing the chalk lines would not survive all the movement necessary with the machine applique. I chose a yellow thread and a long stitch on my machine. Now I had a semi permanent visual of the parameters of my applique area. I also yellow thread stitched the center line of each of the outer borders. I should also mention that I serged the edges of my borders prior to the applique process. All the movement and handling tends to be rough on the fabric cut edges. This way I didn’t have to constantly trim away fabric fray. When I finished the applique I trimmed each of the borders to size and easily removed the yellow center line thread.
The green vine is a 3/8” wide cut on the bias. Cut with Heat n Bond Lite already fused into the back and is very easy to manipulate into swoops and curves.
To make things easier/quicker I chose only a few different colors of threads for my raw edge machine applique and detail stitching. One each of: green, orange, yellow and tan. Where possible, on each border I appliqued all of the same color at a time. In order to break up the monotony I created all the borders and then appliqued each start to finish one at a time.
See how the tiny satin stitch on the pumpkins adds dimension?
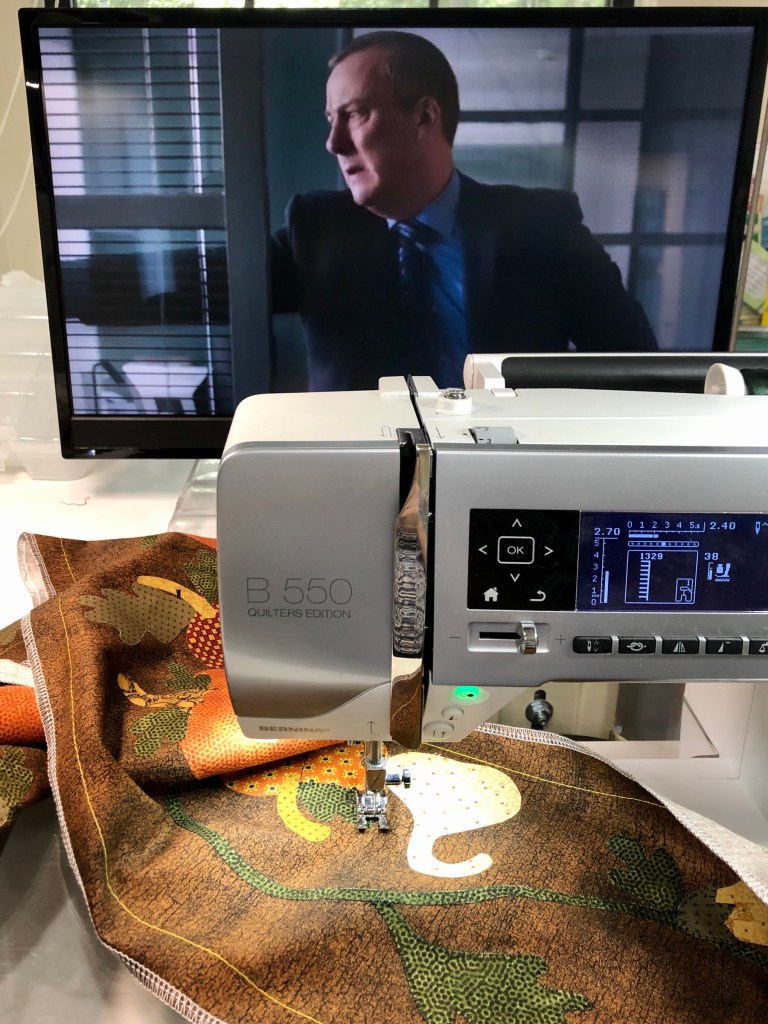
I set up my sewing room television so I could watch/listen binge on some great detective shows while stitching.
Making progress! Only one more outer border to make.
And the quilt top is finished and ready for quilting on the longarm.
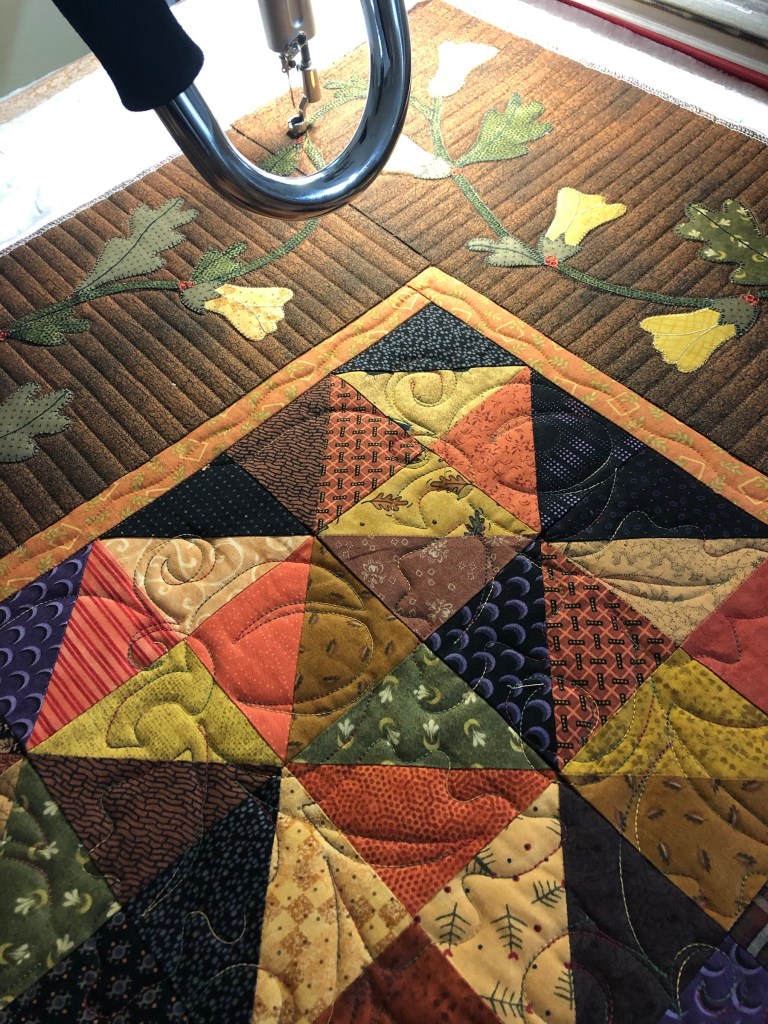
When trying to decide about the quilting I realized I had a dilemma…the center really wouldn’t benefit from custom quilting yet the border cried out for it. After a lengthy phone conversation with a quilting friend I decided to do a hand guided panto in the quilt body and custom quilt the outer border. Was the panto in the body a pain to execute? Yes! Was it worth the aggravation? Again, yes!
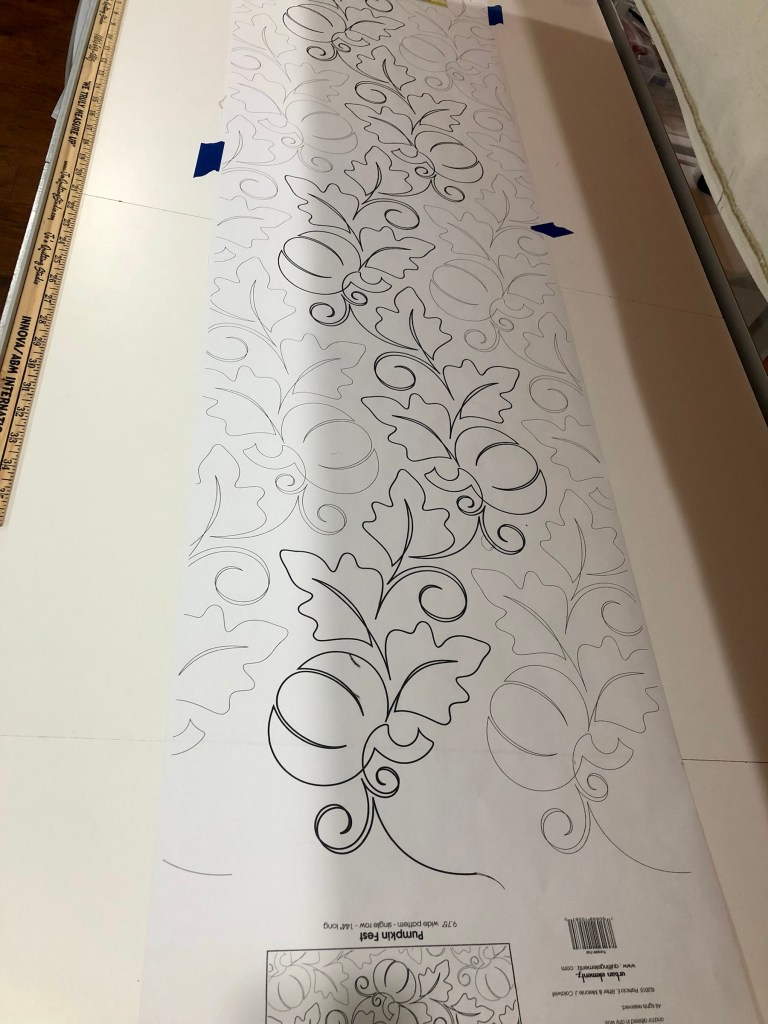
How darling is this pumpkin edge to edge pattern! Purchased from Urban Elements, it’s titled appropriately Pumpkin Fest and is 9.75” high.
And how perfect is this variegated cone of King Tut by Superior Threads! Color: Pharoah’s Treasure. In the bobbin? Omni color #3043 Barley.
I changed to a brown needle thread to match the border fabric and outlined all of the motifs. Once finished I decided to quilt simple straight lines at 1/2” apart:
The small inner orange border needed something, but what? A simple wavy line added enough interest.
What a fun project!
Do you keep a quilting journal? Mine is invaluable to me! If I had not recorded these facts they would have soon been forgotten. My journal tells me what I did and most often why. I record the pattern designer, my adaptations, the quilt top size before quilting. I make note of the needle and bobbin thread(s) as well the batting I used. You will note I need to make a few updates to my journal because it has yet to show Hobbs 80/20 batting as well as the finished size after binding. I also keep detailed “quilting time” records.
The quilting is finished and while this picture does not show it, the binding is complete. What a wonderful project!
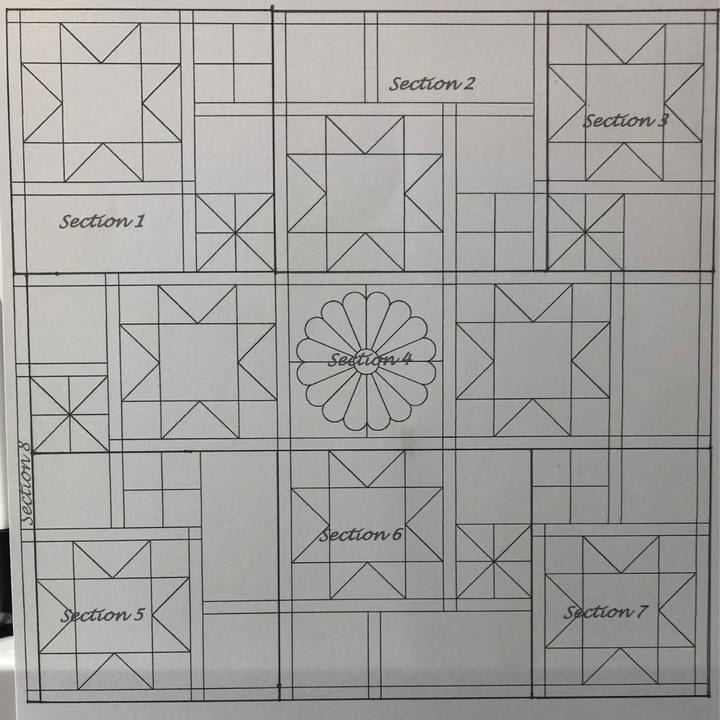
The sashings, the cornerstones and the sections for the quilt top construction.
The sashings and cornerstones: you have measurements and numbers necessary in the Files. (The sashings are where I utilized my June Taylor Shape Cutter.) You can see that I have chosen my sashings to be bleached muslin and my cornerstones are a medium/light green print. There is a speedy quilter that jumped the gun and posted a section of her quilt top showing her pink sashings and various color cornerstones, they look lovely! Again, this is a very personal choice but make color choices that will bring continuity to your quilt top. Your sashings and cornerstones can either pop or they can fade into the quilt top, you be the judge! 🤔🙂❤️
But…don’t just jump in and go crazy sewing blocks together without looking at the diagram that points out the Sections of the pattern. Unless you want to bring crazy trouble into your sewing room, follow the Sections to sew your blocks together.
Note that Section 8 is a peculiar one, it is a strip made up of only cornerstones and sashing strips down the left edge of your fabulous creation.
Now…I know there are many of you who have a bit (or quite a bit) of stitching to do in order to get to this point. Don’t for a minute think I am leaving you behind! Mark my word, we will get you to the finish line, I am here for you!
I am so excited to begin to see finished quilt top pictures popping up all over this FB group page!
Wow! here we are, the final Lesson for Class 1! It has been great! Are you ready for Class 2? Stay tuned for more information to come in the next few week.
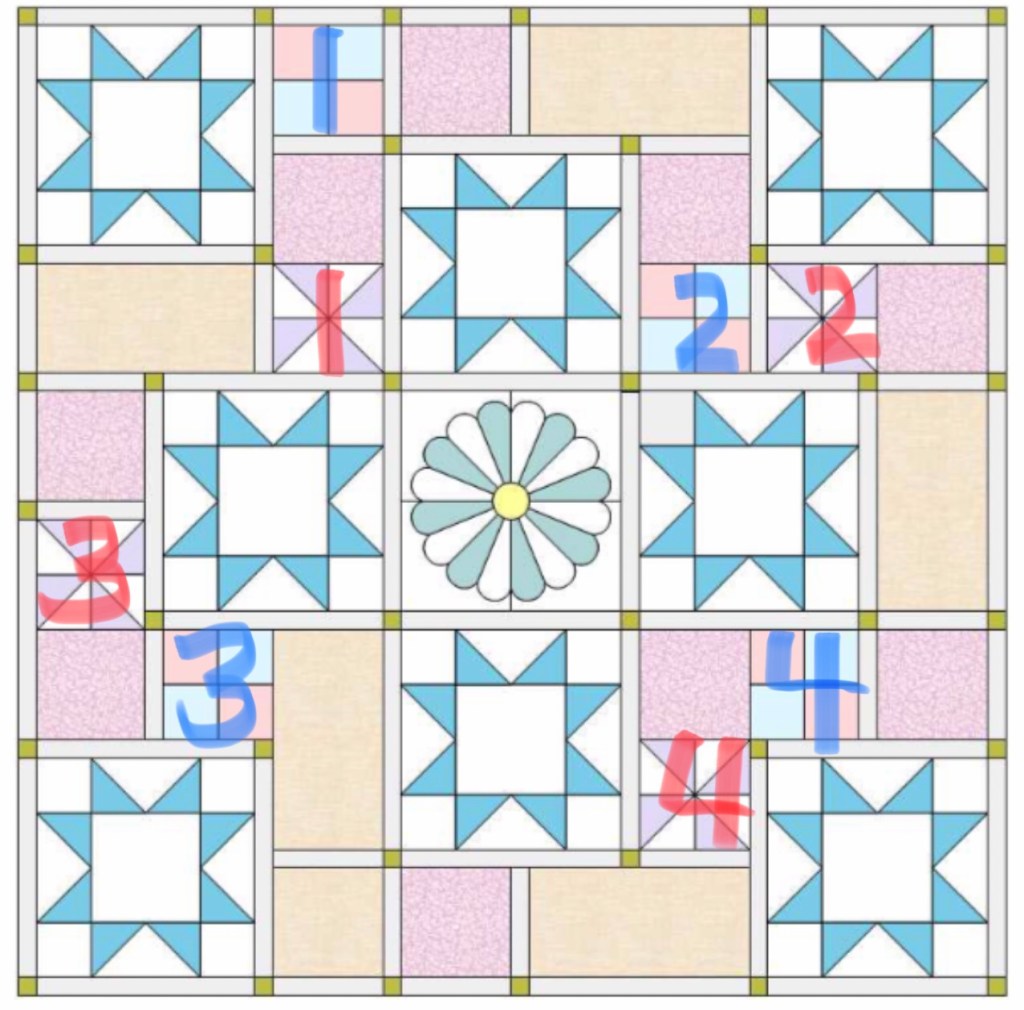
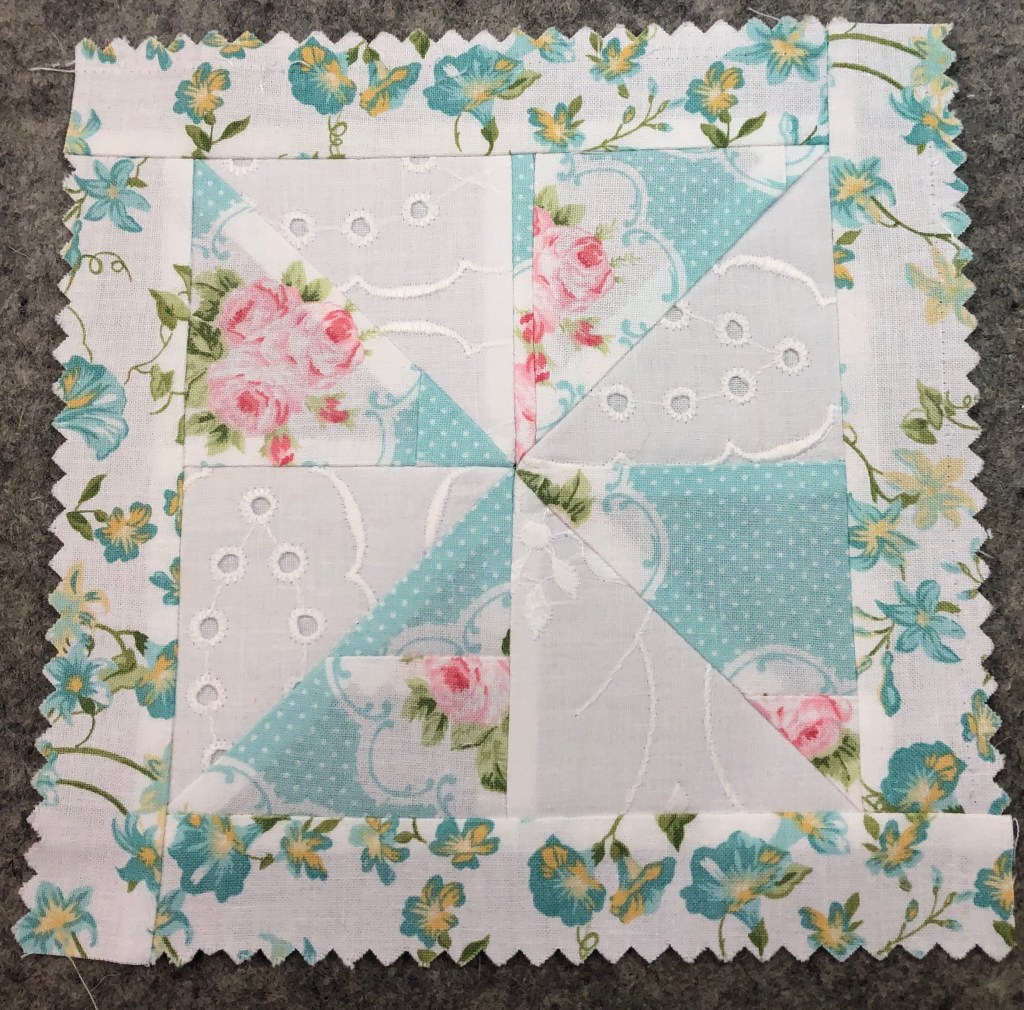
Pinwheels and 4-Patch blocks couldn’t be easier! Remember, the Pinwheels are our little “action blocks”. They draw the eye in and spin it around, the 4-Patches are jealous of the Pinwheels as the 4-Patch blocks are just a very good way to add a little color, use up bits and pieces and provide a hint of interest.
The 4-Patch blocks measure 6″ square when finished, so they will measure 6 1/2″ square before you sew them to other blocks. Each of the 4 pieces for your 4-Patch will be cut 3 1/2″. When sewn together, your unfinished block will measure 6 1/2″. That is all there is to a 4-Patch! Whew!
The Pinwheel blocks look at bit intimidating what with that bias seam running diagonal down the center of each of the 4 quadrants. The Pinwheel block is made up of four Half Square Triangle blocks and are also known as “HST’s”.
If you have not made “8 at a time” half square triangles, you are in for a treat! Either of these excellent tutorials will take you step by step through the process of sewing 4 long diagonal seams, making 4 long cuts resulting in 8 beautiful half square triangles.
If you bought the Slotted Trimmer(s), this is where it come in handy.
What if you do not care for 4-Patch blocks? Make something else, just remember that your unfinished block needs to measure 6 1/2″ square.
What if you do not care for Pinwheel blocks? Same as above, just remember your unfinished measurement requirements and create something else.
The Blue numbers are in the 4-Patch blocks, the Red in the Pinwheels.
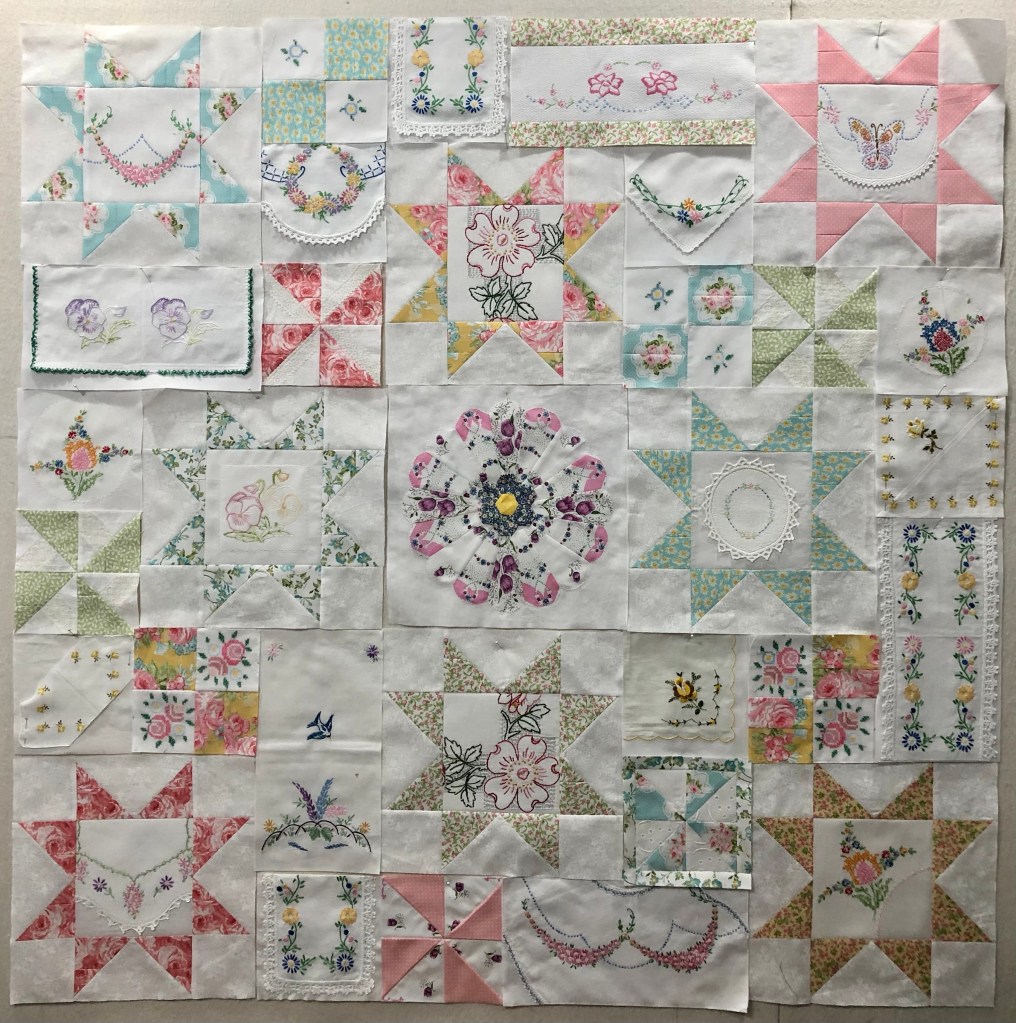
Once these additional 8 blocks are complete, it is time to lay out all your blocks and begin to make some serious decisions about what goes where. If you are keeping with the diagram design, lay out your Stars and your Dresden block and begin to fill around them with everything else.
Feel free to change things up, you do not have to place your blocks as I have diagramed the quilt top…you remember my mantra: Make yourself happy! It is your quilt!
We are close to the end!
Have you realized that after this step all your blocks will have been made? The only thing remaining are the super easy sashing strips and the little cornerstone blocks! Wow! You are well on your way to a finished Vintage Linens Quilt Top! Bravo!
I am so happy to see all of your BEAUTIFUL!❤️blocks! The talent is this group is off the charts! Do you know how far we have come since just a few days ago on January 1st!
We have talked about and made wonderful Star blocks. We have amazed everyone with our fabulous Dresden Plate blocks. We are ready for our next move to:
LESSON #3! 6×6” and 6×12” blocks!
Do you have use of a design wall or a designated area where you can arrange your blocks? It is such a help as you lay out or audition these smaller blocks in your project.
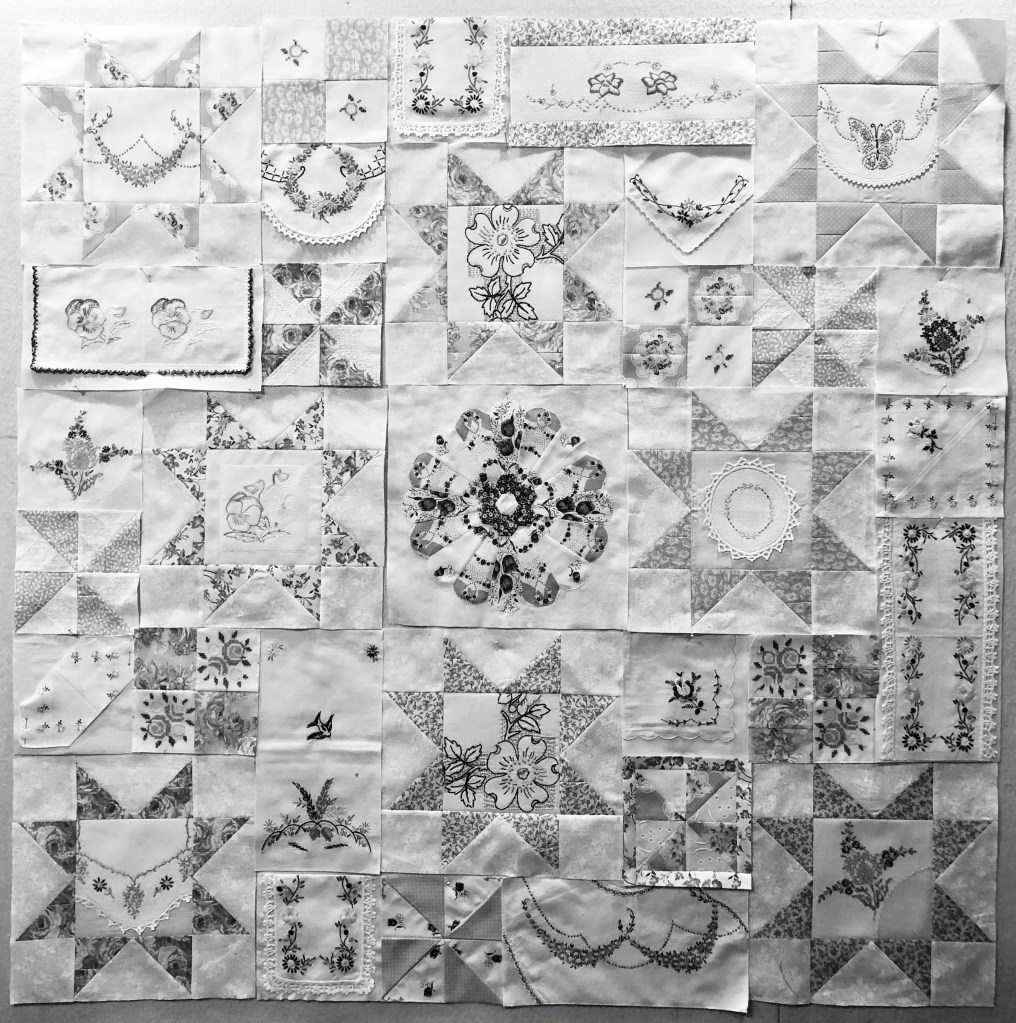
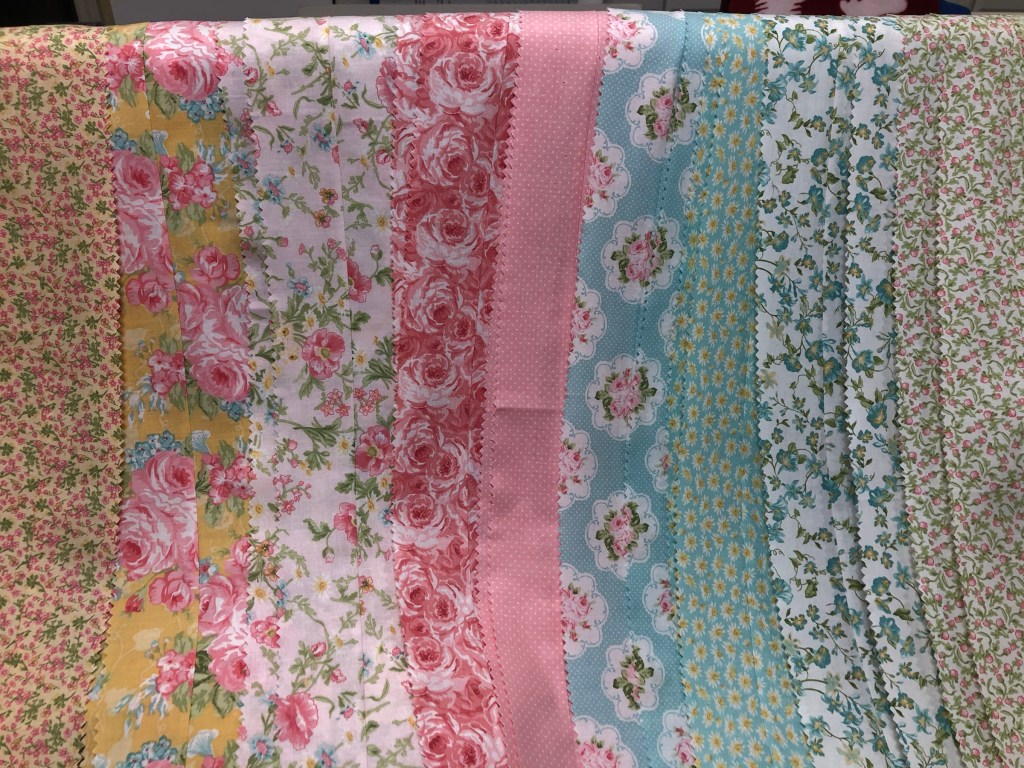
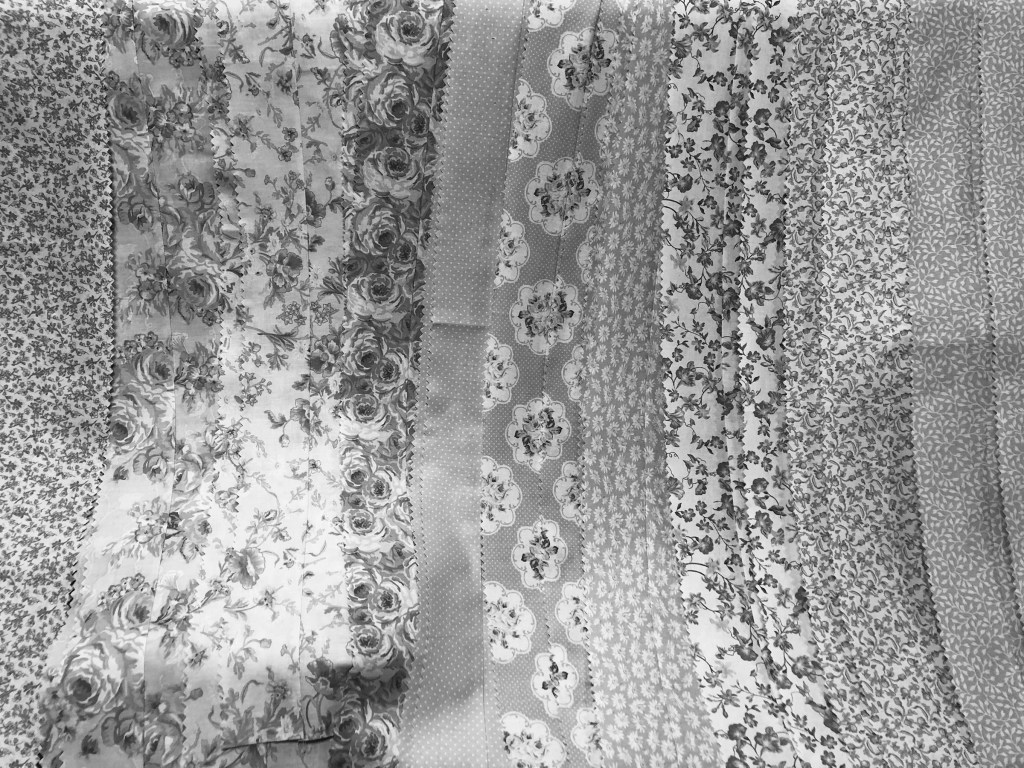
Remember to take pictures of your layouts. Change the picture to black and white to readily see the visual heavy areas. Once identified, begin to move linens/fabrics around until your are pleased with your results.
❤️❤️Remember: this is your quilt! It needs to please you above anyone else! It is ok to ask for the opinion of others, but you are blessed with making the final call.❤️❤️
Oh, and yes I know block 9 background color is incorrect in the diagrams. You’re just going to have to imagine it has a purple/pink color. 🤪 🤷♀️🤣
Spend some time reading the picture/diagram captions, they have information including why block 10 is circled in yellow!
These are very simple yet very important blocks. The Dresden is your “pull me in” bull’s eye block, your Stars draw the viewers eye around the quilt and with these new blocks we are going to work on give the eye a place to sit and rest for a little bit.
Are you ready? I feel like this group will fly through the making of these 15 new blocks. In their simplicity they are so much fun!
I have placed a big red X over the blocks we have addressed.
The red numbers show the ten 6×6” blocks and the blue numbers show the five 6×12” we need to make. Start by sorting through your vintage pieces and fabrics and begin to lay out ideas for the 6×12 blocks first. Why first? Because they require a much larger piece than those half their size.
Here is the Boehm House Vintage quilt top with the blocks marked. Why is block number 10 circled in yellow? Artistic license allowed me to substitute a pinwheel where the pattern called for a solid block. In other words, I made one too many pinwheel blocks and decided to use it in the place of a solid block.
The Dresden Plate center 12” block. Pictures 1-14 show the Dresden made with 2 ladies vintage handkerchiefs. Pictures 15-40 show the same block made with a single handkerchief plus a tiny bit of white fabric.
Take some time to read the picture captions for both the 1 and the 2 handkerchief Dresdens. Hope you enjoy this lesson! 🙂❤️🙂
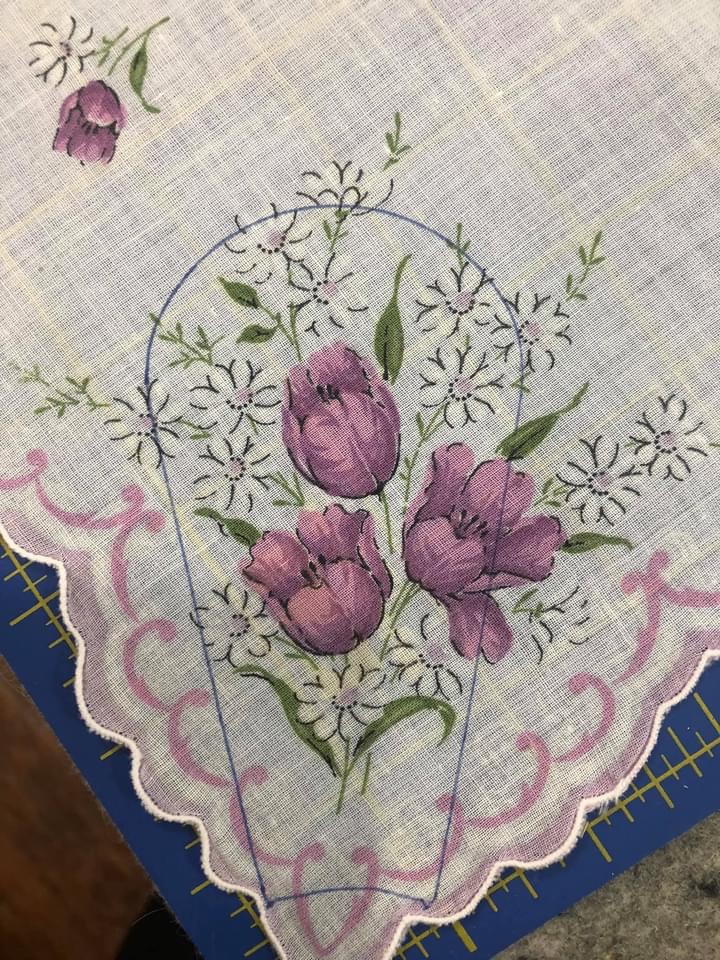
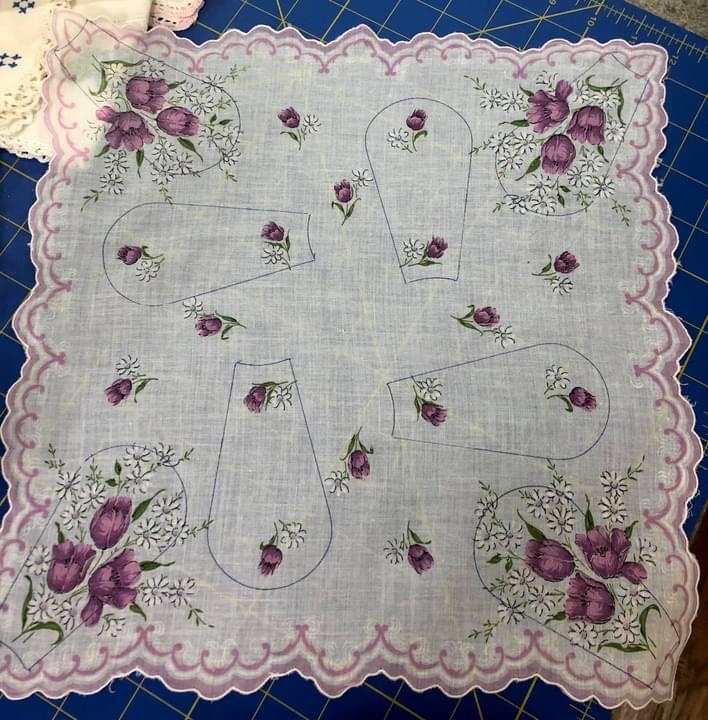
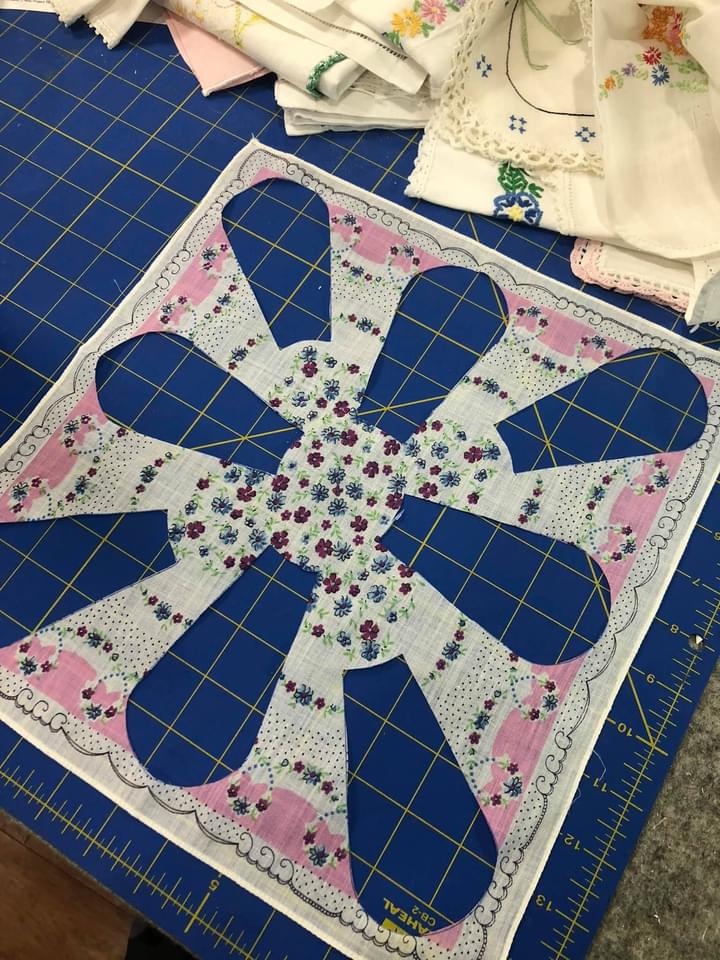
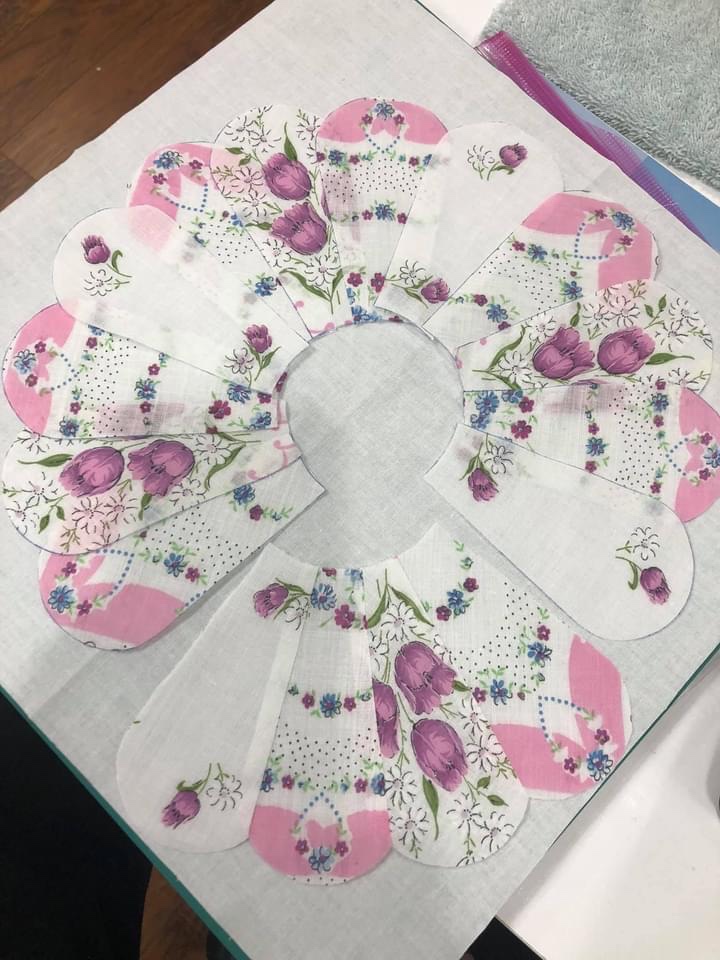
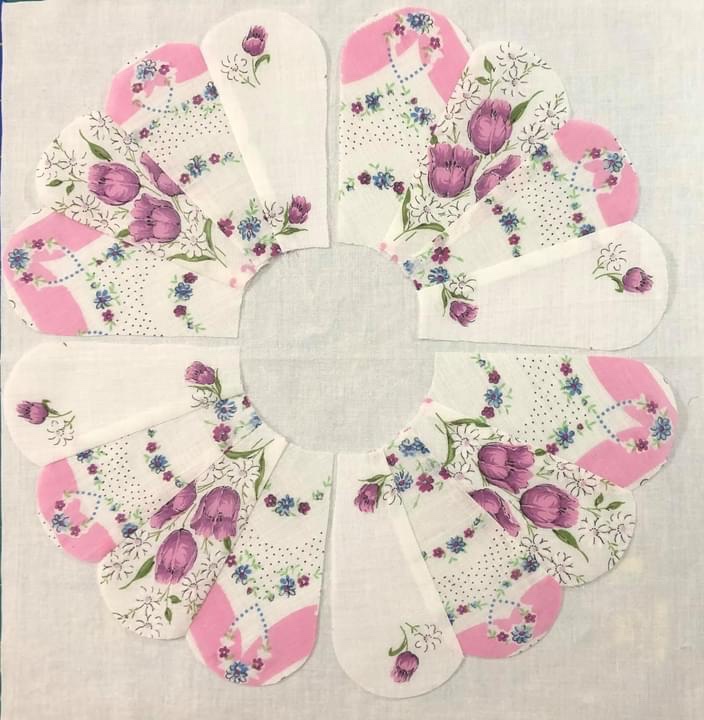
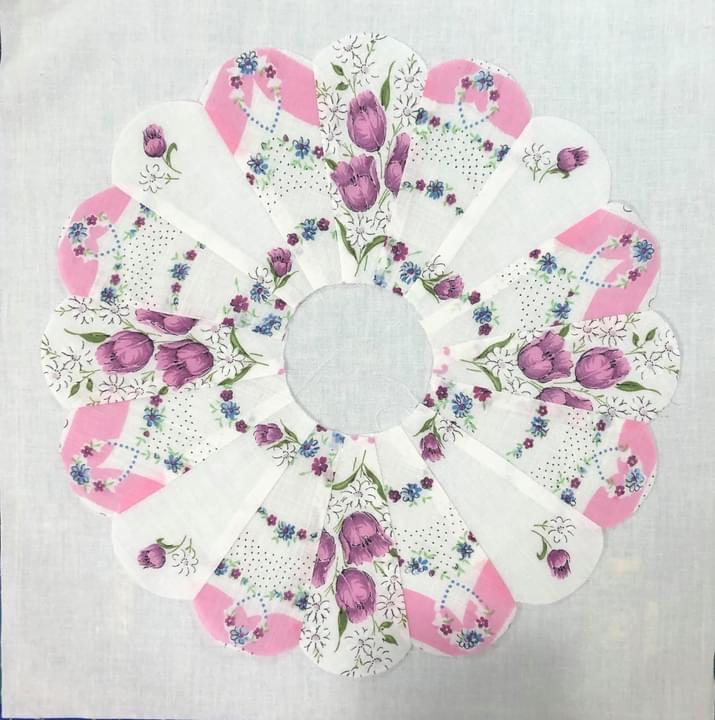
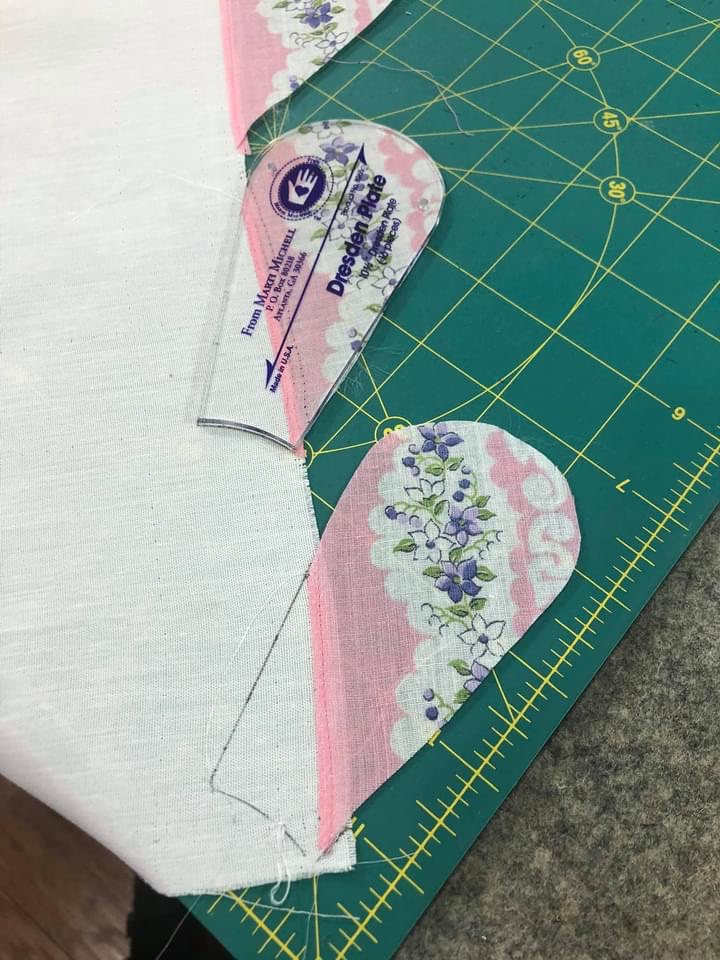
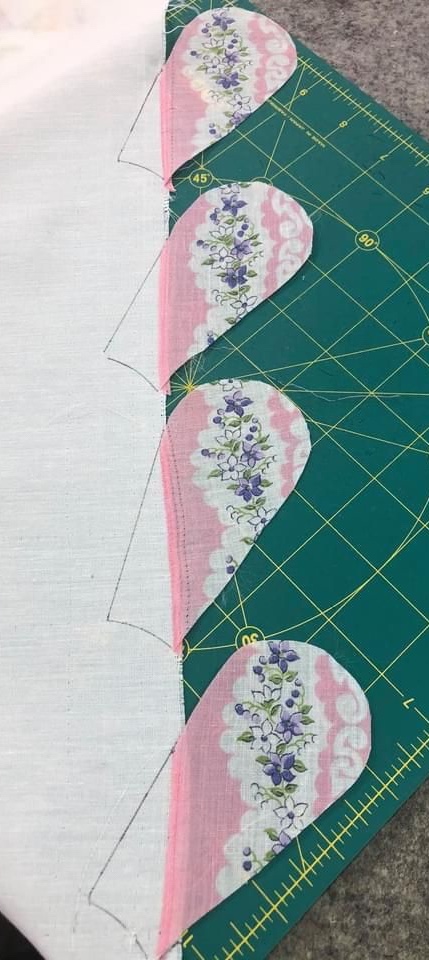
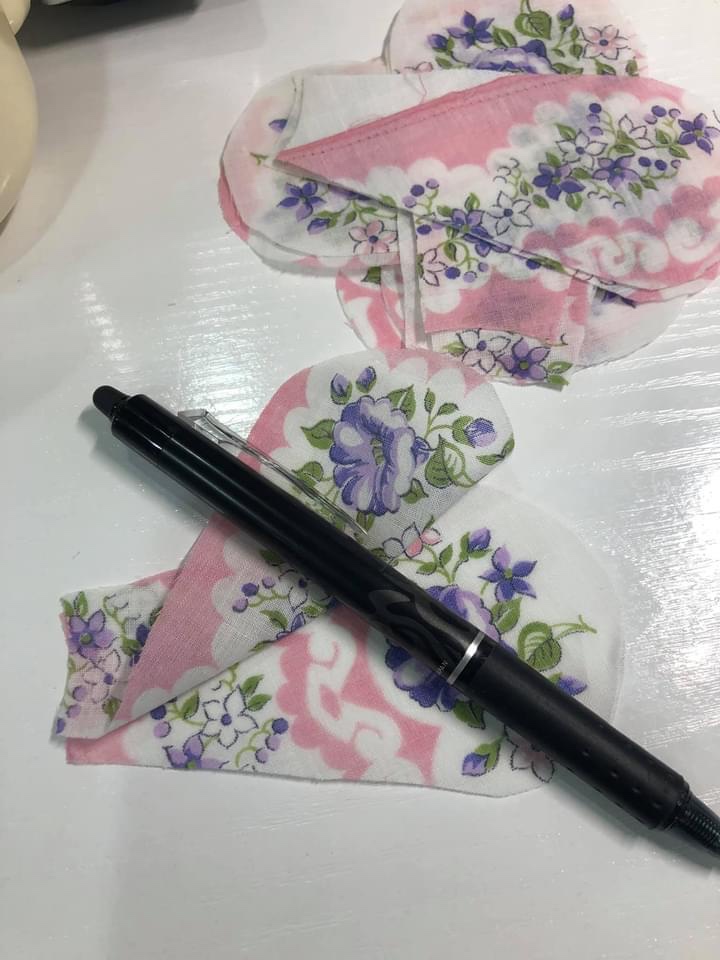
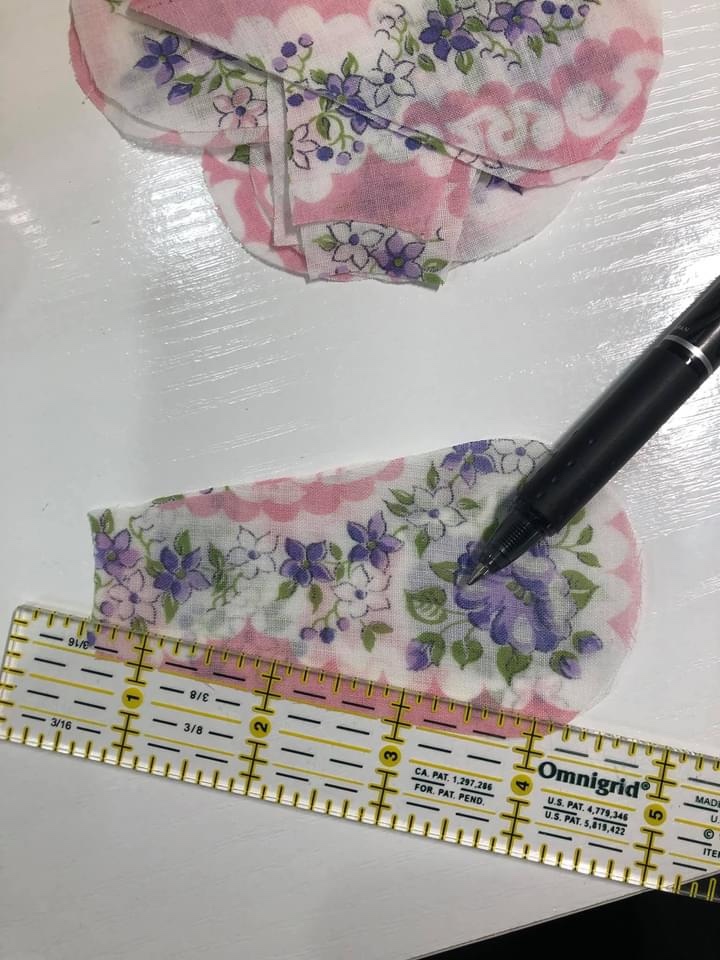
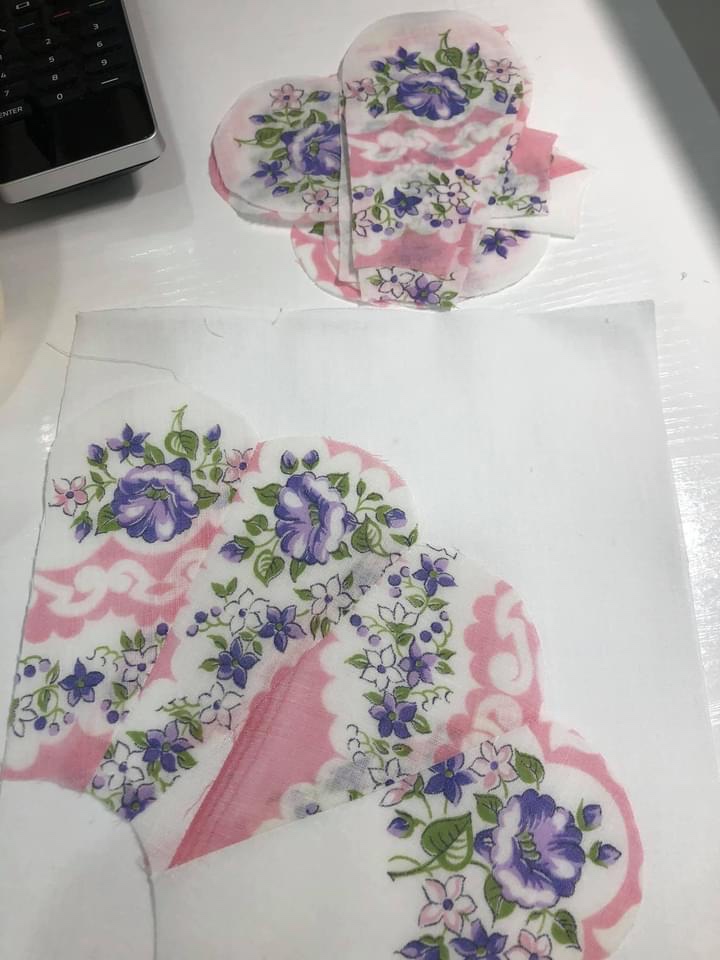
Handkerchief 1 of 2. Using my Marti Michell template I “fussy cut” 8 Dresden Plate pieces from each of the 2 vintage handkerchiefs. I place the template and trace around it. I have used a blue Frixion Pen by the Pilot company.As best as I can I place the template at each of the four corners and mark, trying to have the motif exactly the same. Once the four corners are marked, I repeat the process in the interior of the handkerchief, doing my best to have each of these additional motifs match. From the first of 2 vintage handkerchiefs I have marked 2 sets of matching Dresden Plate petals. Tiny tidbit: did you know that for a Dresden block, if the individual pieces have a curved top (such as ours) they are called Petals. If they were pointed then the pieces are called Blades.The second of 2 handkerchiefs is not marked in the same fashion as the first.Now we have 4 sets of 4 Petals.The cutting out process is slow and steady, of course you could try it with your rotary cutter but you will need a very small diameter blade to cut the bottom concave edge.Save this! There is a lot of useable bits here!Again, save this!Lay out all your pieces into a circle. You have 4 of each motif so one of each “4” will be placed in each of the 4 sections of your circle, top left, top right, bottom left and finally, bottom right. Rearrange until you are pleased with the layout. Lay a small clear ruler along one edge of a Petal. In some fashion mark a 1/4” seam line.Sew carefully on this marked seam line. You may want to change your sewing machine needle to a size 70. Your call, but definitely use a thread color that will not distract.This is one quarter of my Dresden Plate block. Sew each of the 4 quarter sections and lay them out.You can see only 1/4th of the circle petals have been sewn together.In this picture I have completed 4 sections of my Dresden Plate. Next I will sew the top right and left quarters together. Do the same for the bottom left and right sections. You will now have 2 half circles. Sew them together to make a beautiful Dresden Plate! Beautiful and easy!The Dresden petals have all been sewn together and I am happy with the results. I will talk about how I will attach the Dresden circle to background fabric and what I plan to have in the center in a later post.A template if you are needing one. Why have I included a section of my tape measure in the picture? It gives you “scale”. When you print this picture you will need to adjust the printout of the picture via you own printer. For help in this function please see your printer manual, either your paper copy or online.
Now we will talk about making a Dresden Plate using only one vintage handkerchief.
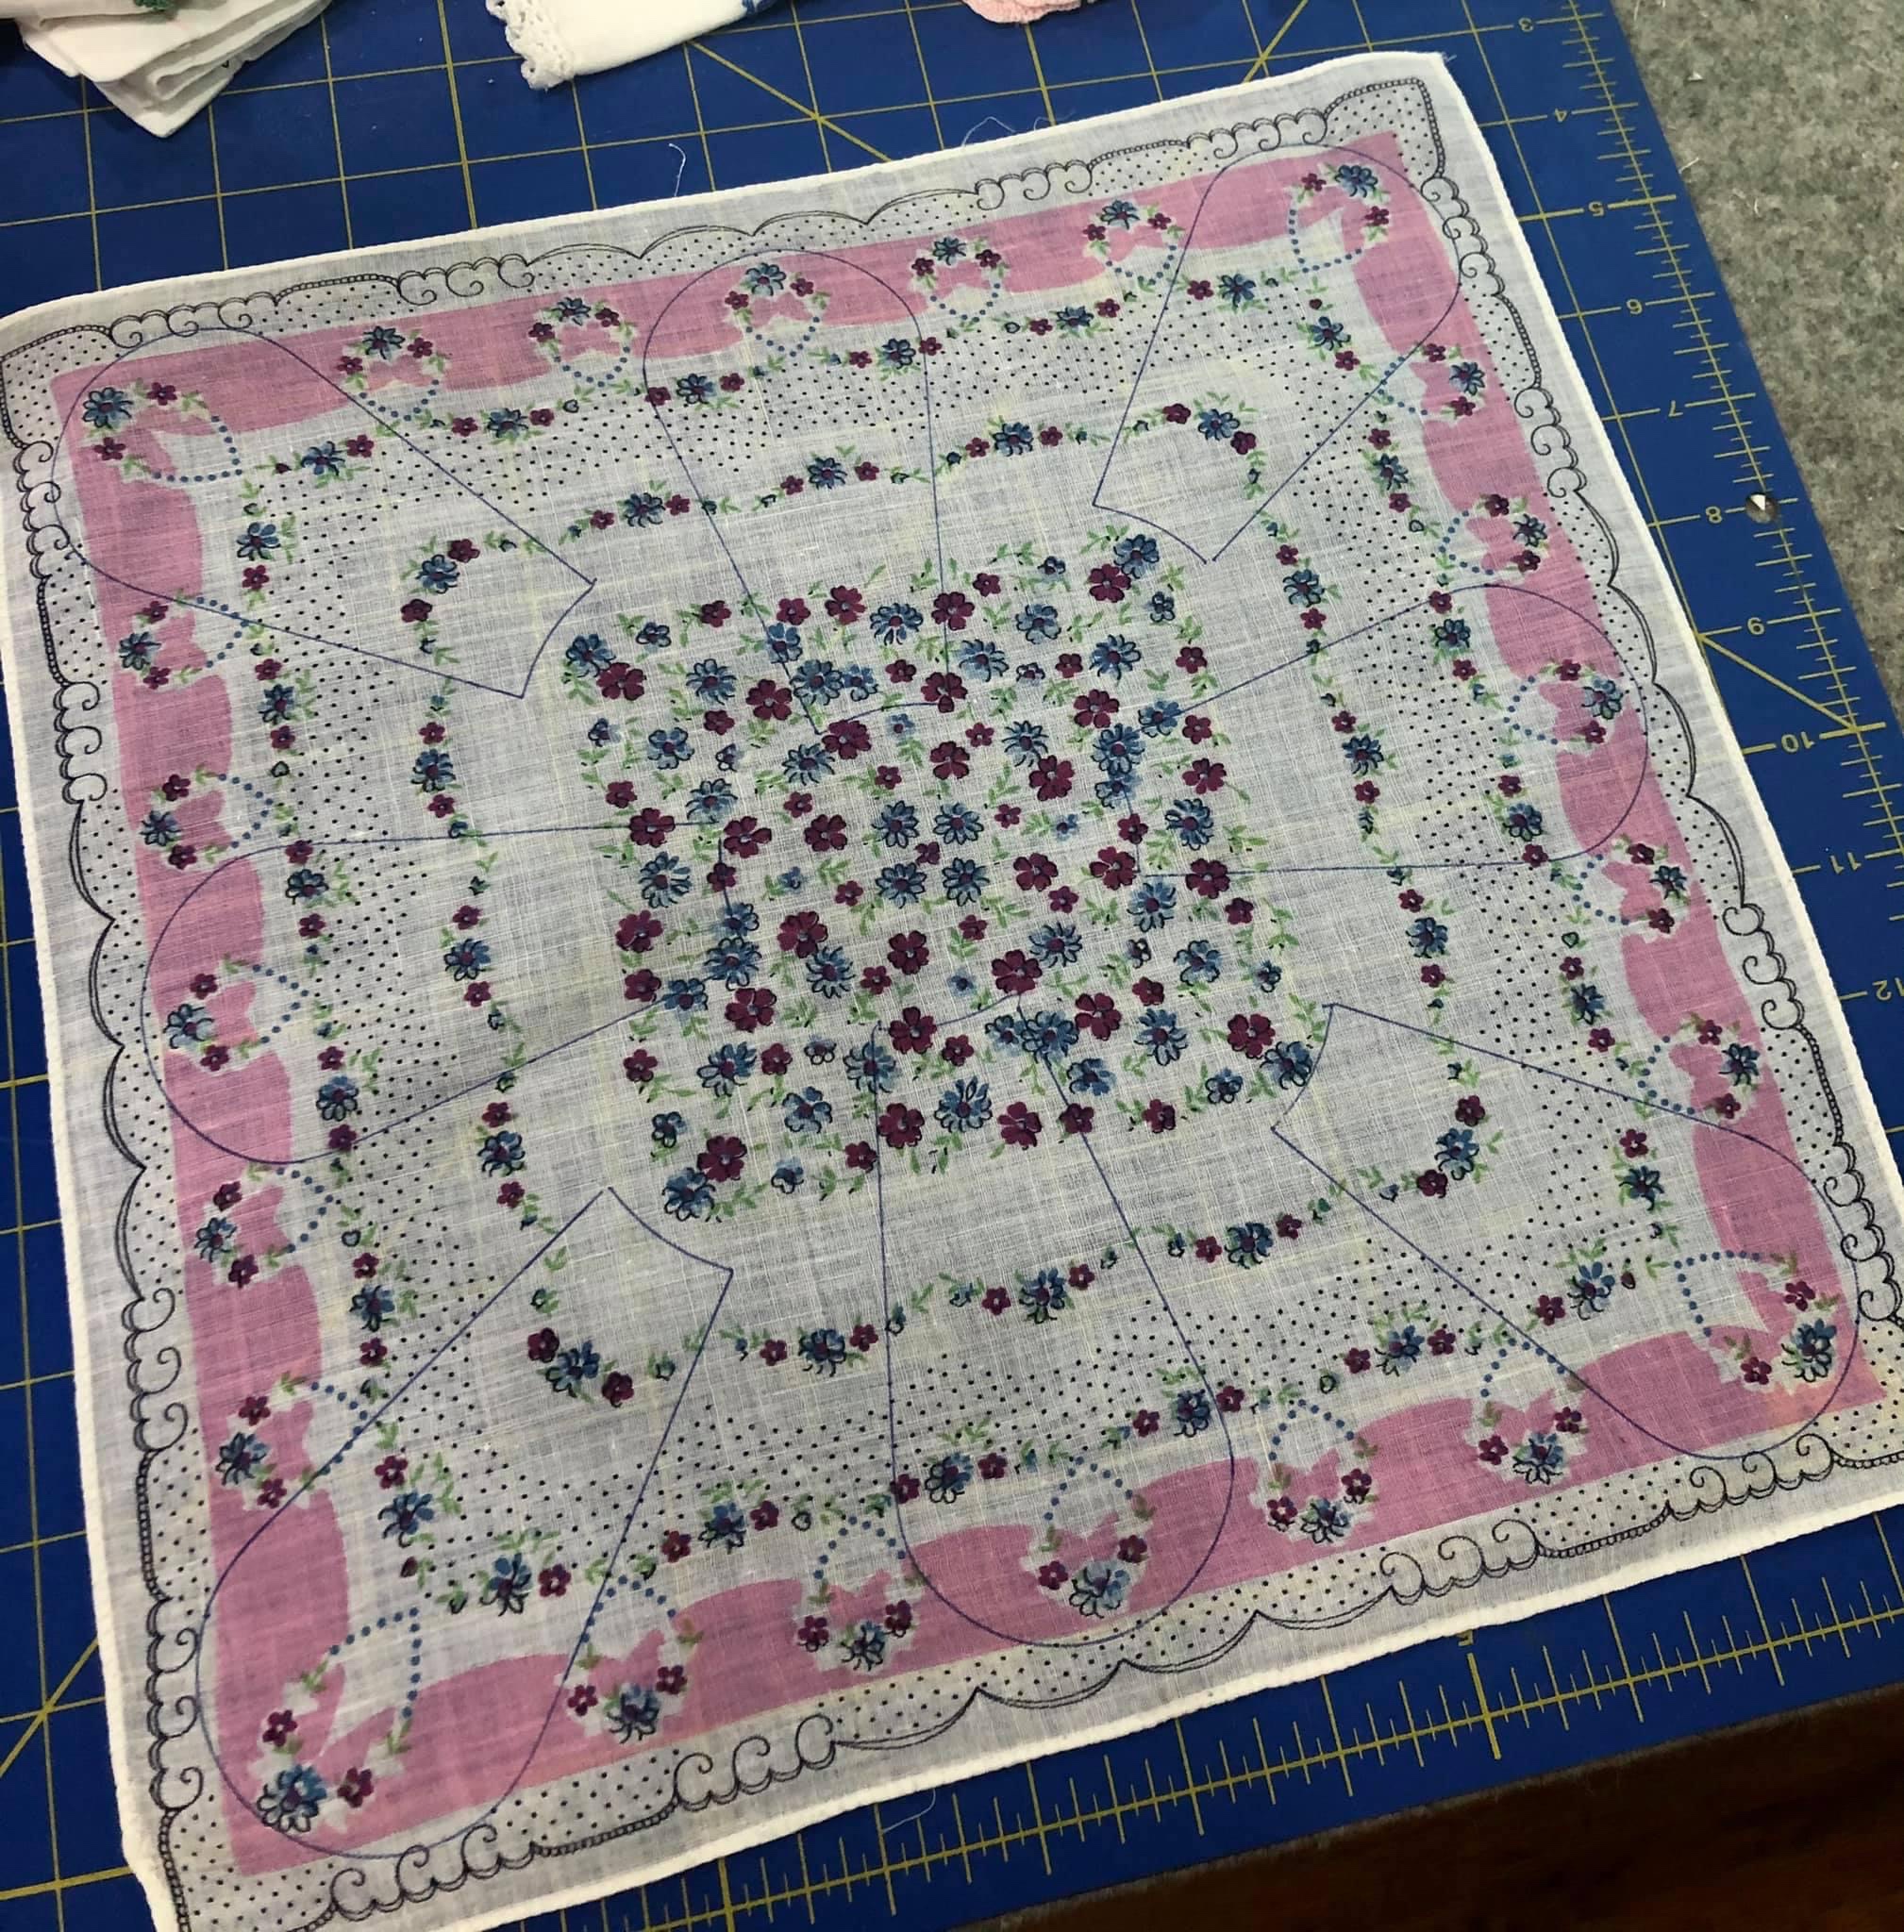
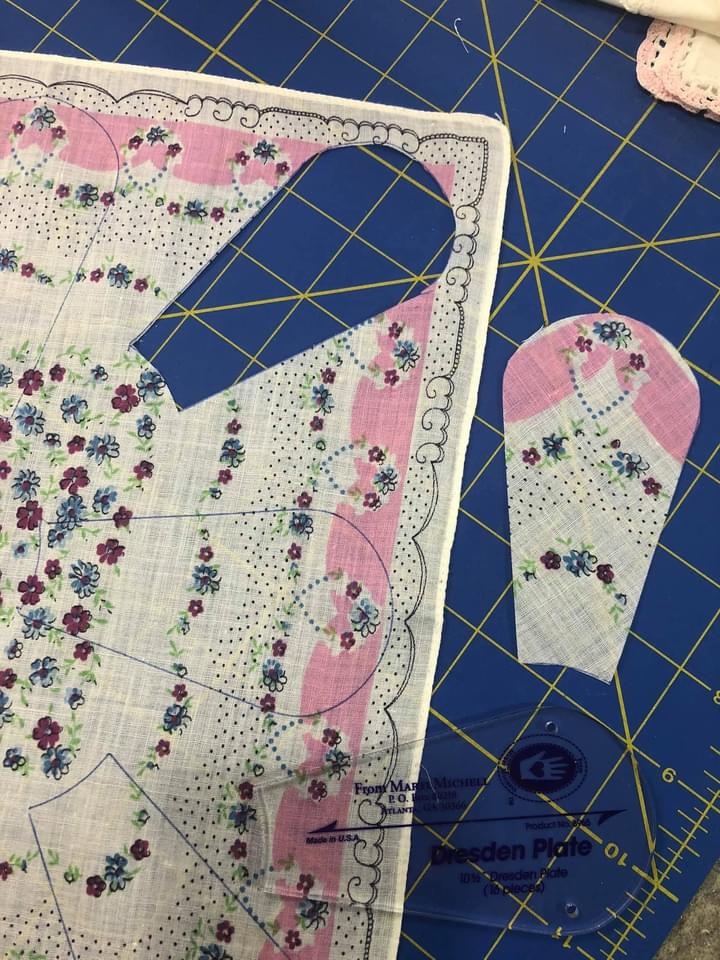
16 Petals drawn/traced on a single handkerchief. What is she doing you might be thinking, does she not see that 4 of the pieces are not complete? I have a plan…In order to give me the maximum amount of fabric, I unstitched the handkerchief hem and carefully pressed it. Of note: see the little black dots on the lower edge? The manufacturer prints these dots as cutting guides as the handkerchief was made.I carefully hand cut each of the 16 little petals.2 sets of 4 matching petals.I flip the petals over to the right and press the 1/8” seam.Using my template I mark the remainder of the petal.And carefully cut.With raw petal edges together and using a black Frixion Pen, I mark a 1/4” seam allowance.Sew 4 sets of petals together in the same fashion.Sew the 2 half circles together and your Dresden Place circle is complete!Does the look of the “4 pieced petals” bother you? Me? Not at all!A nice close up! If I absolutely had to make a choice about using 1 or 2 vintage handkerchiefs to make a Dresden Plate I believe I would choose 2. It does give more variety and pattern to the circle. It is so nice to have choices!
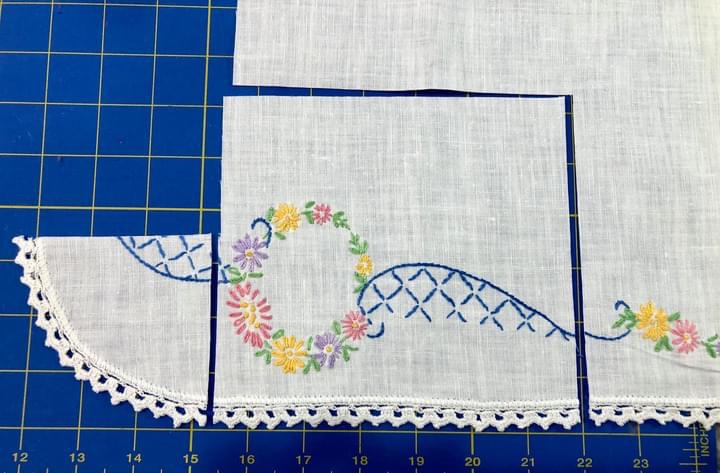
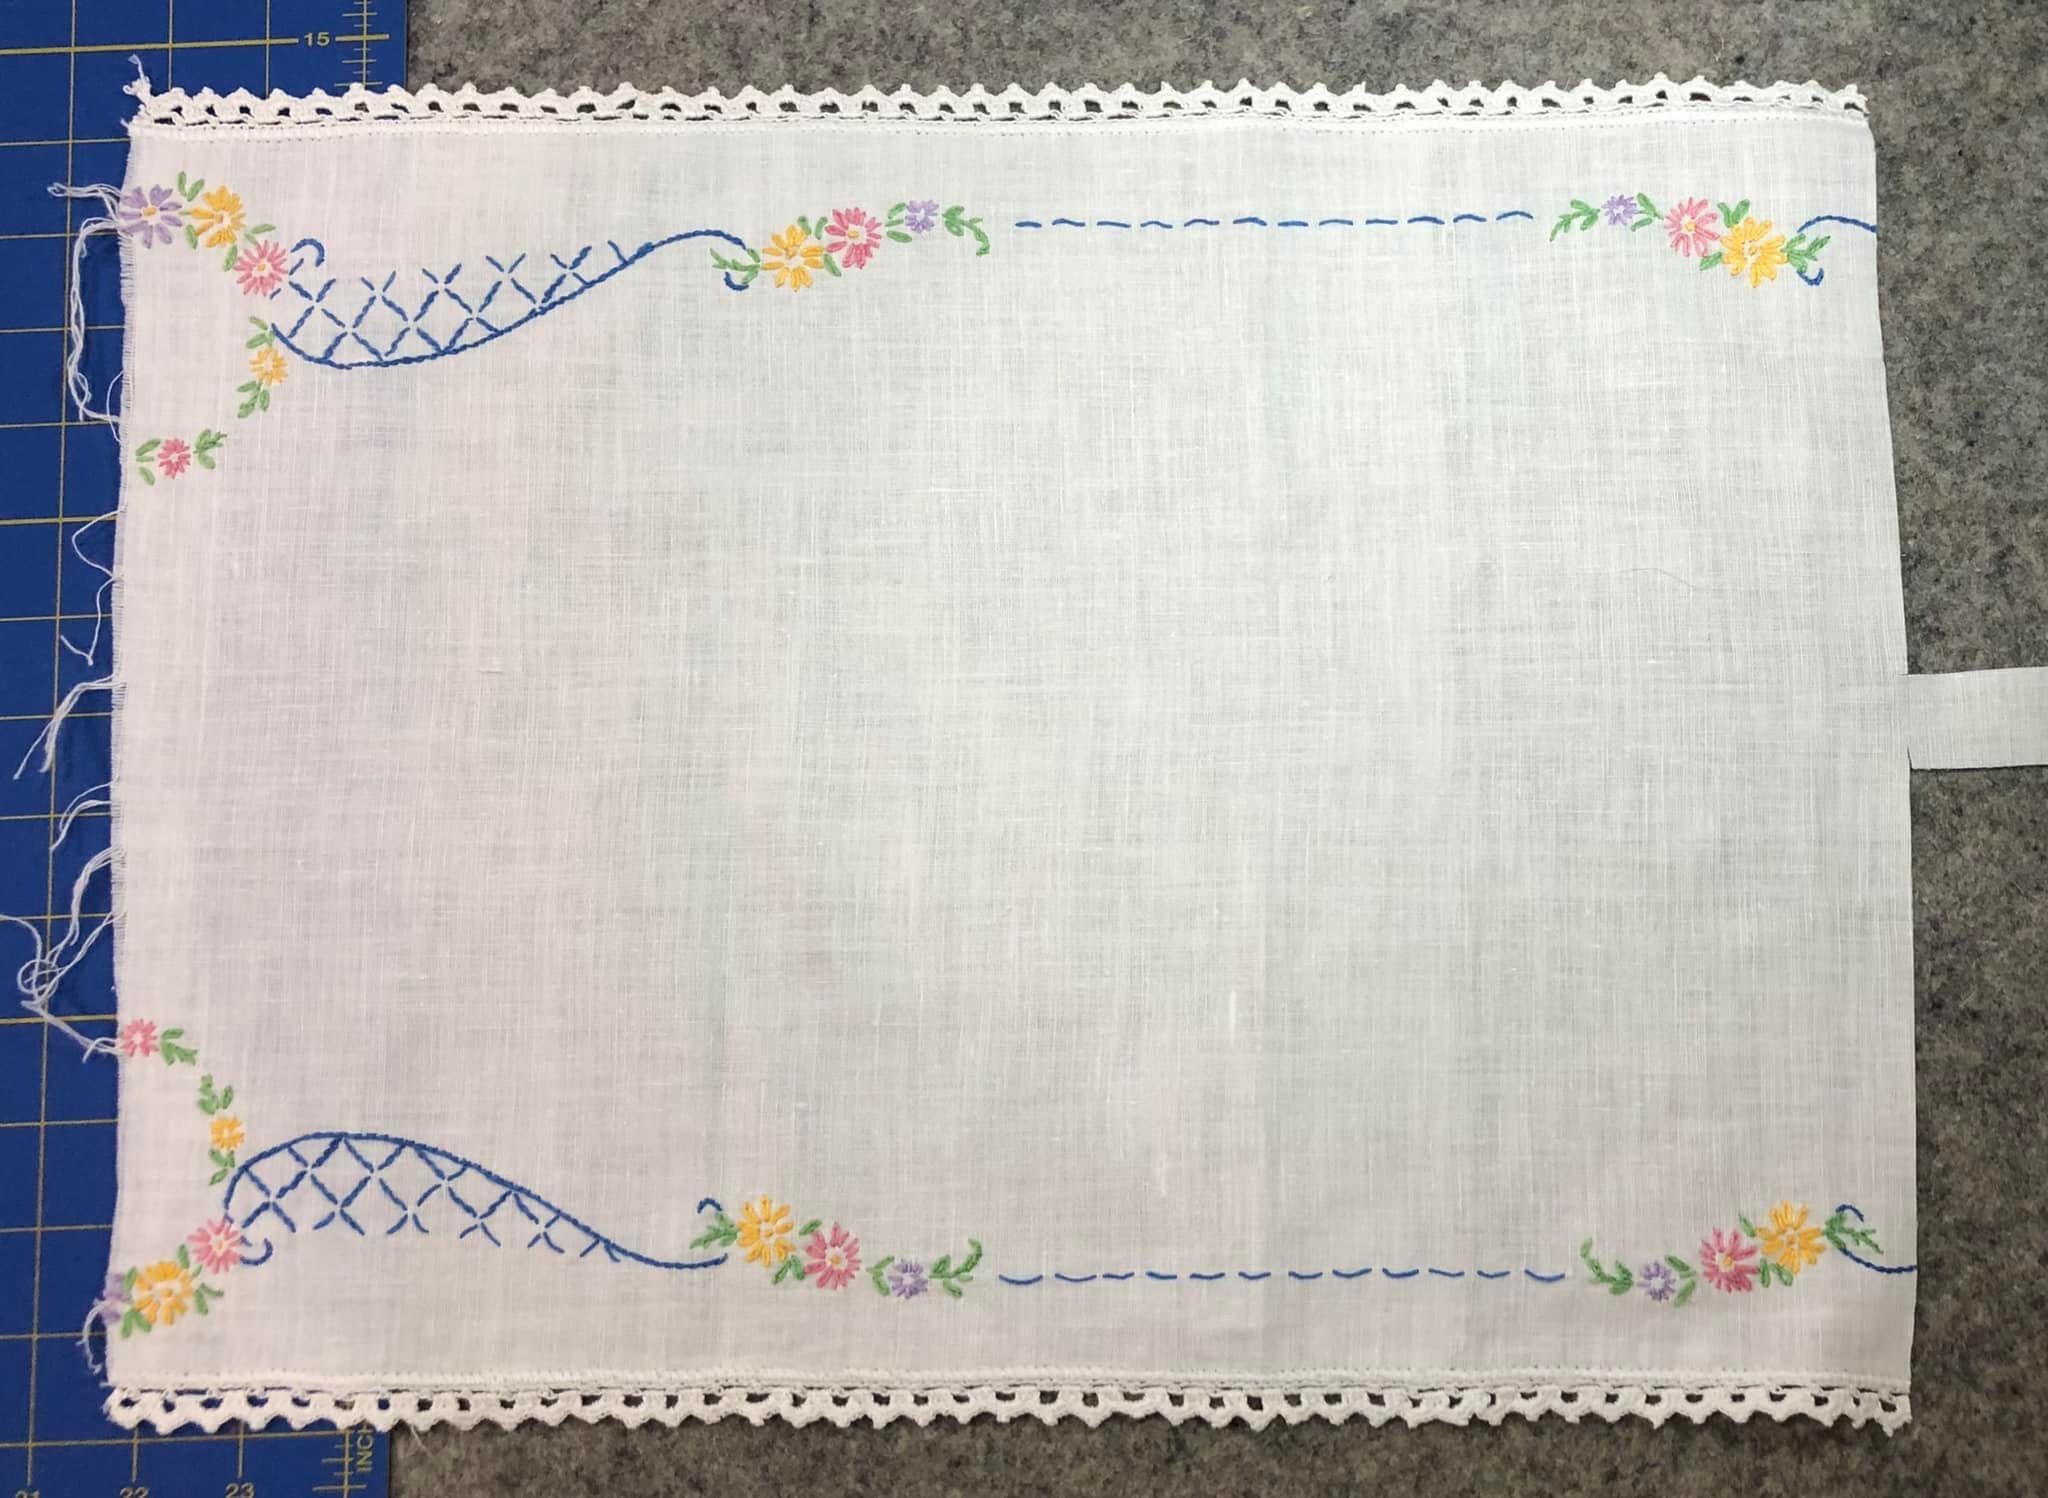
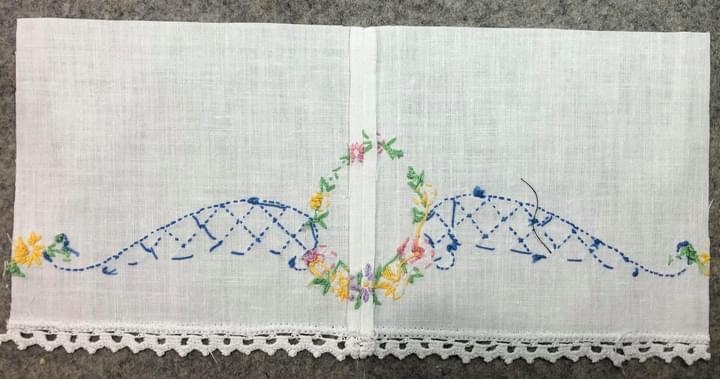
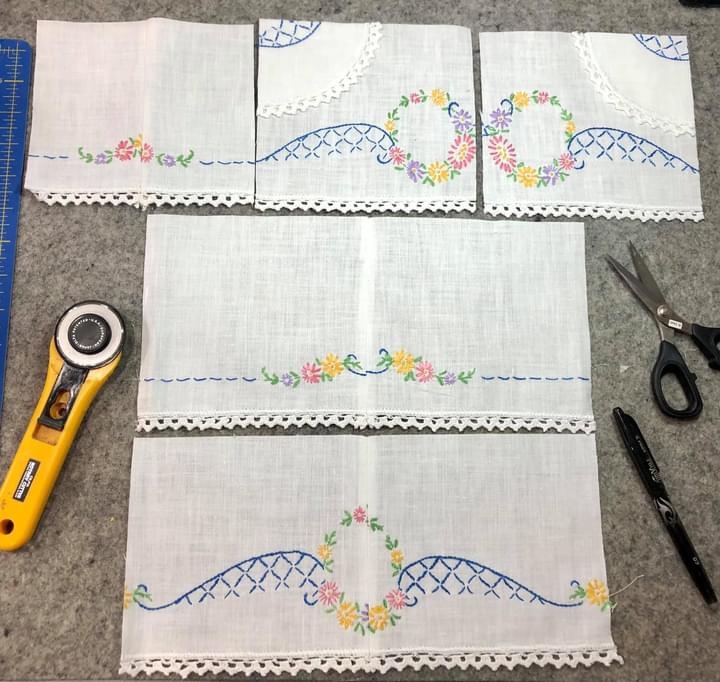
This blog is all about saving bits and pieces and making the most out of a ragged edge dresser scarf.
There are 28 pictures below, most all have information in the picture captions. My intention is to demonstrate to you that almost any vintage linen has potential, it just depends on how you look at it and how willing you are to think outside the box.
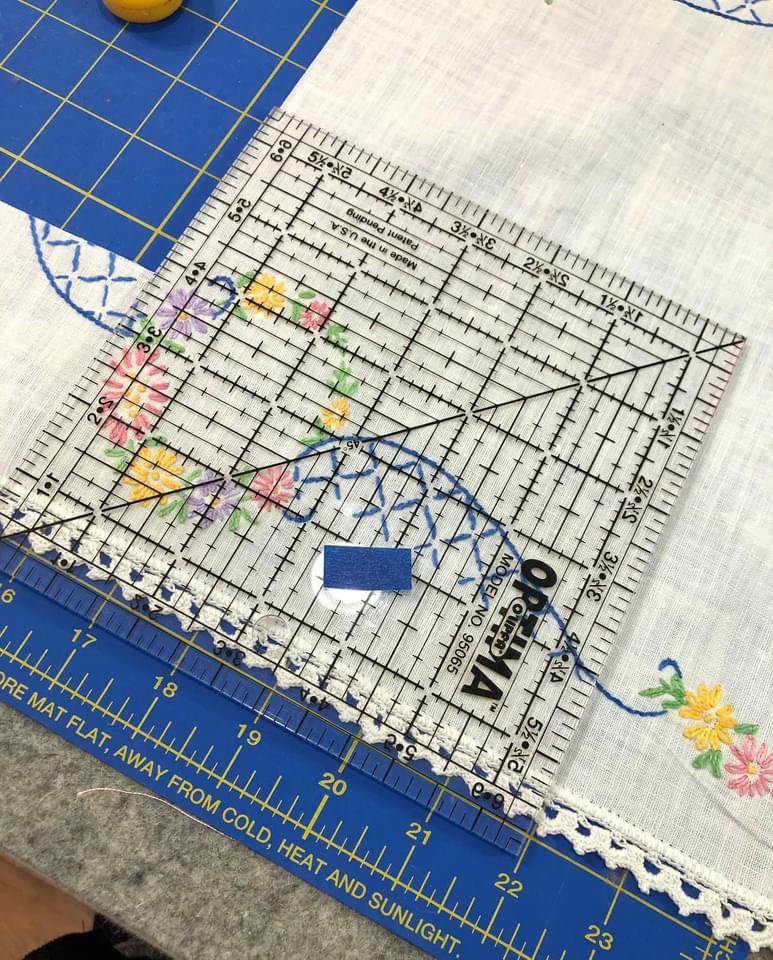
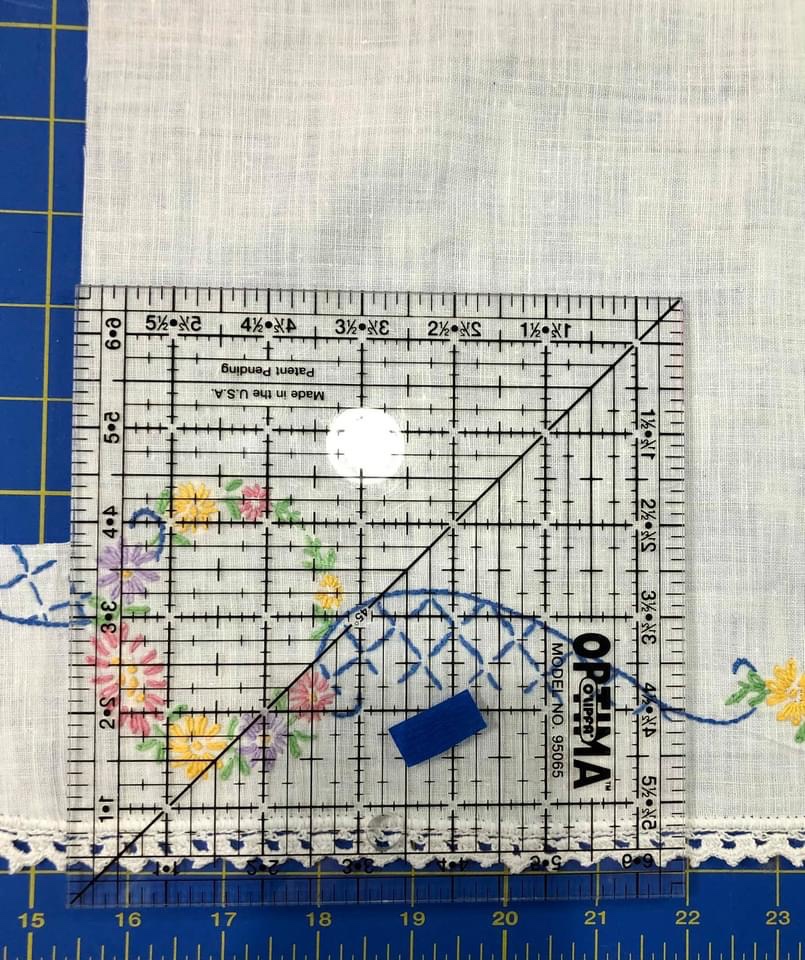
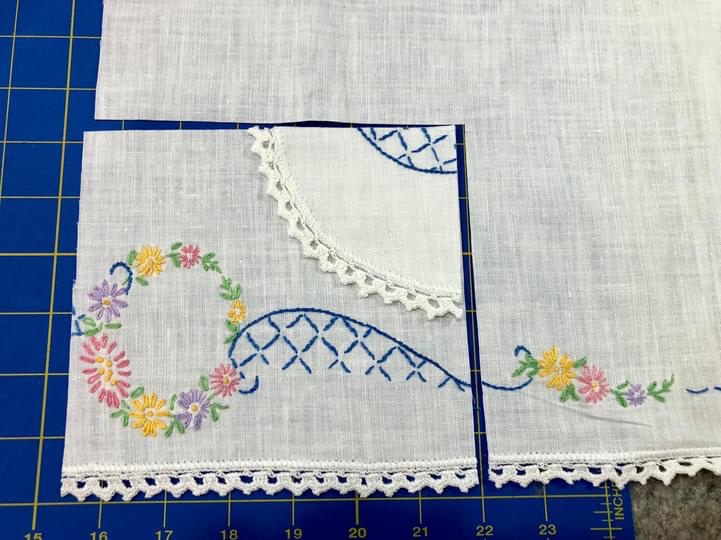
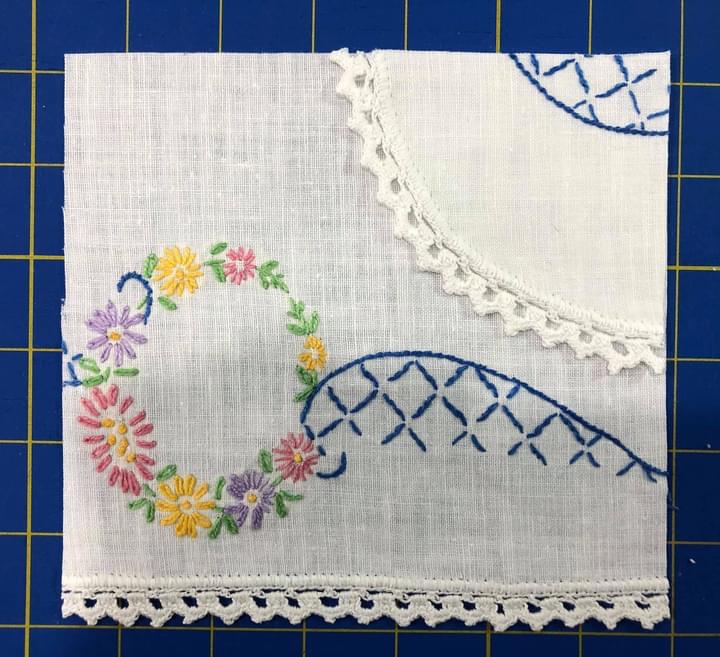
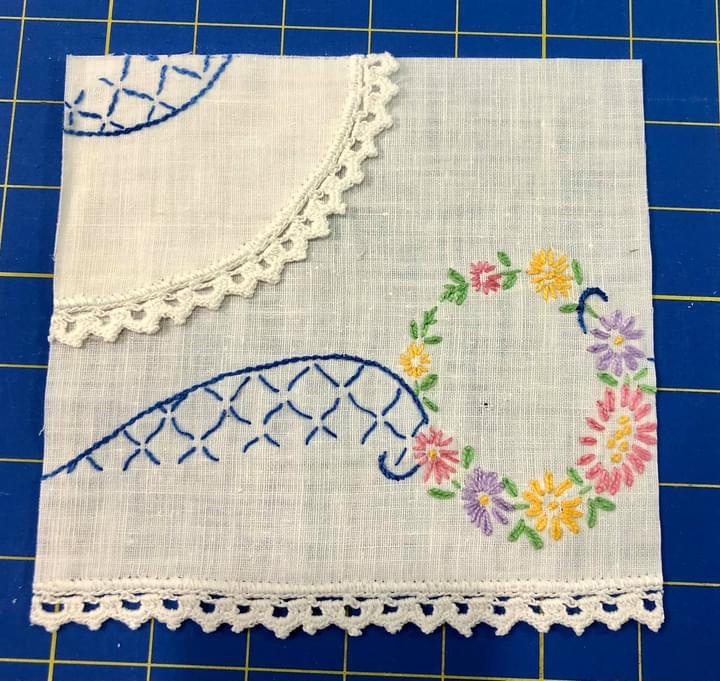
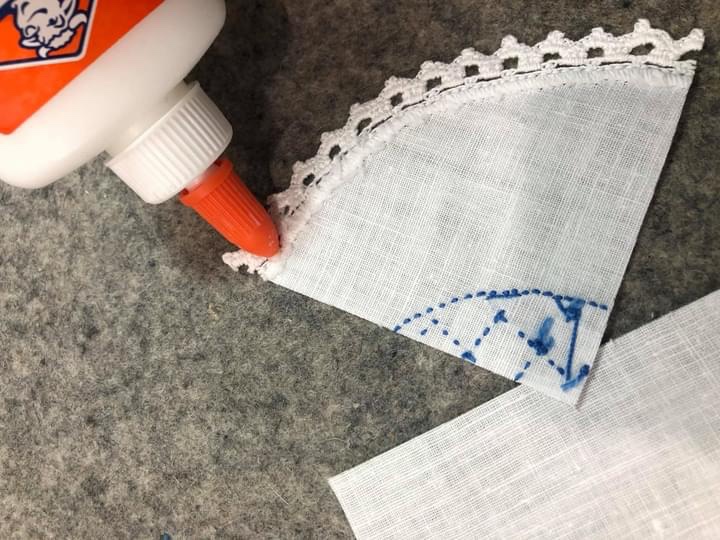
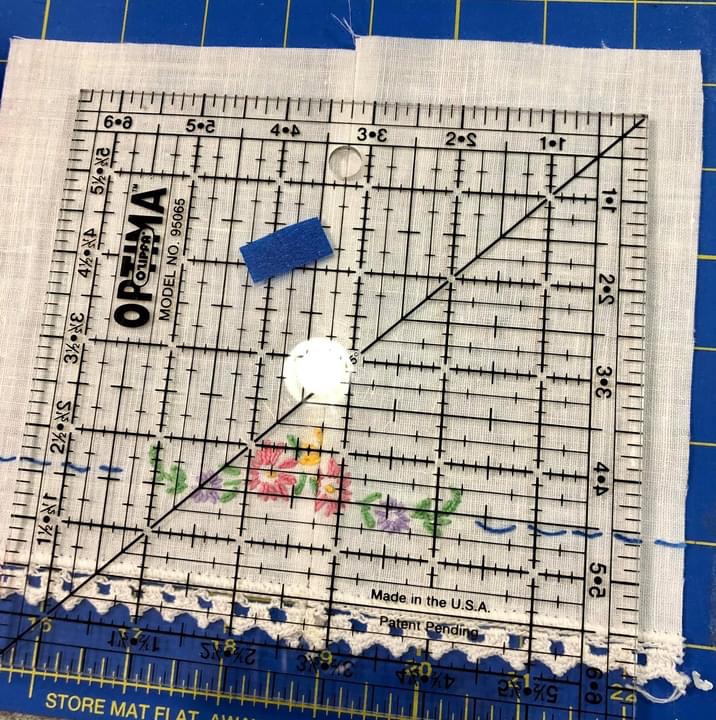
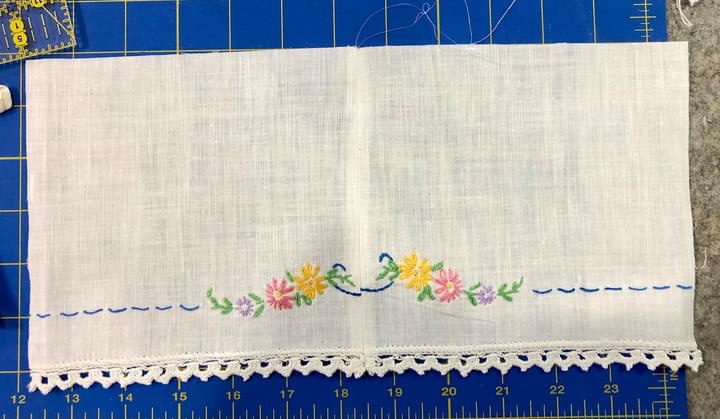
This is a picture illustration/tutorial on why I do not throw anything away that is 1” or larger.
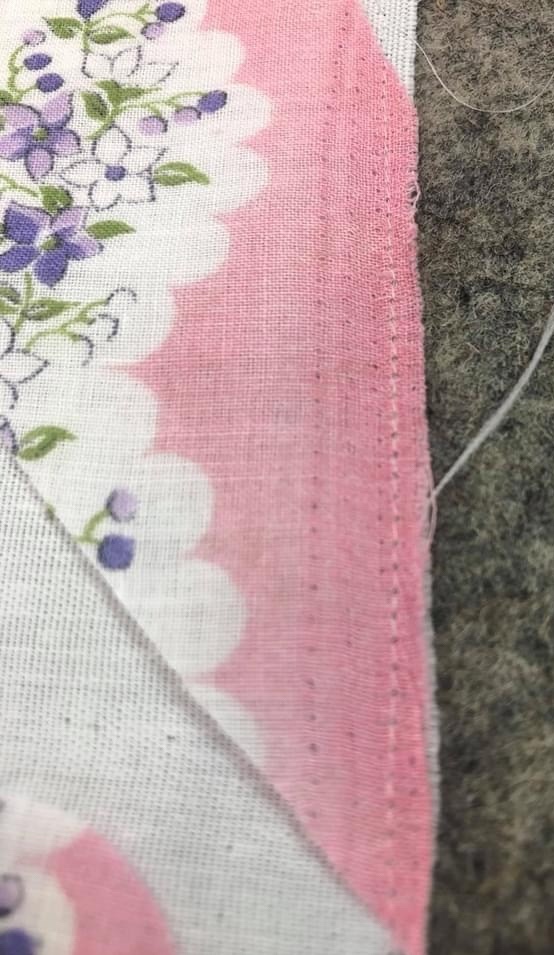
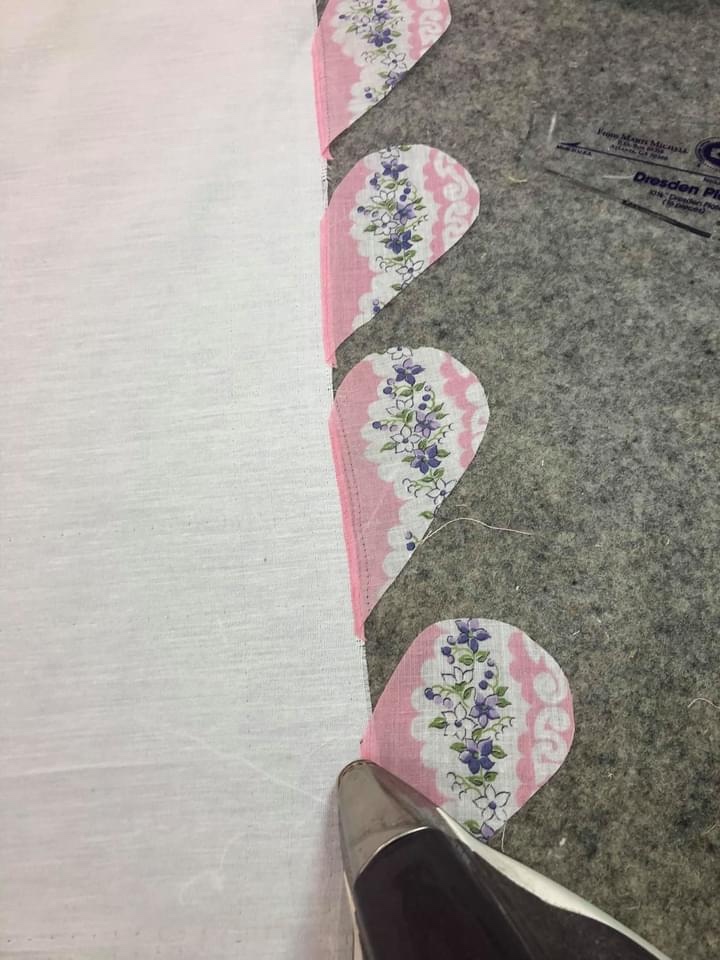
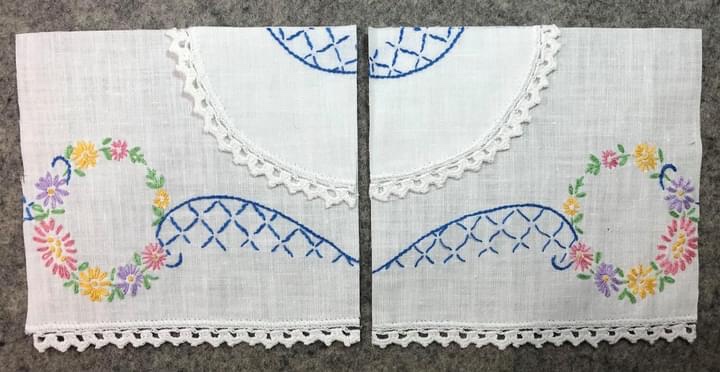
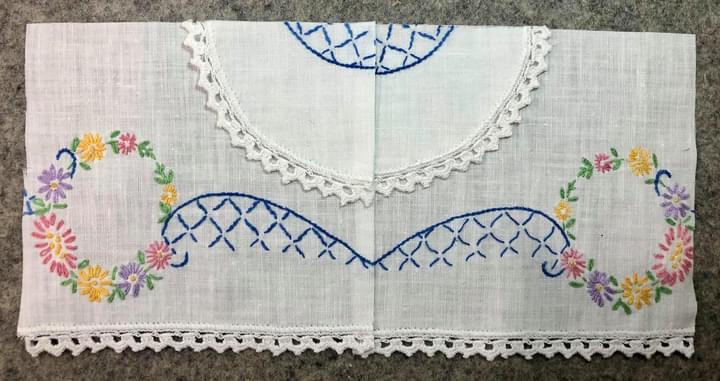
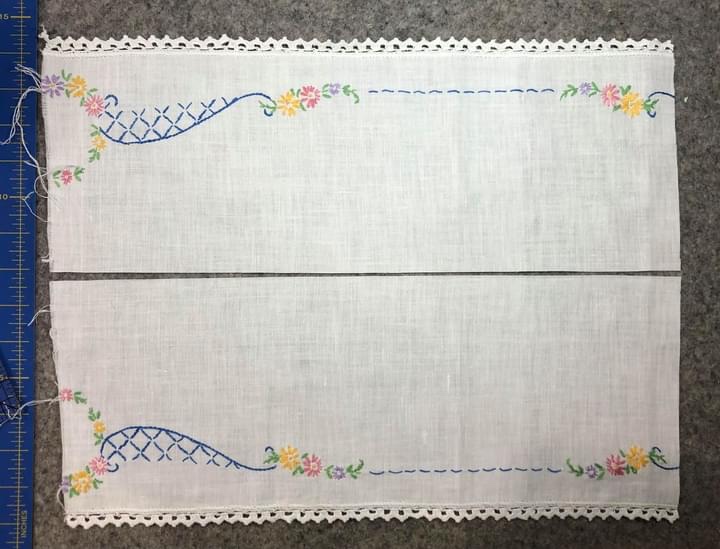
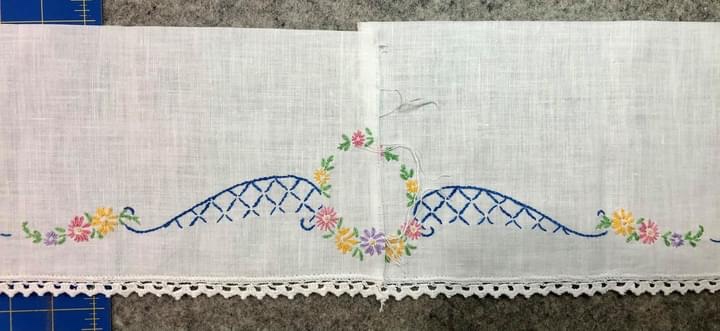
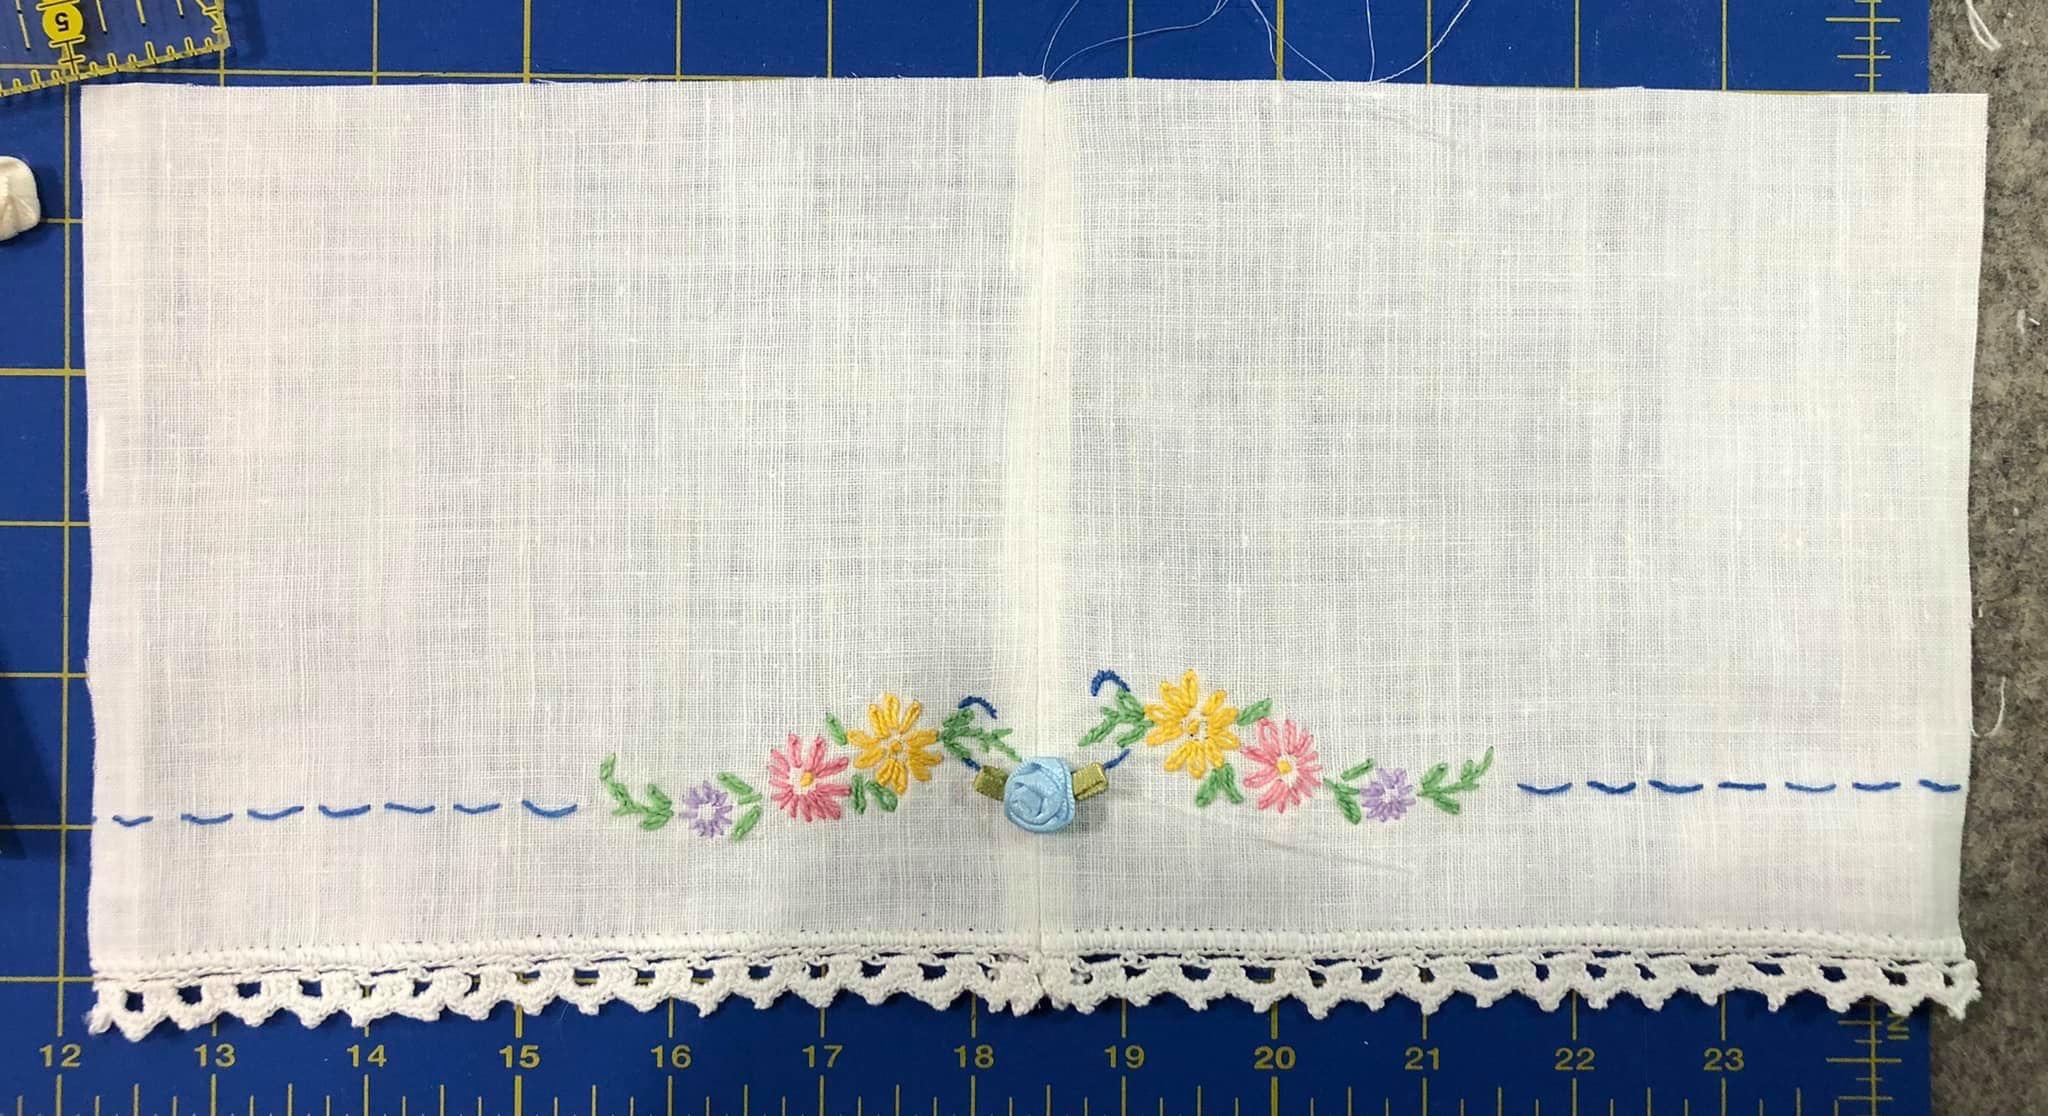
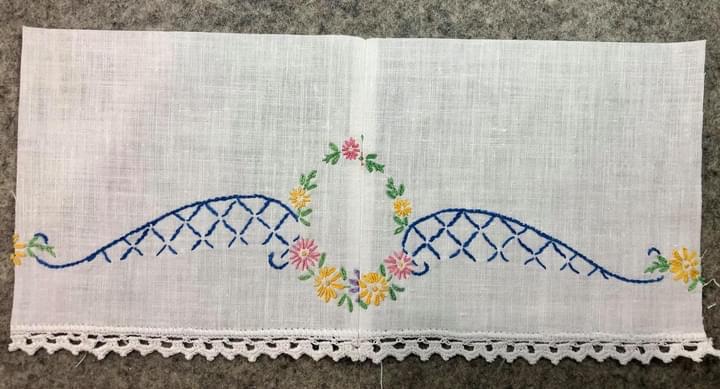
Above is the raggedy end of a once lovely dresser scarf. I did not remember to measure this piece before I began cutting it into sections.Using my 6 1/2” square ruler I cut one piece from the “good” end of the dresser scarf just before this picture was taken.This is the cut piece affixed to a 6 1/2” square of muslin.This is what remained of the “good” end. Lots and lots of potential here!Again, using my 6 1/2” square I cut my next piece but can you see the bottom edge of my ruler is hanging off the bottom edge of the dresser scarf? I want to include the nice small white crochet in this block.Just another view of the same ruler placement as the picture above.I have made the cut but look what I now have on the left…a quarter circle! I can use this!This quarter circle will add interest to the upper right corner of my block.Perfect!I do the same cutting on the other side of the “good” edge of the dresser scarf.And again, place the quarter circle on the block but this time on the upper left.I really like this!And this!I overlap the two blocks to see what a 6 1/2 x 12 1/2” block would look like if I sewed these two together.Elmer’s White Washable School Glue is my good friend! I use this glue all the time! Just a little bit pressed dry with an iron saves pinning. When the Elmer’s is iron dry (in a matter of maybe a minute) I machine stitch the quarter circle to the block right at the point where the crochet meets the fabric.Here is what I now have after cutting the 3 blocks.I can do more with what remains if I cut the piece in half horizontally.Swivel the top half around to meet the bottom half and look what happens!Swivel the pieces in the opposite manner and these two ends meet!At least two more blocks from this dresser scarf!This block is made from the cut off ends of the block above.If I am bothered that the embroidery does not match up perfectly, after the piece is quilted I can strategically place a distractor (the blue silk flower) so no one will ever know.From this single damaged dresser scarf I was able to get six 6 blocks (these 5 and the one already part of the quilt top). I was thrilled!
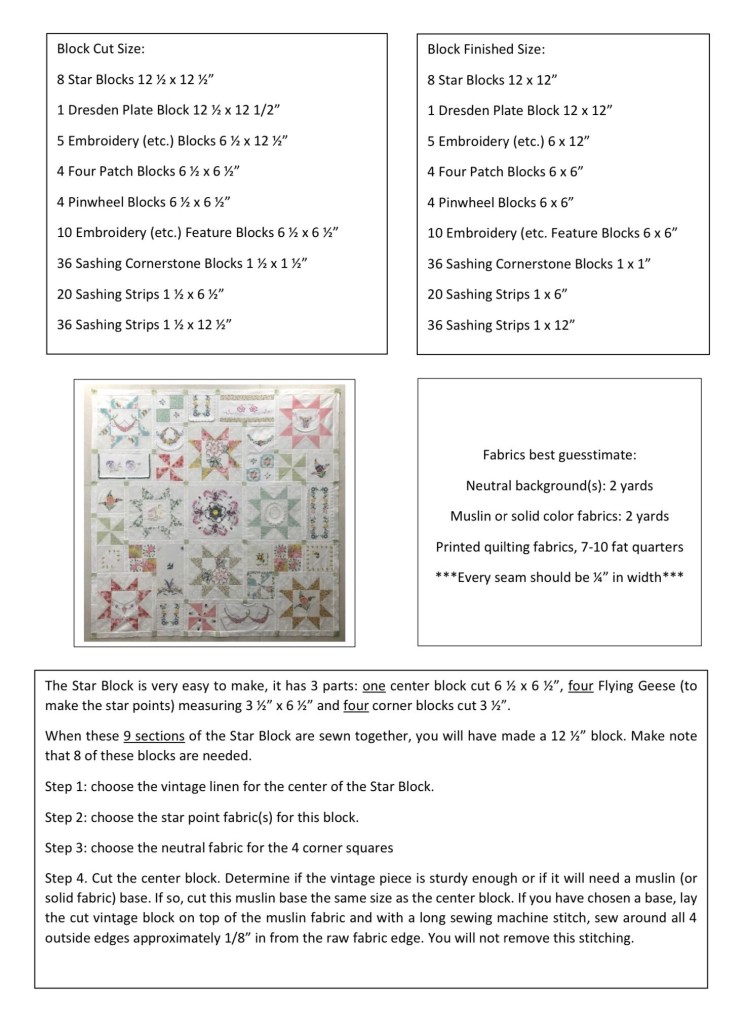
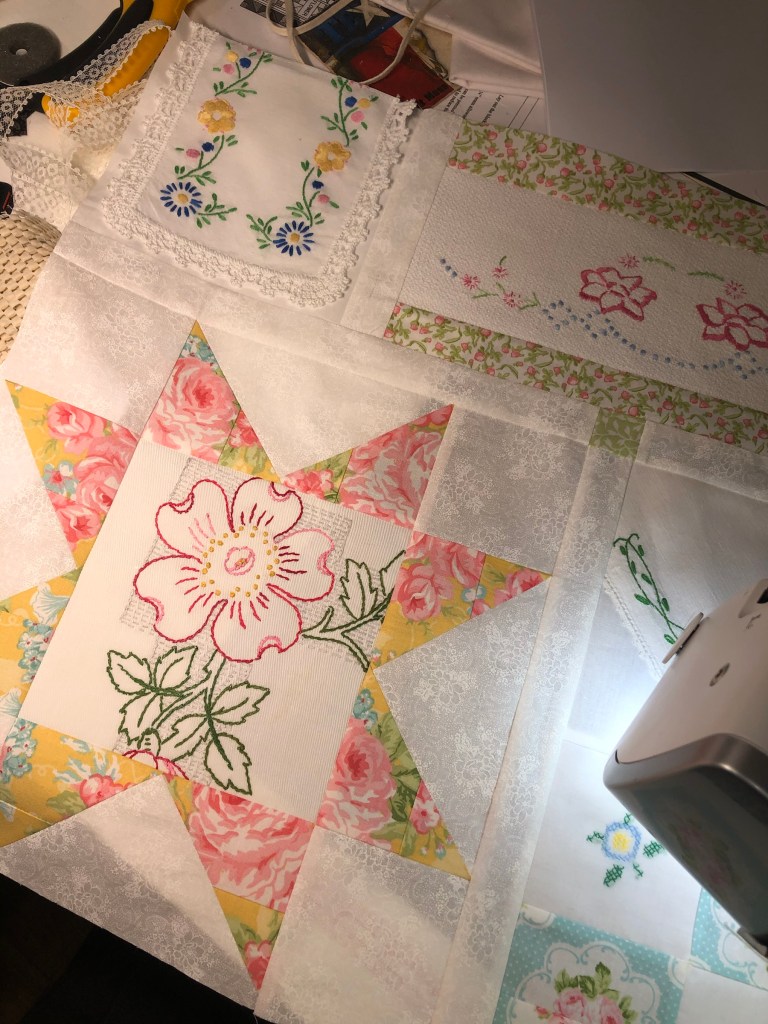
See how visually important the Star Blocks are? That is why we will be starting our project by making all 8 of them over the next few days. As a reminder, I’ve listed above both the cut and finished sizes of the quilt blocks, the “best guesstimate” of fabric needed and a reminder that all seams are to be 1/4” wide.
Follow Steps 1-4 and be amazed at your beautiful Star Blocks! Oh how good it feels to take an old vintage linen and give it a new purpose, a new way to shine for all to see!
Did you practice making Flying Geese quilt blocks? Are you ready to use your chosen fabrics and your vintage linens?
Remember, not all your star blocks need to have exactly the same neutral background fabric. If you have some of these neutral fabrics that are similar, you might want to think about using a variety of them.
I am anticipating we will take 3-4 weeks to end up with a finished quilt top. You may take longer if you like, the instruction will remain here on this Facebook Group page for at least the next 6 months, maybe longer.
Every few days or so I will introduce the “next step” including general instructions and pictures.
Keep this in mind: this is your quilt! If you do not like Star quilt blocks, make yours something else. The same goes for any other block. I will give you the overall measurements so that if you already have adaptations in mind you will know what size everything needs to be to all fit together in the end.
How to say this…you do not have to love every block in your quilt top. There are a few blocks in the quilt pictured above that I am not thrilled with but I did not dislike them enough to take them out. Please know that every block cannot be the “star of the show”.
I have mentioned that the Dresden Plate block is the Bull’s Eye and the 8 Star blocks draw your eye around the quilt. The white muslin sashing strips and the green cornerstones serve to frame the blocks. The Pinwheels create action and the 4 Patches give you opportunity to use bits and pieces of both fabrics and vintage linens. The remainder of the square blocks give you room to feature your vintage pieces in the same fashion as your star centers. And about the sashing strips and cornerstones, remember you do not have to use them, it is your choice.
It starts today! Hope you are as excited as I am! Blessings to all for a Very Happy New Year!
Let us take a few minutes to clear up some confusion…I cannot tell you how much fabric to buy because I do not know where you will use it, how much of it you will use or how often you will use a particular fabric.
What I can tell you is you might want to have on hand maybe 7 or 8 fat quarters of fabrics that will have colors that will work well with the vintage linens you have selected.
You will also need to be thinking about your “background”fabric, a nice light tone-on-tone maybe and either white or natural muslin. If you have 2 yards of background fabric you will most likely have a bit left over. The same for your muslin.
This is no ordinary project we are about to start! It will require you to make your own decisions about color placement, fabrics and such. You will have a very basic pattern to follow but I will not be telling you what to use where linens and fabrics are concerned.
For some of you, you are probably uncomfortable right now. This will be a wonderful learning experience! Remember several weeks ago I suggested that this might not be a project where you would use treasured vintage pieces? Keep that in mind, we are getting ready for a teaching/learning adventure!
You are going to be so excited as we begin to create quilt blocks that give honor to those needleworkers who came before us. We are going to make a quilt top to showcase all the needlework we have so carefully gathered, laundered and pressed! We’re going to have fun!
Blessings to all during this Christmas Season, hope your holidays are filled with joy!
Class begins January 1, 2021, here are some things to keep in mind: The quilt top will measure approx. 54×54” if you follow the pattern as given. If you choose to eliminate the sashing strips and cornerstones, it will measure approx. 48×48”.
The Star Blocks are your Visual Anchor. The center Dresden Plate block is your “Bulls Eye”. The quilting fabrics and handkerchief colors need to work well with each other so as to draw your eye around the quilt top.
Lay out your quilting fabrics in what you consider to be the Light to Dark order. Take a picture of these laid out fabrics. Edit the picture to black and white. Reevaluate the order of your placed fabrics. Move your fabrics around if necessary and take a picture of your final placement. This will guide you to Star fabric placements. Your fabrics that “read” or look darker will work best if they are closer to the bottom on your quilt top. In other words, the darker fabrics will give your quilt top “visual weight” and as such, you may not want them placed at or near the top of your project.
You may have noticed that there ARE NOT cornerstones at all the intersections of sashing strips. This is intentional as I did not want to have cornerstone blocks anywhere other than the 4 corners of each Star Block.
As it appears in the pattern picture, there are horizontal and vertical seams in the center Dresden Plate block. I did not construct my Dresden Plate block in this manner. I completed the Dresden Plate circle and centered it on the bleached muslin single large piece of bleached muslin. I then Raw Edge Machine Appliqued the Dresden Plate circle to the large muslin square. Rather than use a center circle to complete the Dresden Plate I chose to use a small vintage Grandmother’s Flower Garden block which was also machine appliquéd in place.
Remember, this is not a speed challenge! Take your time once we begin! Everyone works at their own pace and unless you drop out, no one will be left behind. There are 8 Sections to this quilt. Once we have constructed all of our quilt blocks, we will lay them out and begin sewing these 8 Sections together.
Along the way you may very well change your mind about some of the blocks you have constructed. You may change your mind about your block placement. Perfectly normal! When I developed this pattern, I went through 19 different versions before I was happy. We will be working with Version #20! I also moved my Star Blocks around quite a bit before I was happy with their placement.
Keep in mind that when working with vintage linens, there are no rules, only what pleases you!